SPONSORED LINKS
510 Series Test and Diagnostics
![]()
Error Code and Error Status Names
This chapter explains how to use the Diagnostic Test program to test the functions of the computer's hardware modules. The Diagnostics Program is stored on the Diagnostics Disk and consists of nine programs that are grouped into the Service Program Module (DIAGNOSTICS MENU).
NOTES: To start the diagnostics, follow these steps:
1. Check all cables for loose connections.
2. Exit any application you may be using and close Windows.
The DIAGNOSTICS MENU consists of the following nine functions.
 DIAGNOSTICS TEST
HARD DISK FORMAT
HEAD CLEANING
LOG UTILITIES
RUNNING TEST
FDD UTILITIES
SYSTEM CONFIGURATION
EXIT TO MS-DOS
SETUP
The DIAGNOSTICS TEST MENU contains the following functional tests:
SYSTEM TEST
MEMORY TEST
KEYBOARD TEST
DISPLAY TEST
FLOPPY DISK TEST
PRINTER TEST
ASYNC TEST
HARD DISK TEST
REAL TIMER TEST
NDP TEST
EXPANSION TEST
SOUND TEST
CD-ROM TEST
MODEM TEST
You will need the following equipment to perform some of the Diagnostic test programs.
The diagnostics disk (all tests)
A formatted working disk for the floppy
disk drive test (all tests)
An external FDD attachment
A cleaning kit to clean the floppy disk
drive heads (head cleaning)
A PC card wraparound connector for the
I/O card test (PCMCIA test)
A printer wraparound connector for the
printer wraparound test (printer test)
An RS-232C wraparound connector for the
RS-232C port wraparound test
(async test)
A CD test media (Toshiba-EMI test disk
TDY-03 and music CD) (CD-ROM test)
External CRT (all tests)
PS/2 or compatible keyboard (all tests)
PS/2 or compatible mouse (keyboard test)
Serial port wraparound connector (async
test)
Multimedia sound system with line-in and
line-out ports (sound test)
Headphone (sound test)
CD-ROM drive (CD-ROM test)
A telephone
A microphone
An external speaker
The following sections detail the tests within the Diagnostic Test function of the DIAGNOSTICS TEST MENU. Refer to Sections 3.20 through 3.26 for detailed information on the remaining Service Program Module functions.
Toshiba MS-DOS is required to run the DIAGNOSTICS PROGRAM. To start the DIAGNOSTICS PROGRAM follow these steps:
NOTE: To execute the CD-ROM test, make sure the CD-ROM and CD-ROM drive are installed in the computer and the external FDD is attached to the FDD port.
The following menu will appear:
TOSHIBA personal computer xxx DIAGNOSTICS
version
X.XX (c) copyright TOSHIBA Corp. 19XX
DIAGNOSTICS MENU :
1 -
DIAGNOSTICS TEST
2 - HARD DISK FORMAT
3 -
4 - HEAD CLEANING
5 - LOG UTILITIES
6 - RUNNING TEST
7 - FDD UTILITIES
8 -
SYSTEM CONFIGURATION
9 - EXIT TO MS-DOS
0 - SETUP
: Select items Enter : Specify Esc
: Exit
NOTE: To exit the DIAGNOSTICS TEST MENU, press the Esc key. If a test program is in progress, press Ctrl + Breakto exit the test program. If a test program is in progress, press Ctrl + Cto stop the test program.
2. To select the DIAGNOSTIC TEST MENU from the DIAGNOSTICS MENU, set the highlight bar to 1, and press Enter. The following screen will appear:
TOSHIBA personal computer xxx DIAGNOSTICS
version X.XX
(c) copyright TOSHIBA Corp. 19XX
DIAGNOSTICS TEST MENU :
1 - SYSTEM
TEST
2 - MEMORY TEST
3 - KEYBOARD TEST
4 - DISPLAY TEST
5
- FLOPPY DISK TEST
6 - PRINTER TEST
7 - ASYNC TEST
8 - HARD
DISK TEST
9 - REAL TIMER TEST
10 - NDP TEST
11 - EXPANSION TEST
12 - SOUND TEST
13 - CD-ROM TEST
14 - MODEM TEST
88 - ERROR
RETRY COUNT SET [FDD & HDD]
99 - EXIT TO DIAGNOSTICS MENU
:
Select items Enter :
Specify Esc : Exit
3. Select the option you want to execute and press Enter. The following message
will appear:
NOTE: The menu displayed by your computer may be slightly different from the one shown above.
4. Select the desired subtest number from the subtest menu and press Enter. The following messages will appear:
TEST LOOP : YES ERROR STOP : YES
Selecting YES for TEST LOOP sets the test to run continuously until it is halted by the user. Selecting NO returns the screen to the main menu after the test is complete.
Selecting YES for ERROR STOP stops the test program when an error is found and displays the operation guide on the right side of the display screen as shown below:
ERROR STATUS NAME [[ HALT OPERATION ]] 1: Test end 2: Continue 3: Retry
These three selections have the following functions:
Use the arrow keys to move the cursor to the desired option and press Enter.
Selecting NO for ERROR STOP keeps the test running even if an error is found.
Table 3-1 in Section 3.3 describes the function of each test on the subtest menu.
Table 3-2 in Section 3.18 describes the error codes and error status for each error.
Table 3-1 lists the subtest names for each test program in the DIAGNOSTICS TEST MENU.
|
|
|
|
|
|
|
SYSTEM |
|
ROM checksum
Fan ON/OFF Thermistor check Quick charge |
|
|
MEMORY |
|
RAM constant data
RAM address pattern data RAM refresh Protected mode Memory module Cache memory L2 Cache memory |
|
|
KEYBOARD |
|
Pressed key display
Pressed key code display PS/2 Mouse connect check Pointing stick |
|
|
DISPLAY |
|
VRAM read/write for VGA
Gradation for VGA Gradation for LCD Gradation & Mode test for VGA All dot on / off for LCD "H" pattern display |
|
|
FDD |
|
Sequential read
Sequential read/write Random address/data Write specified address Read specified address |
|
|
PRINTER |
|
Ripple pattern
Function Wrap around |
|
|
|
|
|
|
|
ASYNC |
|
Wrap around (board)
Point to point (send Point to point (receive) Interrupt test FIR/SIR wrap around test FIR/SIR point to point (send) FIR/SIR point to point (receive) |
|
|
HDD |
|
Sequential read
Address uniqueness Random address/data Cross talk & peak shift Write/read/compare (CE) Write specified address Read specified address ECC circuit Sequential write W-R-C specified address |
|
|
REAL TIMER |
|
Real time
Backup memory Real time carry |
|
|
NDP |
|
NDP test |
|
|
EXPANSION |
|
PCMCIA wrap around
DS bus connect (DS9/CDOC) RGB monitor ID Joystick Joystick wrap around |
|
|
SOUND |
|
CODEC (REC/PLAY)
FM Synthesizer SIN wave playback CODEC (Line In/Out) |
|
|
CD-ROM |
|
Sequential read
Read specified address Random address/data Playback Music |
|
|
MODEM |
|
Modem Sub-system |
To execute the system test select 1 from the DIAGNOSTICS TEST MENU, press Enter and follow the directions displayed on the screen. Move the highlight bar to the subtest you want to execute and press Enter.
| Subtest 01 | ROM checksum
This subtest executes a checksum test of the BIOS ROM on the system board. |
| Subtest 02 | Not used |
| Subtest 03 | Not used |
| Subtest 04 | Fan on/off
This subtest checks fan operation using the on/off command. The fan cable is securely connected to the system board. When you execute this subtest, the following message is displayed: *** Fan ON *** : Press [Enter] key?When you press Enter, the fan should spin. *** Fan OFF *** : Press [Enter] key?When you press Enter, the fan should stop. |
| Subtest 05 | Thermistor check
This subtest reads the thermistor connect check status of the power supply microprocessor, then compares it with the original data. If the data indicates the connector is open or shorted, it displays an error message. |
| Subtest 06 | Quick charge
This subtest displays quick-charge status. |
To execute the memory test, select 2 from the DIAGNOSTICS TEST MENU, press Enter and follow the directions displayed on the screen. Move the highlight bar to the subtest you want to execute and press Enter.
| Subtest 01 | RAM constant data (real mode) This subtest writes a 256-byte unit of constant data to conventional memory (0 to 640 KB), then reads the new data and compares the result with the original data. The constant data is FFFFh, AAAAh, 5555h, and 0000h. |
| Subtest 02 | RAM address pattern data (real mode)
This subtest writes address pattern data created by the exclusive-ORing (XORing), to the address segment and address offset in conventional memory program end to 640 KB), then reads the new data and compares the result with the original data. |
| Subtest 03 | RAM refresh (real mode)
This subtest writes a 256-byte unit of constant data to conventional memory (0 to 640 KB) then reads the new data and compares the result with the original data. The constant data is AAAAh and 5555h. |
NOTE: There is a short delay between write and read operations, depending on the size of the data.
| Subtest 04 | Protected mode |
NOTE: The CONFIG.SYS file must be configured without expanded memory manager programs such as EMM386.EXE, EMM386.SYS or QEMM386.SYS. Also, the HIMEM.SYS must be deleted from the CONFIG.SYS file.
| Subtest 05 | Memory module |
NOTE: To execute this subtest, an optional memory card must be installed in the computer.
Extended memory size
(1:8 MB, 2:16 MB, 3:32 MB, 4:48 MB, 5:128 MB)?
| Subtest 06 | Cache memory |
| To test the cache memory, a pass-through write-read comparison
of '5A' data is run repeatedly to the test area ('7000':'Program' size to
'7000':'7FFF' (32 KB)) to check the hit-miss ratio (on/off status) for CPU cache
memory. One test takes 3 seconds.
Number of misses < Number of hits ® OK | |
| Subtest 07 | L2 Cache memory
To test the L2 cache memory, a pass-through write-read comparison of '5A' data is run repeatedly to the test area ('7000':'Program' size to '7000':'7FFF' (32 KB)) to check the hit-miss ratio (on/off status) for L2 cache memory. One test takes 3 seconds. Number of misses < Number of hits ® OK |
To execute the keyboard test, select 3 from the DIAGNOSTICS TEST MENU, press Enter and follow the directions displayed on the screen. The keyboard test contains four subtests that test the computer's keyboard, PS/2 mouse, and AccuPoint actions. Move the highlight bar to the subtest you want to execute and press Enter.
| Subtest 01 | Pressed key display (82/84) |
NOTE: The Num Lockand the Overlaymode must be off to execute
this subtest.
[[[ Press Key Display ]]]

If TEST OK, Press [Del] [Enter] Key
| Subtest 02 | Pressed keycode display
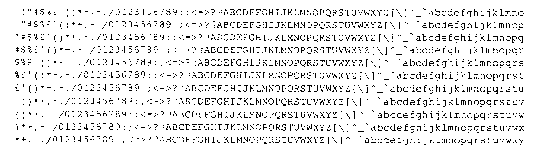
When a key is pressed, the scan code, character code, and keytop name are displayed on the screen in the format shown below. The Ins, Caps Lock, Num Lock, Scroll Lock, Alt, Ctrl, Left Shift, and Right Shift keys are displayed in reverse screen mode when pressed. The scan codes, character codes, and keytop names are shown in Appendix D. KEYBOARD TEST IN PROGRESS 302000 Scan code = Character code = Keytop = Ins Lock Caps Lock Num Lock Scroll Lock Alt Ctrl Left Shift Right Shift PRESS [Enter] KEY |
| Subtest 03 | PS/2 mouse connect check |
NOTE: To execute the PS/2 mouse connect check, a PS/2 mouse must be connected to the computer, before the power is turned on.
KBD - MOUSE INTERFACE ERROR
 [[ HALT OPERATION ]]
1: Test end
2: Continue
3: Retry
| Subtest 04 | Pointing stick
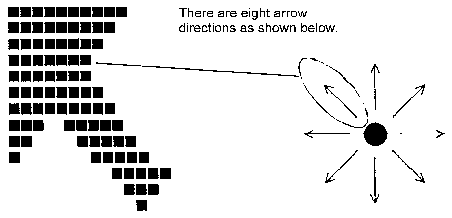
This subtest checks the functions of the pointing stick as shown below.
(B) IPS switch function check. This test reports the pointing stick motion response from the IPS and IPS switch. When the stick is pressed towards the upper left, the <POINTING> display changes according to the following illustration. If an IPS switch is pressed, the <BUTTON> display alternates between black and white. Also, the parameters appear on the right side of the display. If two IPS switches are pressed at the same time, the subtest menu is displayed. |
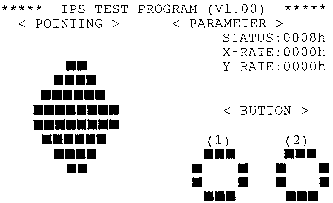
<< PRESS BUTTON1 + BUTTON2 THEN END >>

To execute the display test, select 4 from the Diagnostic Test Menu, press Enter and follow the directions displayed on the screen. The display test contains six subtests that test the display in various modes. Move the highlight bar to the subtest you want to execute and press Enter.
| Subtest 01 | VRAM read/write for VGA
This subtest writes constant data AAh and 55h and address data to video RAM (2MB: A0000h-AFFFFh). This data is then read from the video RAM and compared to the original data. |
| Subtest 02 | Gradation for VGA
This subtest displays four colors: red, green, blue and white from left to right across the screen from black to maximum brightness. The display below appears on the screen when this subtest is executed. |

| Subtest 03 | Gradation for LCD
This subtest displays eight colors: red, semi-red, green, semi-green, blue, semi-blue, white, and semi-white. Each color is displayed full screen for three seconds. |
| Subtest 04 | Gradation & Mode test for VGA
This subtest displays gradations for each mode. Execute the test, then press Enter to change the mode. |
|
|
|
|
|
|
The display below appears on the screen when this subtest is executed.

[Mode 12]
Pressing Enterchanges the size of the displayed image.

[Mode 13]
Pressing Enterchanges
the size of the displayed image.

[Mode 3]
Pressing Enterchanges the size of the displayed image.

[Mode 43]
[Mode 52]
Pressing Enterchanges the size of the displayed image.
To exit this subtest and return to the DISPLAY TEST menu, press Ctrl + Break.
| Subtest 05 | All dot(s) on/off for LCD
This subtest displays an all-white screen (all dot(s) on) for three seconds then an all-black screen (all dot(s) off) for three seconds. To exit this subtest and return to the DISPLAY TEST menu, press Ctrl + Break. |
| Subtest 06 | "H" pattern display |
| This subtest displays a full screen of "H" patterns. |
HHHHHHHHHHHHHHHHHHHHHHHHHHHHHHHHHHHHHHHHHHHHHHHHHH HHHHHHHHHHHHHHHHHHHHHHHHHHHHHHHHHHHHHHHHHHHHHHHHHH HHHHHHHHHHHHHHHHHHHHHHHHHHHHHHHHHHHHHHHHHHHHHHHHHH HHHHHHHHHHHHHHHHHHHHHHHHHHHHHHHHHHHHHHHHHHHHHHHHHH HHHHHHHHHHHHHHHHHHHHHHHHHHHHHHHHHHHHHHHHHHHHHHHHHH HHHHHHHHHHHHHHHHHHHHHHHHHHHHHHHHHHHHHHHHHHHHHHHHHH HHHHHHHHHHHHHHHHHHHHHHHHHHHHHHHHHHHHHHHHHHHHHHHHHH HHHHHHHHHHHHHHHHHHHHHHHHHHHHHHHHHHHHHHHHHHHHHHHHHH HHHHHHHHHHHHHHHHHHHHHHHHHHHHHHHHHHHHHHHHHHHHHHHHHH HHHHHHHHHHHHHHHHHHHHHHHHHHHHHHHHHHHHHHHHHHHHHHHHHH HHHHHHHHHHHHHHHHHHHHHHHHHHHHHHHHHHHHHHHHHHHHHHHHHH HHHHHHHHHHHHHHHHHHHHHHHHHHHHHHHHHHHHHHHHHHHHHHHHHH HHHHHHHHHHHHHHHHHHHHHHHHHHHHHHHHHHHHHHHHHHHHHHHHHH HHHHHHHHHHHHHHHHHHHHHHHHHHHHHHHHHHHHHHHHHHHHHHHHHH HHHHHHHHHHHHHHHHHHHHHHHHHHHHHHHHHHHHHHHHHHHHHHHHHH
To exit this subtest and return to the DISPLAY TEST menu, press Ctrl + Break.
NOTE: Before running the floppy disk test, prepare a formatted work disk. Remove the diagnostics disk and insert a work disk into the FDD. The contents of the floppy disk will be erased.
To execute the Floppy Disk test, select 5 from the DIAGNOSTICS TEST MENU, press Enter and follow the directions displayed on the screen. The Floppy Disk test contains five subtests that test the FDD. The following messages will appear after selecting the Floppy Disk test from the DIAGNOSTICS TEST MENU. Answer each question with an appropriate response to execute the test.
Test drive number select (1:FDD#1,2:FDD#2,0:FDD1&2) ?
Media in drive #X mode (0:2DD,3:2HD) ?
Test start track (Enter:0/dd:00-79) ?
xxxx DIAGNOSTIC TEST VX.XX
[Ctrl]+[Break] : test end
[Ctrl]+[C] : key stop
FLOPPY DISK XXXXXXX
| Subtest 01 | Sequential read
This subtest performs a Cyclic Redundancy Check (CRC), that continuously reads all the tracks on a floppy disk. The following tracks are read according to the media type in the floppy disk drive: The start track is specified when the FDD test is started from the Diagnostic Test Menu. Refer to Step 3 at the beginning of this section to set the start track. |
| Subtest 02 | Sequential read/write
This subtest continuously writes data pattern B5ADADh to all the specified tracks selected in Subtest 01. The data is then read and compared to the original data. |
| Subtest 03 | Random address/data
This subtest writes random data to random addresses on all tracks defined in Subtest 01. The data is then read and compared to the original data. |
| Subtest 04 | Write specified address
This subtest writes specified data to a specified track, head, and address. |
| Subtest 05 | Read specified address
This subtest reads data from a specified track, head, and address. |
To execute the printer test, select 6 from the DIAGNOSTICS TEST MENU, press Enter and follow the directions displayed on the screen. The printer test contains three subtests that test the output of the printer connected to the computer.
NOTE: An IBM compatible printer must be connected to the system to execute this test.
The following message appears when the printer test is selected:
channel#1 = XXXXh channel#2 = XXXXh channel#3 = XXXXh Select the channel number (1-3) ?
The printer I/O port address is specified by the XXXXh number. The computer supports three printer channels. Select the printer channel number, and press Enter to execute the selected subtest.
| Subtest 01 | Ripple pattern
This subtest prints characters for codes 20h through 7Eh line-by-line while shifting one character to the left at the beginning of each new line. |
| Subtest 02 | Function |
| This subtest is for IBM compatible printers, and tests the
following functions:
Normal print Double width print Compressed print Emphasized print Double strike print This subtest prints the various print types shown below: |
| Subtest 03 | Wraparound |
NOTE: To execute this subtest, a printer wraparound connector must be connected to the computer's printer port. The printer wraparound connector (34M741986G01) wiring diagram is described in Appendix F.
To execute the async test, select 7 from the DIAGNOSTICS TEST MENU, press Enter and follow the directions displayed on the screen. The async test contains seven subtests that test the asynchronous communication functions. Move the highlight bar to the subtest you want to execute and press Enter.
Subtests 01 through 07 require the following data format:
Method: Asynchronous Speed: 9600BPS (Subtests 01 to 04) 38,400 BPS (Subtests 05 to 07) Data: 8 bits and one parity bit (EVEN) Data pattern: 20h to 7Eh
The following message will appear at the bottom of the screen when Subtests 01, 02, 03, 05, 06, and 07 are selected:
Channel#1 = XXXXh Channel#2 = XXXXh Channel#3 = XXXXh Select the Channel number (1/2/3)
The serial I/O port address is specified by the XXXXh number. Select the serial port channel number, and press Enter to start the subtest.
| Subtest 01 | Wraparound (board) |
NOTE: To execute this subtest an RS-232-C wraparound connector (34M741621G01) must be connected to the RS-232C port. The RS-232-C wraparound connector wiring diagram is described in Appendix F.
.
| Subtest 02 | Point to point (send) |
NOTE: To execute this subtest, two machines must be connected with an RS-232-C direct cable. One machine should be set as "send"(Subtest 02) and the other set as "receive" (Subtest 03). The wiring diagram for the RS-232-C direct cable is described in Appendix F.
This subtest sends 20h through 7Eh data to the receive side, then receives the sent data and compares it to the original data.
| Subtest 03 | Point to point (receive)
This subtest is used with subtest 02 described above. This subtest receives the data from the send side, then sends the received data. |
| Subtest 04 | Interrupt test
This subtest checks the Interrupt Request Level of IRQ 4, 3 and 5 from the send side. |
NOTE: Before conducting subtests 05 to 07, you must execute SIRDRV.COM to enable the infrared communication port.
| Subtest 05 | FIR/SIR Wraparound test
This subtest checks the data send/receive function through the SIR port. |
NOTE: To execute Subtests 06 and 07, each computer must have access to the other computer's infrared port.
| Subtest 06 | FIR/SIR point to point (send)
This subtest sends 20h through 7Eh data to the receive side, then receives the sent data and compares it to the original data through the SIR port. |
| Subtest 07 | FIR/SIR point to point (receive)
This subtest is used with subtest 06 described above. This subtest receives the data from the send side, then sends the received data through the SIR port. |
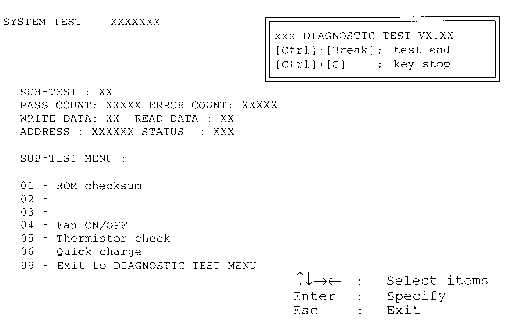
To execute the Hard Disk test, select 8 from the DIAGNOSTICS TEST MENU. Press Enter, and follow the directions displayed on the screen. The hard disk test contains ten subtests that test the hard disk drive functions.
NOTES: The contents of the hard disk will be erased when subtest 02, 03, 04, 05, 06, 08, 09, or 10 is executed. Before running the test, transfer the contents of the hard disk to floppy disk.
If MS-DOS 6.22/Windows for Workgroups is selected, use the Master Diskette Creator (MDC) utility in the Toshiba Utility folder to back up the preinstalled software. After backing up the preinstalled software, use the BACKUP command in the Toshiba Companion Utility to back up the entire disk, including the user's files.
If Windows 95 is selected, check to see if the Microsoft Create System Disks Tools (MSCSD.EXE) still exists in the System Tools Folder. (This tool can be used only once.) If it exists, use it to back up the preinstalled software, then use the Backup utility in the System Tools folder to back up the entire disk, including the user's files.
Refer to the appropriate instructions for each operating system.
1. When you select the hard disk test from the DIAGNOSTICS TEST MENU, the following message will appear:
Test drive number select (1:HDD#1,2:HDD#2,0:HDD1&2) ?
2. Select the hard disk drive number to be tested and press Enter. The following message will appear:
HDC F/W error retry (1:yes,2:no) ?
3. This message is used to select the retry operation when the hard disk controller detects an error. Select 1 or 2 and press Enter. The following message will appear:
Data compare error dump (1:no,2:yes) ?
4. This message is used to select the error dump operation when a data compare error is detected. Select 1 or 2 and press Enter. The following message will appear:
Detail status display (1:no,2:yes) ?
6. The Hard Disk test message will appear after you respond to the Detail Status prompt. Select the number of the subtest you want to execute and press Enter. The following message will appear during each subtest.
HARD DISK TEST XXXXXXX SUB-TEST : XX PASS COUNT: XXXXX ERROR COUNT: XXXXX WRITE DATA: XX READ DATA : XX ADDRESS : XXXXXX STATUS : XXX
| Subtest 01 | Sequential read
This subtest is a sequential reading of all the tracks on the HDD starting at track 0. When all the tracks on the HDD have been read, the test starts at the maximum track and reads the tracks on the HDD sequentially back to track 0. |
| Subtest 02 | Address uniqueness
This subtest writes unique address data to each sector of the HDD track-by-track. The data written to each sector is then read and compared with the original data. There are three ways the HDD can be read: Forward sequential Reverse sequential Random. |
| Subtest 03 | Random address/data
This subtest writes random data to random addresses on the HDD cylinder, head, and sector. This data is then read and compared to the original data. |
| Subtest 04 | Cross talk & peak shift
This subtest writes eight types of worst pattern data (shown below) to a cylinder, then reads the data while moving from cylinder to cylinder. |
|
|
|
|
|
|
|
|
|
|
|
|
|
|
|
|
|
|
|
|
|
|
|
|
|
|
|
| Subtest 05 | Write/read/compare (CE)
This subtest writes B5ADADh worst pattern data to the CE cylinder on the HDD, then reads the data from the CE cylinder and compares it with the original data. |
| Subtest 06 | Write specified address
This subtest writes specified data to a specified cylinder and head |
| Subtest 07 | Read specified address
This subtest reads data which has been written to a specified cylinder and head on the HDD. |
| Subtest 08 | ECC circuit
This subtest checks the Error Check and Correction (ECC) circuit functions of the specified cylinder and head on the HDD. |
| Subtest 09 | Sequential write
This subtest writes specified 2-byte data to all of the cylinders on the HDD. |
| Subtest 10 | W-R-C specified address
This subtest writes data to a specified cylinder and head on the HDD, then reads the data and compares it to the original data. |
To execute the Real Timer Test, select 9 from the DIAGNOSTIC TEST MENU, press Enter and follow the directions on the screen. The real timer test contains three subtests that test the computer's real timer functions. Move the highlight bar to the subtest you want to execute and press Enter.
| Subtest 01 | Real time
A new date and time can be input during this subtest. To execute the real time subtest, follow these steps:
|
| Subtest 02 | Backup memory
This subtest performs the following backup memory check: Writes 1-bit of "on" data to address 01h through 80h Writes 1-bit of "off" data to address 0Eh through 80h The subtest then reads and compares this data with the original data. To exit, press Ctrl + Break. |
| Subtest 03 | Real time carry |
CAUTION: When this subtest executes, the current date and time are erased.
This subtest checks the real time clock increments, making sure the date and time display in the following format:
Current date :  12-31-1995
Current time :  23:59:58
Pressing Enter displays the following:
Current date : 01-01-1996 Current time : 00:00:00 PRESS [Enter] KEY TO EXIT TEST
Press Ctrl + Break to exit.
To execute the NDP test, select 10 from
the DIAGNOSTICS TEST MENU, press Enter and
follow the directions on the screen. The NDP test contains one subtest that
tests the computer's NDP functions.
| Subtest 01 | NDP
This test checks the following functions of the coprocessor:
Press Ctrl + Break to exit. |
To execute the expansion test, select 11 from the DIAGNOSTICS TEST MENU, press Enter and follow the directions on the screen. The expansion test contains one subtest.
NOTE: To execute this subtest, the PC card wraparound connector is required.
| Subtest 01 | PCMCIA wraparound (Main point to point (Receive)
This test checks the following signal line of the PC card slot:
This subtest executes in the following order: |
|
|
|
|
|
|
|
|
00001 |
nn |
xx |
Address line REG#, CE#1, CE#2 nn =A0, 90, 80, 00 |
|
|
|
|
|
Data line
ww=write data, rr=read data |
|
|
|
|
|
Speaker line |
|
|
|
|
|
Wait line (40<xx<80) |
|
|
|
|
|
Other lines (BSY#, BVD1)
nn=21, 00 |
| Subtest 02 | DS bus connect (DS9/CDDC) |
| Subtest 03 | RGB monitor ID |
| Subtest 04 | Joystick |
| Subtest 05 | Joystick wraparound |
NOTE: Subtests 02 through 05 are for Desk Station V Plus. For procedures on those subtests, refer to the Desk Station V Plus maintenance manual.
To execute the sound test, select 12 from the DIAGNOSTICS TEST MENU, press Enter and follow the directions on the screen. The sound test contains four subtests that test the computer's sound functions.
NOTE: To execute this subtest, the internal microphone and internal headphone (or internal speaker) are required.
WARNING: The system is capable of producing high volume sound, so when you use the headphones be careful to set the volume low and adjust it as necessary. Using the headphones at full volume could damage your ears.
| Subtest 01 | CODEC (REC/PLAY)
This subtest tests the functions of the Codec (AD1848) A/D, D/A converter. At the same time, it tests the microphone terminals and headphone terminals. When you execute this subtest the following message displays: [Quick REC & PLAY for AD1848] After pressing a key, start recording and immediately play the sound. (It takes three seconds.) |
| Subtest 02 | FM Synthesizer
Test the OPL# (YMF262) functions. Connect the headphone and check the scale of the right and left sides. Also, check the sound adjustment volume. |
| Subtest 03 | SIN wave playback
This subtest expands the sine wave data table to 64KB and creates sine wave data. The play data is transferred between DMA and CODEC, and plays the sound. (It is a long beep.) Also, use the oscilloscope to observe the sine waveform. |
| Subtest 04 | CODEC (line In/Out)
Load file AD1848L.COM. Connect a sound source such as a CD player or stereo to the line-in port. Next, connect an output device (an amplifier for the internal speaker or a radio/cassette player) to the line-out port. After making the connections, a dialogue box displays. Press Enter to play a recorded sound. About three seconds after the recorded sound is played, the dialogue box displays again. |
To execute the CD-ROM test, select 13 from the DIAGNOSTICS TEST MENU, press Enter and follow the directions on the screen. The CD-ROM test contains four subtests that test the computer's CD-ROM functions.
NOTE: First, make sure the CD-ROM driver (CDRDRV.COM) is installed and then insert the test media CD (Toshiba-EMI Test Disk TDY-03).
| Subtest 01 | Sequential read This subtest is a sequential reading of one block unit (2K bytes) of all the logical addresses. |
| Subtest 02 | Read specified address This subtest reads one-block data from a specified address. |
| Subtest 03 | Random address/data This subtest reads one-block data and multi-block data from random addresses 200 times. |
| Subtest 04 | Playback Music |
NOTE: The Toshiba-EMI Test Disk TDY-03 cannot be used for Subtest 04. For this test, use an ordinary music CD.
NOTE: First, use the Hardware Setup program to select COM2 (2F8H/IRQ3) for the modem COM port, I/O address and IRQ.
--------------------------[EXECUTION AREA]---------------------- [ASYNC MODEM (FAX/DATA) INSPECTION] : VX.XX 1. FLXCY3 TEST 2. LOOPBACK TEST 3. SPEAKER (L) TEST 4. SPEAKER (R) TEST 5. TERMINAL 9. END PRESS [1] - [9] KEY? STOP=[crtl]+[break] ----------------------[ERROR MESSAGE]-------------------------
[XXXXX-X] [ XXXXXXXXXX] ----------------------[EXECUTION AREA]------------------------ Select the COM(1:COM1/3F8h,2:COM2/2F8h)?
[XXXXX-X] [ XXXXXXXXXX] ----------------------[EXECUTION AREA]------------------------ Select the COM(1:COM1/3F8h,2:COM2/2F8h)? Baud rate (2:300,,4:1200,5:2400,6:9600,7:14400,8:19200,9:38400)?
| Subtest 01 | FLXCY3 TEST
Initializes the modem and sends an ATZ command. |
| Subtest 02 | LOOPBACK TEST
A loopback signal is sent from board FVRMD* to FLXDA. |
| Subtest 03 | SPEAKER (L) TEST
A tone dial sound is generated in the left speaker. |
| Subtest 04 | SPEAKER (R) TEST
A tone dial sound is generated in the right speaker. |
| Subtest 05 | TERMINAL |
NOTE: Before you conduct Test 05, connect the DAA module to a telephone.
When you have connected the DAA module to a telephone, test the connection by calling the line from another phone.
Table 3-2 lists the error codes and error status names for the Diagnostic Test.
|
|
|
|
| (COMMON) |
|
Data Compare Error |
| SYSTEM |
02 03 |
ROM Checksum Error Location ID Error Serial ID Write Error |
| MEMORY |
02 14 DD DE DF |
Parity Error Protected Mode Not Changed Memory Read/Write Error Cache Memory Error 2nd Cache Error TAG-RAM Error |
| Keyboard |
02 03 04 05 06 |
Mouse Interface Error IPS Interface Error Interface Error Retransmit Error Mouse Handler Not Supported PS/2 Mouse & IPS Not Supported |
| FDD |
02 03 04 06 08 09 10 20 40 60 80 EE |
Bad Command Error Address Mark Not Found Write Protected Record Not Found Media Removed DMA Overrun Error DMA Boundary Error CRC Error FDC Error Seek Error FDD Not Drive Error Time Out Error Write Buffer Error |
| Printer |
08 10 20 40 80 |
Time Out Fault Select Line Out Of Paper Power Off Busy Line |
| ASYNC |
02 04 08 10 20 40 50 60 80 88 |
DSR On Time Out
CTS On Time Out RX-READY Time Out |
|
|
|
|
| HDD |
02 04 05 07 08 09 0A 0B 10 11 20 40 80 AA BB CC DA E0 EE |
Bad Command Error Address Mark Not Found Record Not Found HDC Not Reset Error Drive Not Initialized HDC Overrun (DRQ) DMA Boundary Error Bad Sector Bad Track Error ECC Error ECC Recover Enabled HDC Error Seek Error Time Out Error Drive Not Ready Undefined Error Write Fault No HDD Status Error Access Time Out Error |
| NDP |
02 03 04 05 06 |
No Co-Processor Control Word Error Status Word Error Bus Error Addition Error Multiply Error |
| PCMCIA |
C2 C3 C4 C5 C6 C7 C8 CD |
Address Line Error REG# Line Error CE#1 Line Error CE#2 Line Error DATA Line Error WAIT Line Error BSY# Line Error BVD1 Line Error No PCMCIA |
| CD-ROM |
02 03 04 05 06 09 11 20 40 80 90 B0 |
Bad Command Illegal Length Unit Attention Media Change Request Media Detected Additional Sense Boundary Error Corrected Data Error Drive Not Ready Seek Error Time Out Reset Error Address Error |
When an error occurs in the hard disk test, the following message displays:
HDC status = XXXXXXXX
Detailed information about the hard disk test error displays on the screen by an eight-digit number. The first four digits represent the hard disk controller (HDC) error status number and the last four digits are not used.
The hard disk controller error status is composed of 2 bytes; the first byte displays the contents of the HDC status register in hexadecimal form and the second byte displays the HDC error register.
The contents of the HDC status register and error register are listed in Tables 3-3 and 3-4.
|
|
|
|
|
|
BSY (Busy) | "0"-HDC is ready.
"1"-HDC is busy. |
|
|
DRDY (Drive ready) |
"0"-Hard disk drive is not ready to accept any
command. "1"-Hard disk drive is ready. |
|
|
DWF (Drive write fault) |
"0"-DWF error is not detected. "1"-Write fault condition occurs. |
|
|
DSC (Drive seek complete) |
"0"-The hard disk drive heads are not settled over a
track. "1"-The hard disk drive heads are settled over a track. |
|
|
DRQ (Data request) | "0"-Drive is not ready for data transfer. "1"-Drive is ready for data transfer. |
|
|
CORR (Corrected data) | "0"-Not used "1"-Correctable data error is corrected. |
|
|
IDX (Index) | "0"-Not used "1"-Index is sensed. |
|
|
ERR (Error) | "0"-Normal "1"-The previous command was terminated with some error. |
|
|
|
|
|
|
BBK1
(Bad block mark) |
"0" Not used. "1" A bad block mark is detected. |
|
|
UNC (Uncorrectable) | "0" There is no uncorrectable data error. "1" Uncorrectable data error has been detected. |
|
|
-- | Not used |
|
|
IDNF (Identification) | "0" Not used
"1" There was no ID field in the requested sector. |
|
|
-- | Not used |
|
|
ABRT (Abort) | "0" Not used
"1" llegal command error or a drive status error occurs. |
|
|
TK00 (Track 0) | "0" The hard disk has found track 0 during a
recalibrate command. "1" The hard disk could not find track 0 during a recalibrate command. |
|
|
-- | Not used. |
This command executes hard disk formatting. There are two types of hard-disk formatting:
This hard disk format function performs a low-level format of the hard disk and executes the following hard disk formats and check:
NOTES: The contents of the hard disk will be erased when this program executes. Before executing the function, transfer the contents of the hard disk onto floppy disk.
If MS-DOS 6.22/Windows for Workgroups is selected, use the MasterDiskette Creator (MDC) utility in the Toshiba Utility folder to back up the preinstalled software. After backing up the preinstalled software, use the BACKUP command in the Toshiba Companion Utility to back up the entire disk, including the user's files.
If Windows 95 is selected, check to see if the Microsoft Create System Disks Tools (MSCSD.EXE) still exists in the System Tools Folder. (This tool can be used only once.) If it exists, use it to back up the preinstalled software, then use the Backup utility in the System Tools folder to back up the entire disk, including the user's files.
Refer to the appropriate instructions for each operating system.
NOTE: Before executing the all track format option, check for bad tracks using the Bad Track CHECK option or display a list of bad tracks on the HDD.
|
|
|
|
|
|
|
|||
|
|
|
|
|
|
|
|
|
|
|
|
|
|
|
|
|
|
|
|
|
|
|
|
|
|
|
|
|
|
NOTE: After the HDD has been formatted, execute the Toshiba MS-DOS FDISK command to partition the HDD. Next, execute the Toshiba MS-DOS FORMAT command. Refer to the Toshiba MS-DOS manual for more information about using these commands.
Selecting Test 2 and pressing Enter in the DIAGNOSTIC MENU displays the following messages:
DIAGNOSTICS - HARD DISK FORMAT : VX.XX 1 - All track FORMAT 2 - Good track FORMAT 3 - Bad track FORMAT 4 - Bad track CHECK 9 - Go to TEST MENU : Select items, Enter: Finish, Esc: Exit
[All track FORMAT] Drive : #1 = HDD #2 = Non Cylinder : XXXX Head : XX Sector : XX <<< Model name = >>>
Drive number select (1:#1,2:#2) ?
Interleave number (1/1 ~ 8) ?
(b) All track format
(c) Track verification

Drive number select (1:#1, 2:#2) ? Bad tracks will be displayed in the format shown below. [[cylinder, head = 0123 03]]
This function cleans the heads in the FDD by executing a series of head load/seek and read operations. A cleaning kit is necessary to perform this program.
DIAGNOSTICS - FLOPPY DISK HEAD CLEANING : VX.XX Mount cleaning disk(s) on drive(s). Press any key when ready.
cleaning start
This function logs error information generated while a test is in progress and stores the results in RAM. This function can store data on a floppy disk or output the data to a printer. If the power switch is turned off, the error information will be lost. The error information displays in the following order:
1. Selecting 5 and pressing Enterin the DIAGNOSTIC MENU logs error information into RAM or onto a floppy disk. The error information displays in the following format:
2. The error information displayed on the screen can be manipulated by the following number keys:
3. In the case of "error retry OK," a capital "R" will be placed at the beginning of the error status. However, it is not added to the error count.
This function automatically executes the following tests in sequence:
The system automatically detects the number of floppy disk drives connected to the computer for the FDD test.
NOTE: Do not forget to load a work disk in the FDD. If a work disk is not loaded, an error will be generated during the FDD testing.
2. Select 6 from the Diagnostic Menu and press Enter, the following message displays:
Printer wrap around test (Y/N) ?
3. Select Yor N and press Enter. The following message appears:
Serial #A wrap around test (Y/N) ?
Mount the work disk(s) on the drive(s), then press [Enter] key. [Warning : The contents of the disk(s), will be destroyed.]
5. This program executes continuously. To terminate the program, press Ctrl + Break.
This function formats the FDD, copies the floppy disk and displays the dump list for both the FDD and HDD.
NOTE: This program is only for testing a floppy disk drive. The option is different from the Toshiba MS-DOS FORMAT command.
1. Selecting 7 from the DIAGNOSTIC MENU and pressing Enter displays the following message:
[ FDD UTILITIES ] 1 - FORMAT 2 - COPY 3 - DUMP 9 - EXIT TO DIAGNOSTICS MENU
(a) Selecting FORMAT displays the following message:
DIAGNOSTICS - FLOPPY DISK FORMAT : VX.XX Drive number select (1:A, 2:B) ?
(b) Select a drive number to display the following message:
Type select (0:2DD,3:2HD) ?
(c) Select a media/drive type number and press Enter. A message similar to the one below displays:
Warning : Disk data will be destroyed. Insert work disk into drive A: Press any key when ready.
(d) Remove the diagnostics disk from the FDD, insert the work disk and press any key.
[ FDD TYPE ] : TRACK = XXX [ FDD TYPE ] : HEAD = X [ FDD TYPE ] : SECTOR = XX Format start [[track, head = XXX X]]
Format complete Another format (1:Yes/2:No) ?
(e) Typing 1 displays the message from Step (c) above. Typing 2 returns the test to the DIAGNOSTIC MENU.
(a) When COPY is selected, the following message appears:
FLOPPY DISK FORMAT & COPY : VX.XX Type select (0:2DD,3:2HD) ?
(b) Selecting a media/drive type number displays a message similar to the one below:
Insert source disk into drive A: Press any key when ready.
(c) Remove the diagnostics disk from the FDD, insert the source disk and press any key. The following message appears, indicating the program has started.
[ FDD TYPE ] : TRACK = XXX [ FDD TYPE ] : HEAD = X [ FDD TYPE ] : SECTOR = XX Copy start [[ track,head = XXX X ]]
(d) Remove the source disk from the FDD, insert a formatted work disk and press any key. The [[ track, head = XXX X ]] message appears and starts copying to the target disk. When the amount of data is too large to be copied in one operation, the message from Step (b) displays again. After the floppy disk has been copied, the following message appears:
Copy complete Another copy (1:Yes/2:No) ?
(e) To copy another disk, type 1 and the message from Step (a) displays again. Entering 2 returns the test program to the DIAGNOSTIC MENU.
(a) When dump is selected, the following message appears:
DIAGNOSTICS-HARD DISK & FLOPPY DISK DUMP : VX.XX Drive type select (1:FDD, 2:HDD) ?
Select drive number (1:A, 2:B) ? (1:C, 2:D) ?
(c) Select a drive number and the following message displays:
Format type select (1:2DD, 3:2HD) ?
(d) Select a media type number and the following message appears:
Insert source disk into drive A: Press any key when ready.
(e) Insert a source disk and press any key and the following message appears:
-- Max. address -- [Track ] = 0079 [ Head ] = 01 [Sector] = 09 Track number ??
(f) Set the track number you want to dump. Then, the system will access the disk and dump a list.
The System Configuration program contains the following configuration information for the computer:
1. BIOS ROM version
2. Boot ROM version
3. KBC version
4. PS Microprocessor Version
5. The number of floppy disk drives
6. The number of ASYNC ports
7. The number of hard disk drives
8. The number of printer ports
9. Total memory size
10. The number of math coprocessors
Selecting 8 from the DIAGNOSTIC MENU and pressing Enter displays the following system configuration:
SYSTEM CONFIGURATION : * BIOS ROM VERSION = VX.XX * - BOOT ROM VERSION = VX.XX * - KBC VERSION = VX.XX * - PS MICOM VERSION = VX.XX * - 1 FLOPPY DISK DRIVE(S) * - 2 ASYNC ADAPTER * - 1 HARD DISK DRIVE(S) * - 1 PRINTER ADAPTER * - 016MB + XXXXKB TOTAL MEMORY * - 1 MATH CO-PROCESSOR Press [Enter] Key
Press Enter to return to the DIAGNOSTIC
MENU.
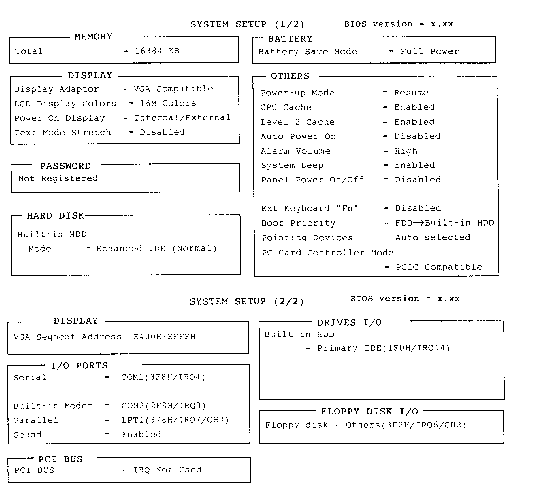
This program displays the current system setup information as listed below:
1. Memory
2. Display
3. Password
4. Hard Disk
5. Battery
6. Others
7. Display
8. I/O Ports
(a) Serial Port
(b) Built-in Modem Port
(c) Parallel Port
(d) Sound System
9. PCI Bus
10. Drives I/O
11. Floppy Disk I/O
Selecting 0 from the DIAGNOSTICS MENU and pressing Enter displays the TSETUP screen. The TSETUP screen is divided into two pages SYSTEM SETUP (1/2) and SYSTEM SETUP (2/2) .
: Select items Space, BkSp : Change values PgDn, PgUp : Change pages
Esc: Exit without saving Home: Set default values End:
Save changes and Exit
NOTES:
The Panel Power On/Off item appears only when the computer is in Resume mode.
The 510CDS LCD display colors options are 222K Colors and 4096 Colors.
The built-in modem item appears only when an internal modem is installed in the computer. The modem is an option in some marketing regions.
1. Press ¬and®to move between the two columns. Press and ¯ to move between items in a column.
2. Press either the space bar or BkSp to change the value.
3. To change pages, press the PgUp (page up) or PgDn (page down) key.
NOTE: On either page, you can go directly to a specific group by pressing the first letter (highlighted) of the group's name. For example, B to go to the battery group.
1. Press End to accept the changes you made.
If the changed item does not require the system to reboot, the following message displays:
Are you sure? (Y/N)
If the changed item requires the system to reboot, the following message displays:
Are you sure? (Y/N) The changes you made will cause the system to reboot.
2. To make other changes, press N. Repeat the steps above.
3. To accept the changes, press Y.
NOTE: You can press Esc to quit at any time without saving
changes.
SETUP asks you to confirm that you don't want to save your
changes.
When you access SETUP, the current configuration displays.
1. To show the factory preset configuration, press Home.
2. To accept the default settings, press End and then press Y.
NOTE: When you execute the default setting, the following settings are not changed:
HDD Mode
Password
Sound
Write Policy
The SETUP screen is divided into functionally related groups. This section describes each group and its options.
(a) Total
|
Enables the internal VGA controller. (Default) |
|
Disables the internal VGA controller. |
| 222K colors (510CDS) | Displays 64k colors out of 226,981 colors, or 4096 which displays 4096 colors out of 4096 colors. |
| 16M colors (510CDT) | Displays up to 16,777,216 colors simultaneously (This value cannot be changed.) |
| Internal/External | Selects an external CRT if one is connected, otherwise it selects the internal LCD. (Default) |
| Simultaneous | Selects both the internal LCD and the external CRT for simultaneous display. |
NOTE: When starting the computer in Resume mode, the last configuration is remembered. If data does not appear on the display you are using after starting in Resume mode, press Fn+F5.
Pressing Fn+F5 changes the display
setting as follows: Internal LCD to simultaneous to external CRT.
| Enabled | Enables the text mode stretch feature. |
| Disabled | Disables the text mode stretch feature. (Default) |
This option allows you to set or reset the user password for power on and instant security.
| Registered | The user password has been registered. |
| Not registered | The user password has not been registered. |
This option is available to prevent an unauthorized user from removing the computer from an optional Desk Station V Plus.
| Enabled | The eject password has been registered. |
| Disabled | The eject password has not been registered. |
| Enhanced IDE (Normal) | Select this mode when using MS-DOS, Windows for Workgroups, Windows 95, or OS/2. (Default) |
| Standard IDE | Select this mode when using Novell NetWare or UNIX. When this mode is selected, up to 504MB is logically available even though the disk's capacity is larger than 504MB. |
| No drive | HDD is not installed. |
To see the capacity of the hard disk, use the CHKDSK command. See your DOS
NOTE: Formats for Enhanced IDE and Standard IDE are different, so if you change the setting, you will have to reformat the hard disk for the appropriate setting.
This option is used to select Full Power or Low Power or User Setting of the BATTERY SAVE OPTION.
| Full Power | The following shows full power settings. |
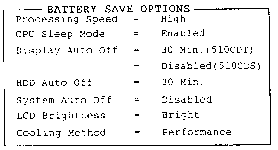
| Low Power |
|

NOTES:
In boot mode, the System Auto Off message does not appear.
With the AC cord plugged in (on the 510CDT), the LCD Brightness message
displays below:
Full Power: Super-Bright
Low Power: Bright
| User Setting | This option allows you to set the battery save parameters on the sub-window, BATTERY SAVE OPTIONS. When you select this option, the automatic setting feature (Full Power or Low Power) is disabled and the user-preferred parameters become effective. The default setting in the sub-windows depends on the Battery Save Mode: Low Power (Long Life) or Full Power (Normal Life). For details, see Battery Save Options below. |
| High | CPU operates at high speed. (Default) |
| Low | CPU operates at low speed. |
| Enabled | Enables sleep mode. |
| Disabled | Disables sleep mode. |
| Disabled | Disables display automatic power off. |
| xx Min. | Automatically turns off power to the LCD panel's illumination if the panel is not used for the duration set. The duration xx can be set to Disabled 1, 3, 5, 10, 15, 20 or 30 minutes. |
| Disabled | Disables display automatic power off. |
| xx Min. | Automatically turns off power to the hard disk drive if it is not used for the duration set. The duration xx can be set to Disabled 1, 3, 5, 10, 15, 20 or 30 minutes. |
| Disabled | Disables system automatic power off. |
| xx Min. | Automatically turns off power to the system if it is not used for the duration set. The duration xx can be set to 10, 20, 30, 40, 50 or 60 minutes. |
|
|
| |
| External power | Battery power | |
| Full Power | Super-bright | Bright |
| Low Power | Bright | Semi-bright |
| User Settings | Super-bright, Bright or Semi-bright | |
|
|
|
| Full Power | Bright |
| Low Power | Semi-bright |
| User Settings | Bright or Semi-bright |
| Performance | If the CPU becomes too hot, the fan turns on automatically. When the CPU temperature falls to a normal range, high-speed processing is resumed and the fan is turned off. |
| Quiet | If the CPU becomes too hot, the processing speed is lowered. If the temperature is still too high, the fan turns on. When the CPU temperature falls to a normal range, the fan is turned off and the processing speed is increased. |
| Boot | Turns on boot mode. (Default) |
| Resume | Turns on the AutoResume feature. |
(b) CPU Cache
| Enabled | Enables the CPU cache. (Default) |
| Disabled | Disables the CPU cache. |

| Enabled | Enables the CPU cache. (Default) |
| Disabled | Disables the CPU cache. |
NOTES:
Do not remove the AC cable and battery pack at the same time when you use this feature. If you do so, data saved by AutoResume will be lost. You must also reset this option.
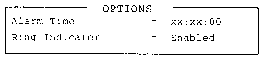
If you have set a password and the computer boots by the Auto Power On function and Resume is on, the computer will start with the instant security function enabled. The password = message is not displayed; however, you must enter the password to use the computer.
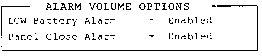
Alarm Volume
| Off | Disables the alarm. |
| Low | Sets the alarm volume to low. |
| Medium | Sets the alarm volume to medium. |
| High | Sets the alarm volume to high. (Default) |
| Enabled | Enables the feature. (Default) |
| Disabled | Disables the feature. |
System Beep
| Enabled | Enables the feature. (Default) |
| Disabled | Disables the feature. |
Panel Power On/Off
| Enabled | Enables the feature. |
| Disabled | Disables the feature. (Default) |
NOTE: Do not remove the AC cable and battery pack at the same time when you use this feature. If you do so, data saved by AutoResume will be lost. You must also reset this option.
| Enabled | Enables the feature. |
| Disabled | Disables the feature. (Default) |

| Fn Equivalent | Left Ctrl + Left Alt* Right Ctrl + Right Alt* Left Alt + Left Shift Right Alt + Right Shift Left Alt + Caps Lock |
| FDD®Built-in HDD | The computer looks for bootable files first on the FDD and next on the HDD. (Default) |
| Built-in HDD®FDD | The computer looks for bootable files first on the HDD and next on the FDD. |
| FDD®Second HDD | The computer looks for bootable files first on the FDD and next on the optional second HDD (installed in the selectable bay of the computer or optional Desk Station V Plus or in the Desk Station V Plus's 5" drive bay). |
| Second HDD®FDD | The computer looks for bootable files first on the optional second HDD (installed in the selectable bay of the computer or optional Desk Station V Plus or in the Desk Station V Plus's 5" drive bay) and next on the FDD. |
NOTE: The above settings display even if the computer is not connected to a Desk Station V Plus. However, in this case the Bay HDD settings will not be effective.
| F | Selects the FDD. |
| B | Selects the computer's built-in HDD. |
| S | Selects the second HDD. |
| Auto selected | If the PS/2 mouse is connected to the computer when you turn on the power, the PS/2 mouse is enabled and the AccuPoint is disabled. Otherwise, the AccuPoint is enabled. (Default) |
| Simultaneous | Enables both the AccuPoint and PS/2 mouse |
| PCIC Compatible | For PCMCIA R2.01 and ZV port card. (Default) |
| CardBus/16bit | For PC card 16 multi-function card, CardBus card and ZV port card. |
E000h-EFFFh, E400h-EFFFh (Default),
C000h-CBFFh or E000h-EBFFh
NOTE: Do not assign the same interrupt request level and I/O address to the serial port and PC card.
|
level |
|
address |
||||||
|
|
|
|
(Serial port default) | |||||
|
|
|
|
||||||
|
|
|
|
||||||
|
|
|
|
||||||
|
|
|
|
||||||
|
|
|
|
||||||
|
|
|
|
||||||
|
|
|
|
||||||
|
|
|
|||||||
|
|
(Other settings made automatically by plug-and-play operating systems) | |||||||
NOTE: If the setting for the serial port is the same as that for the modem port, the modem port is automatically set to disabled.
This option allows you to set the COM level for the Modem port. The Modem port interrupt request level (IRQ) and the I/O port base address for each COM level are shown below:
NOTE: If an internal modem (option in some markets) is not installed, this selection does not appear.
|
level |
|
|||
|
|
|
|
||
|
|
|
|
| |
|
|
|
|
||
|
|
|
|
||
|
|
|
|
||
|
|
|
|
||
|
|
|
|
||
|
|
|
|
||
|
|
|
|||
|
|
(Other settings made automatically by plug-and-play operating systems) | |||
NOTE: If the setting for the modem port is the same as that for the serial, the serial is automatically set to disabled.
|
|
|
|
| LPT 1 |
|
|
| LPT 2 |
|
|
| LPT 3 |
|
|
| Not Used |
| |
| Others | (Other settings made automatically by plug-and-play operating systems) | |
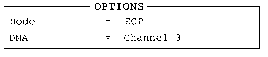
When the Printer Port Type (see settings below) is set to ECP, the DMA channel can also be set to 1, 2 or 3. The default is 3.
|
|
address |
|
| |
| LPT 1 |
|
|
| |
| LPT 2 |
|
|
| |
| LPT 3 |
|
|
| |
| Not Used |
|
|||
| Others | (Other settings made automatically by plug-and-play operating systems) | |||
When you select one of the above options, except for Not used, a
subwindow similar to the one below appears to let you set the parallel port
mode. The options for this setting are ECP (default) and Standard
Bi-Directional.
For most printers, the port should be set to ECP. With some other parallel devices, the setting should be Standard Bi-Directional.
| Enabled | Enables the sound system. (Default) |
| Disabled | Disables the sound system. |

534h (default), 608h, E84h, F44h
220h (default), 240h, Other
(Other settings made automatically by plug-and-play operating system)
388h, Others.
(Others settings made automatically by plug-and-play operating system)
IRQ5 (default), IRQ7, IRQ9, IRQ11, IRQ15
WSS & SBPro DMA
| Playback: | Channel 0, Channel 1 (default), Channel 3 |
| Capture: | Channel 0 (default), Channel 1, Channel 3 |
Control I/O Address
120h, Others.
(Other settings made automatically by plug-and-play operating system)
MPU401 (MIDI I/F) IRQ level
Not Used (default), 330H/IRQ5, 330H/IRQ7,
330H/IRQ9, 330H/IRQ11, 330H/IRQ15, Others
(Other settings made automatically by plug-and-play operating system)
Joystick I/O address
200h
NOTE: When you set the Playback and Record option to the same channel, the Record option will display Same as Playback.
NOTE: In this case, the system will sound a warning beep when you connect the Desk Station V Plus and turn on the computer. Also, the following on the Desk Station V Plus cannot be used: PCI bus slots, ISA bus slots, PC card slots, and SCSI port.
| Built-in HDD | = Primary IDE (1F0H/IRQ14)
= Not used Disables Built-in HDD = No drive Built-in HDD is not installed = Others Other settings made automatically by |
| Int Selectable Bay | = Secondary IDE (170H/IRQ15
= Not used Disables secondary HDD installed in = Others (190H/IRQ10)
|
| DS Selectable Bay | = Secondary IDE (170H/IRQ15)
= Not used Disables secondary HDD installed in = Others (190H/IRQ10)
|
| DS 5" Drive Bay | = Secondary IDE (170H/IRQ15)
= Not used Disables IDE type HDD installed in = Others (190H/IRQ10)
|
| Int Selectable Bay | = Secondary IDE (170H/IRQ15)
= Not used Disables CD-ROM installed in the = Others (168H/IRQ10) = Others (1E8H/IRQ11) = Others Other settings made automatically by |
| DS Selectable Bay | = Secondary IDE (170H/IRQ15)
= Not used Disables CD-ROM installed in the = Others (168H/IRQ10) CD-ROM installed in
= Others Other settings made automatically by |
| DS 5" Drive Bay | = Secondary IDE (170H/IRQ15)
= Not used Disables IDE type CD-ROM = Others (168H/IRQ10) = Others (1E8H/IRQ11) IDE type CD-ROM = Others Settings made automatically by plug- |
NOTE: If the computer is attached to a Desk Station V Plus, you have access to two selectable bays. However, you cannot use two CD-ROM drives in the selectable bays at the same item. If two CD-ROM drives are installed in the selectable bays, the Desk Station V Plus the selectable bay is set to Not used by default.
| 3F2H/IRQ6/CH2 | Computer FDD ready for use. |