SPONSORED LINKS
510 Series Replacement Procedures
![]()
Top Cover with Display Assembly
RTC Battery, Backup Battery, and Speaker
System Board, PC Card Slot, Fan and DAA Module
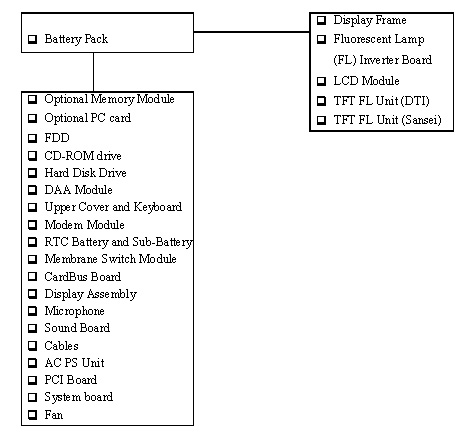
This section explains how to disassemble the computer and replace
Field Replaceable Units (FRUs). It may not be necessary to remove
all the FRUs in order to replace one. The chart below is a guide
to which FRUs need to be removed in order to remove others. Always
start by removing the battery pack, then follow the lines on the
chart to determine which FRU you must remove next in order to
repair the one you think is causing the computer to operate improperly.
Safety Precautions
Before you begin disassembly, read the following safety precautions and observe them carefully as you work.
DANGER:
WARNING:
To avoid the risk of electric shock or other injury:
CAUTION:
To avoid damage to the computer:
Before You Begin
Look over the procedures in this Section before you begin disassembling the computer. Familiarize yourself with the disassembly and reassembly steps. Begin each procedure by removing the AC power cord and the battery pack as instructed in Section 4.2, Battery Pack.
1. Do not disassemble the computer unless it is operating abnormally.
2. Use only the correct and approved tools.
3. Make sure the working environment is free from the following elements whether you are using or storing the computer:
4. Make sure the FRU you are replacing is causing the abnormal operation by performing the necessary diagnostics tests described in this manual.
5. Do not perform any unnecessary operations and use only the described procedures for disassembling and installing FRUs in the computer.
6. After removing parts from the computer, place them in a safe place away from the computer so they will not be damaged and will not interfere with your work.
7. You will remove and replace many screws when you disassemble the computer. When you remove screws, make sure they are placed in a safe place and are identified with the correct parts.
8. When assembling the computer, make sure you use the correct screws to secure the various pieces in place. Screw sizes are listed in the corresponding Figures.
9. The computer contains many sharp edges and corners, so be careful not to injure yourself.
10. After you have replaced an FRU, make sure the computer is
functioning properly by performing the appropriate test on the
FRU you have fixed or replaced.
Disassembly Procedures
The computer has three basic types of cable connectors:
To disconnect a Pressure plate connector, lift up the tabs on either side of the plastic pressure plate and slide the cable out of the connector. To connect the cable to a Pressure plate connector, make sure the pressure plate is fully lifted and slide the cable into the connector. Secure the cable in place by pushing the sides of the pressure plate down so the plate is flush with the sides of the connector. Gently pull on the cable to make sure the cable is secure. If you pull out the connector, connect it again making sure the connector's pressure plate is fully lifted when you insert the cable.
Standard pin and flexible cable connectors are used with all other cables. These connectors can be connected and disconnected by simply pulling them apart or pushing them together.
Assembly Procedures
After you have disassembled the computer and fixed or repaired the problem that was causing the computer to operate abnormally, you will need to reassemble the computer.
While assembling the computer, remember the following general points:
o Take your time, making sure you follow the instructions closely. Most problems arise when you hurry to assemble the computer.
o Make sure all cables and connectors are securely fastened.
o Before securing the FRU or other parts, make sure that no cables will be pinched by screws or the FRU.
o Check that all latches are closed securely in place.
o Make sure the correct screws are used to secure all FRUs. Using the wrong screw can damage the threads or the screw head and may prevent proper seating of an FRU.
After installing an FRU in the computer confirm that the FRU and the computer are functioning properly.
Tools and Equipment
The use of electrostatic Discharge (ESD) equipment is very important for your safety and the safety of those around you. Proper use of these devices will increase the success rate of your repairs and lower the cost for damaged or destroyed parts. The following equipment is necessary to disassemble and reassemble the computer:
Screw Tightening Torque
When you fasten screws, be sure to follow the torque list below. Overtightening can damage components and screws; undertightening can result in electrical shorts or other damage if screws or components come loose.
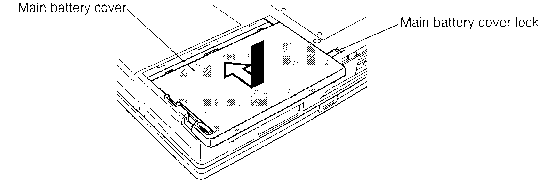
Removing the Battery Pack
To remove the battery pack, follow the steps below and refer to Figures 4-1 and 4-2.
1. Turn off the power to the computer. Disconnect the AC power cord and all external cables connected to the computer.
2. Turn the computer over (upside down).
3. Slid the main battery cover lock fully in the direction of the arrow, then slide out and remove the main battery cover.
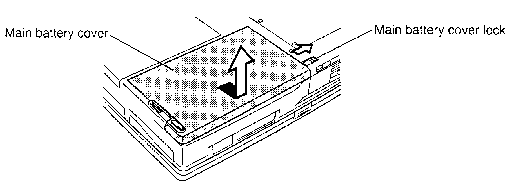
4. Push the main battery release latch in the direction of the arrow and the battery pack will pop up slightly from the computer base.
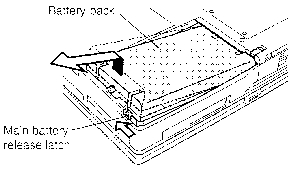
NOTE: For environmental reasons, do not throw away a spent battery pack. Please return spent battery packs to Toshiba.
Installing the Battery Pack
To install the battery pack, follow the steps below and refer to Figures 4-3 and 4-4.
WARNING: The battery is a lithium ion battery. The battery can explode if not properly replaced, used, handled and disposed of. Use only batteries recommended by Toshiba as replacements.
1. Turn off the power to the computer. Disconnect the AC power cord and all external cables connected to the computer.
2. Push on the right end near the battery lock to set the battery pack in place.
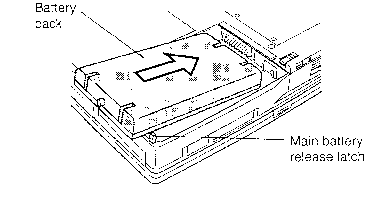
3. Slide the main battery cover lock fully in the direction of the arrow. Lay the main battery cover in place so that there is about a 1 cm gap between the edge of the cover and the computer. Slide the cover in until the locks click into place.
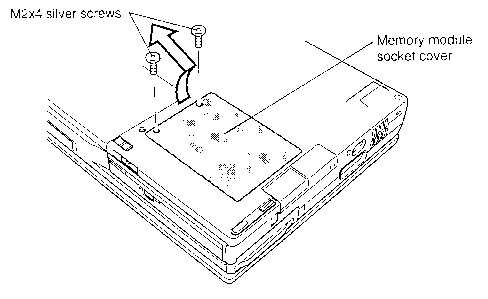
Removing the Optional Memory Module
To remove the optional memory module, make sure the computer is in boot mode, then follow the steps below and refer to Figures 4-5 and 4-6.
1. Turn off the power to the computer, then disconnect the AC power cord and all external cables connected to the computer.
2. Remove the battery pack as described in Section 4.2. If required, remove the second battery.
3. Make sure the computer is upside down.
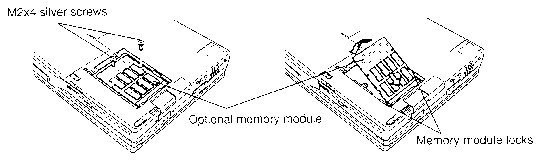
4. Remove two M2x4 silver screws securing the memory module socket cover and lift off the cover.
5. Remove two M2x4 screws securing the optional memory module, you can skip this step if the half-size memory module is installed because it is not secured with screws.
6. Push the memory module locks on both sides of the module outwards. The module is unlocked and is lifted up partially by springs.
7. Grasp the edges of the module and remove it.

CAUTION: Do not touch the connectors or circuits on the memory module or on the computer. Debris on the connectors may cause memory access problems.
Installing the Optional Memory Module
To install the optional memory module, make sure the computer is in boot mode then follow the steps below and refer to Figures 4-7 and 4-8.
1. Put the optional memory module into the memory slot, firmly inserting the connector on the module into the corresponding connector.
CAUTION: Do not touch the connectors or circuits on the memory module or on the computer. Debris on the connectors may cause memory access problems.
2. Place your fingertips on the screw holes on the module, and press the module firmly but gently to secure it with the memory module locks.
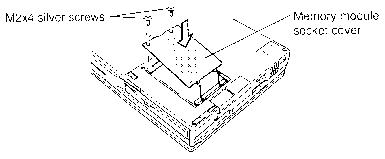
3. Fasten two M2x4 silver screws. Skip this step if the half-size memory module is used, it is not secured with screws.
4. Place the memory module socket cover and secure it with two M2x4 silver screws.
5. Install the battery pack as described in Section 4.2. If required,
install the second battery.
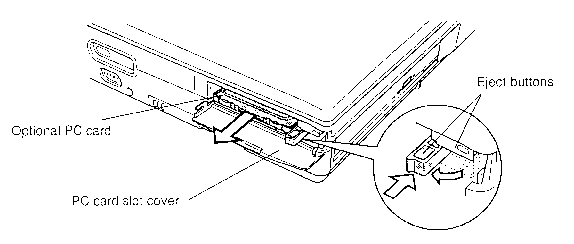
Removing the Optional PC card
To remove the optional PC card, make sure the computer is in boot mode then follow the steps below and refer to Figure 4-9.
1. Turn off the power to the computer. Disconnect the AC power cord and all external cables connected to the computer.
2. Remove the battery pack and optional memory module as described in Sections 4.2 and 4.3. If required, remove the second battery.
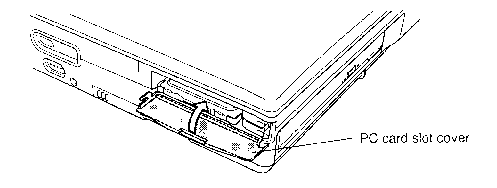
3. Open the PC card slot cover.
4. Pull out the eject button for the upper or lower card.
5. Grasp the optional PC card and remove it.
Installing the Optional PC card
To install the optional PC card, make sure the computer is in boot mode then follow the steps below and refer to Figures 4-10 and 4-11.
1. Insert the optional PC card. Press gently to ensure a firm connection.
2. Press down the eject button to lock the card into the slot.
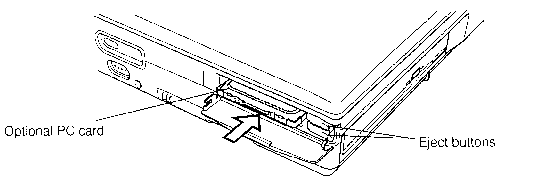
3. Close the PC card slot cover.
4. Install the optional memory module and battery pack as described
in Sections 4.3 and 4.2. If required, install the second battery.
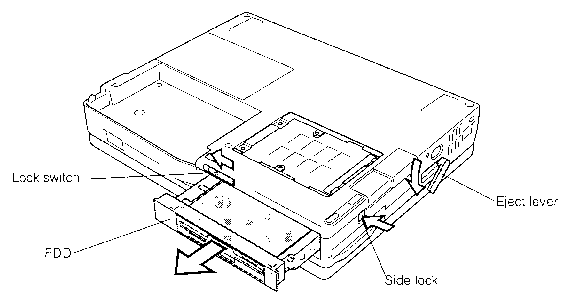
Removing the FDD
To remove the FDD, follow the steps below and refer to Figures 4-12 to 4-15.
1. Turn off the power to the computer. Disconnect the AC power cord and all external cables connected to the computer.
2. Remove the battery pack, optional memory module, and optional PC card as described in Sections 4.2, 4.3, and 4.4.
3. Turn the computer over.
4. Slide the lock switch in the direction of the arrow so that the red mark appears.
5. Press the eject release button, push the eject lever so that it comes out of its hole.
6. Turn the eject lever down to pop the FDD out slightly.
7. Grasp the drive and pull it out.
8. Remove six M2x6 screws, and take off the upper plastic cover by releasing four latches.
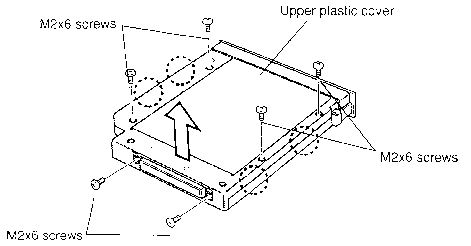
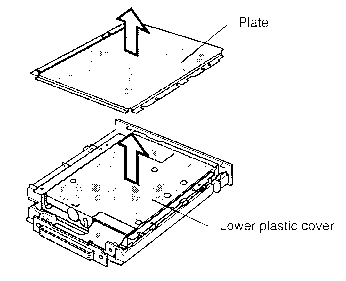
9. Lift off the plate and remove the lower plastic cover.
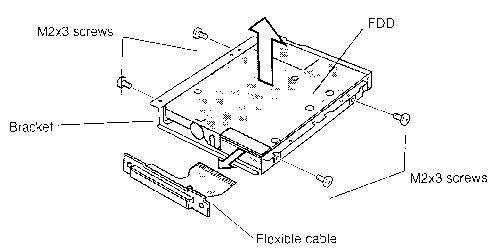
10. Disconnect the flexible cable.
11. Remove four M2x3 screws and remove the FDD from the bracket.
Installing the FDD
To install the FDD, follow the steps below and refer to Figures 4-15 back to 4-12.
1. Seat the FDD in the bracket and secure it with four M2x3 screws.
2. Connect the flexible cable. Be sure the pins on the case extend through the holes in the connector base.
3. Seat the FDD in the lower plastic cover and set the plate in place.
4. Set the upper plastic cover in place by securing the latches and fasten six M2x6 screws.
5. Turn the computer upside down.
6. Insert the FDD into the slot until the eject lever returns to the lock position.
7. Push the eject lever back into its hole.
8. Slide lock switch in the opposite direction of the arrow to cover the red mark.
9. Install the optional PC card, optional memory module, and battery
pack as described in Sections 4.4, 4.3, and 4.2.
Removing the CD-ROM drive
To remove the CD-ROM drive, follow the steps below and refer to Figures 4-16 to 4-18.
1. Turn off the power to the computer. Disconnect the AC power cord and all external cables connected to the computer.
2. Remove the battery pack, optional memory module, and optional PC card as described in Sections 4.2, 4.3, and 4.4.
3. Turn the computer upside down.
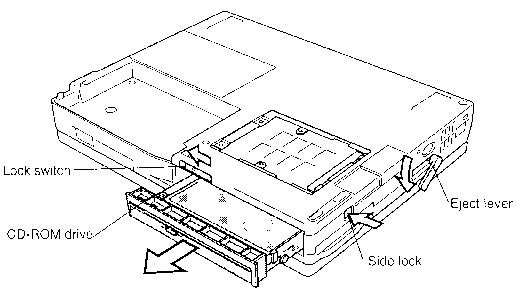
4. Slide the lock switch in the direction of the arrow so that the red mark appears.
5. Push the eject lever so that it comes out of its hole.
6. Push in the side lock and turn the eject lever
down to pop the CD-ROM drive
out slightly.
7. Grasp the drive and pull it out.
8. Remove four M2x3 screws and three M2x6 screws
securing the frame to the
CD-ROM drive.
9. Release two latches and remove the front cover.
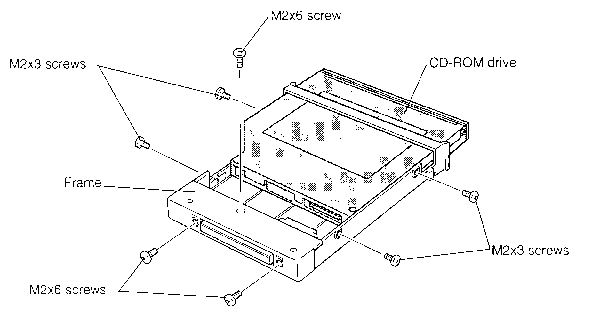
9. Disconnect the flexible cable from the drive.
10. Hold the unit with the drive door facing away. Push the drive unit forward with your thumbs to slide drive out of the case.
Installing the CD-ROM drive
To install the CD-ROM drive, follow the steps below and refer to Figures 4-17 and 4-16.
CAUTION:
CAUTION: Be careful to insert the module straight and press firmly so that the drive is flush with the computer. NOTE: The release lever will close partially.
5. Hold the CD-ROM drive module flush to the computer and push the lever down until it snaps into place.
6. Lock the drive release lever lock.
7. Install the optional PC card, optional memory module, and battery
pack as described in Sections 4.4, 4.3, and 4.2.
Removing the Hard Disk Drive
To remove the hard disk drive, follow the steps below and refer to Figures 4-18 to 4-20.
1. Turn off the power to the computer. Disconnect the AC power cord and all external cables connected to the computer.
2. Remove the battery pack, optional memory module, optional PC card, and selectable bay module as described in Sections 4.2 through 4.6.
3. Make sure the computer is upside down.
4. While sliding the HDD lock fully in the direction of the arrow, pull out the HDD cover until it stops (about 0.5 cm).
5. Grasp the cover and remove it.
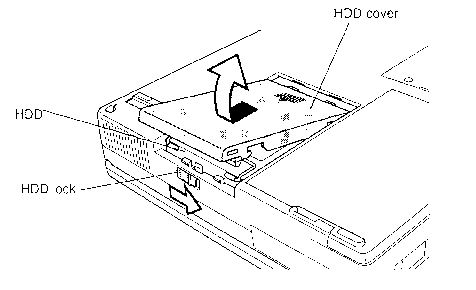
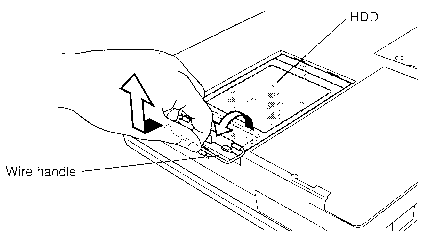
6. Grasp the wire handle, turn it 180 degrees, and pull it to disconnect the HDD from the computer.
7. Hold the handle and pull it up to remove the HDD.
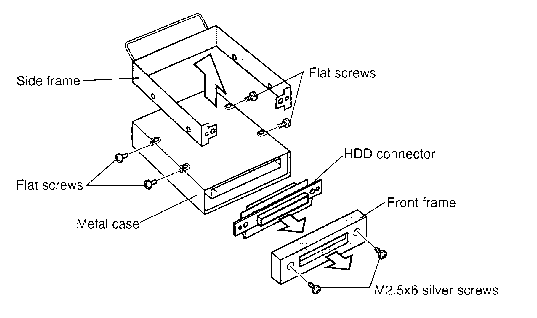
8. Remove two M2.5x6 silver screws securing the plastic front frame and remove it.
9. Remove four flat screws securing the metal side frame and remove it.
10. Carefully pull off the HDD connector and remove the HDD from the metal case.
CAUTION: Note the position of the HDD connector for reinstall. The number of pins on the HDD differs from the number of pins on the connector.
Installing the Hard Disk Drive
To install the hard disk drive, follow the steps below and refer to Figures 4-20 back to 4-18.
1. Replace the metal case and attach the HDD connector to the HDD. Be sure to set the position of the connector by matching the width of the HDD front with that of the connector. The number of the pins on the HDD is different from the number on the connector.
CAUTION: Make sure to put the connector straight into the corresponding connector, otherwise the pins of the connectors may bend and cause problems.
2. Set the metal side frame so that its front parts are in between the folded board of the connector, and secure it with four flat screws.
3. Put the plastic front cover in place, making sure that its top and bottom are oriented correctly, and secure it with two M2.5x6 silver screws.
4. Make sure the computer is upside down, insert the HDD into the computer, and slide the HDD lock in the direction of the arrow to let the HDD drop into place.
5. Push the HDD to secure the HDD connection slot to the corresponding connector on the computer.
6. Lay the HDD cover in place, being sure to leave a narrow gap (about 0.5 cm), and then slide the cover in until it clicks.
7. Install the selectable bay module, optional PC card, optional
memory module, and battery pack as described in Sections 4.6 back
through 4.2.
Removing the DAA Module
To remove the DAA module, follow the steps below and refer to Figures 4-21 and 4-22.
1. Turn off the power to the computer. Disconnect the AC power cord and all external cables connected to the computer.
2. Remove the battery pack, optional memory module, optional PC card, selectable bay module, and HDD as described in Sections 4.2 through 4.7.
3. Insert a thin object and press gently to remove the modem slot cover.
4. Remove two M2.5x4 silver screws.
5. Put your fingertips into the slot, hold both sides of the DAA module, and pull it out of the connector.
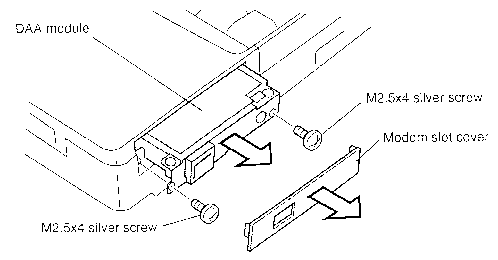
6. Remove two M2.5x4 screws.
7. Slightly lift the upper plastic cover off the lock holes in the metal cover. Remove the metal cover.
8. Release four latches and remove the lower plastic cover.
9. Release four latches and remove the DAA module from the upper plastic cover.
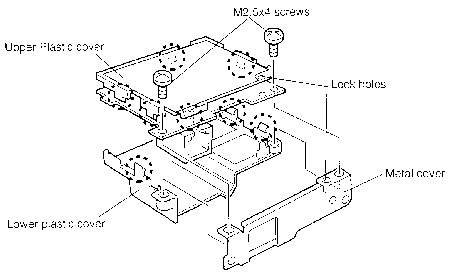
Installing the DAA Module
To install the DAA module, follow the steps below and refer to Figures 4-22 and 4-21.
1. Put the DAA module and upper plastic cover together and secure four latches.
2. Fit the lower plastic cover into the module and secure four latches.
3. Fit the metal cover into the module, making sure that the lock hole part of the metal cover is put in between the upper plastic cover and DAA module and that the projected part on the lower plastic cover is put into the hole.
4. Fasten two M2.5x4 screws.
5. Insert the module into the slot and press it in to ensure a firm connection.
6. Fasten two M2.5x4 silver screws and replace the DAA slot cover.
7. Install the HDD, selectable bay module, optional PC card, optional memory module, and battery pack as described in Sections 4.7 back through 4.2.
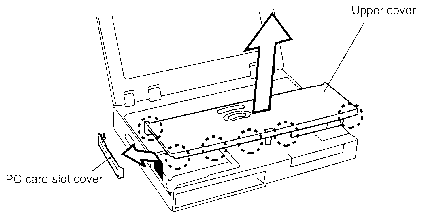
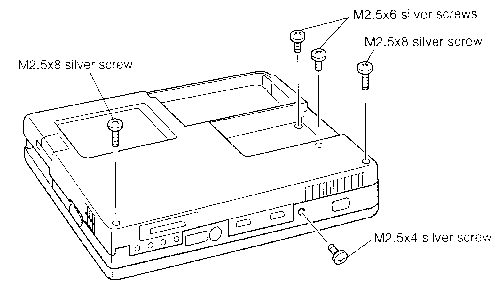
Removing the Upper Cover and Keyboard
To remove the upper cover and keyboard, follow the steps below and refer to Figures 4-23 to 4-25.
1. Turn off the power to the computer. Disconnect the AC power cord and all external cables connected to the computer.
2. Remove the battery pack, optional memory module, optional PC card, selectable bay module, HDD, and DAA module as described in Sections 4.2 through 4.8.
3. Make sure the computer is upside down.
4. Remove five M2.5x8 silver screws (four inside the battery pack slot at the bottom and one on the bottom of the computer).

5. Turn the computer over and open the display panel.
6. Remove the upper cover by releasing six latches. Start with five latches at the front of the cover, then one latch at the back.
7. Release the PC card slot cover by grasping the projecting parts on both sides and bending it gently and slightly. Be careful not to apply too much force as it may damage the cover.
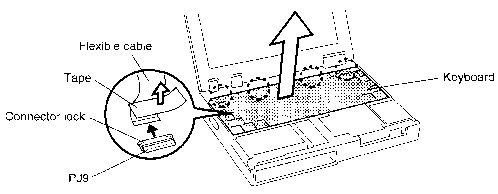
8. Lift up and hold the front side of the keyboard.
9. Release the connector lock by pulling out slightly in the direction of the arrow, then disconnect the cable from PJ9.
10. Remove the keyboard, being careful that the projections at the back of the keyboard are not caught under the speaker cover.
Installing the Upper Cover and Keyboard
To install upper cover and keyboard, follow the steps below and
refer to Figures 4-25 back to 4-23.
1. Turn up the connector lock and insert the flexible cable into PJ9. While holding the cable down, press the lock down and push it into the connector.
2. Put the keyboard in place, inserting the four projections into the corresponding holes on the speaker cover. Be careful that the cable is not caught between the keyboard and the speaker cover.
3. Seat the upper cover and press to secure six latches.
4. Replace the PC card slot cover by bending it gently and slightly so that the projecting parts fit into the holes on both sides. Be careful not to apply too much force as it may damage the cover.
5. Turn the computer upside down and fasten five M2.5x8 silver screws.
6. Install the DAA module, HDD, selectable bay module, optional
PC card, optional memory module, and battery pack as described
in Sections 4.8 back through 4.2.
Removing the Modem Module
To remove the modem module, follow the steps below and refer to Figure 4-26.
1. Turn off the power to the computer. Disconnect the AC power cord and all external cables connected to the computer.
2. Remove the battery pack, optional memory module, optional PC card, selectable bay module, HDD, DAA module, and upper cover and keyboard as described in Sections 4.2 through 4.9.
3. Remove four M2.5x6 screws and take off the metal cover.
4. Disconnect PJ601 on the modem module from PJ6, and take out the module.

Installing the Modem Module
To install the modem module, follow the steps below and refer to Figure 4-26.
1. Put the modem module in place, firmly connecting PJ601 on the module to PJ6.
2. Seat the metal cover and secure it with four M2.5x6 screws.
3. Install the upper cover and keyboard, DAA module, HDD, selectable bay module, optional PC card, optional memory module, and battery pack as described in Sections 4.9 back through 4.2.
WARNING: If you replace the RTC battery and/or sub-battery, be sure to use only batteries recommended by Toshiba. Installation of the wrong battery can cause the battery to explode or otherwise cause damage.
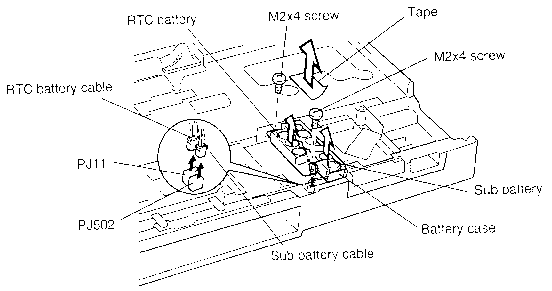
Removing the RTC Battery and Sub-Battery
To remove the RTC battery and sub-battery, follow the steps below and refer to Figure 4-27.
1. Turn off the power to the computer. Disconnect the AC power cord and all external cables connected to the computer.
2. Remove the battery pack, optional memory module, optional PC card, selectable bay module, HDD, DAA module, upper cover and keyboard, and modem module as described in Sections 4.2 through 4.10.
3. Remove the tape fastening the batteries.
4. Disconnect RTC battery cable from PJ11 and the sub-battery cable from PJ502.
5. Take out the RTC battery and sub-battery.
6. Remove two M2x4 screws and lift out the battery case.
Installing the RTC Battery and Sub-Battery
To install the RTC battery and sub-battery, follow the steps below and refer to Figure 4-27.
1. Put the battery case in place, and secure it with two M2x4 screws.
2. Put the RTC battery and sub-battery in the case.
3. Carefully run the battery cables in their respective grooves on the case.
4. Connect the RTC battery cable to PJ11 and the sub-battery cable to PJ502.
5. Secure the batteries with tape.
6. Install the modem module, upper cover and keyboard, DAA module, HDD, selectable bay module, optional PC card, optional memory module, and battery pack as described in Sections 4.10 back through 4.2.
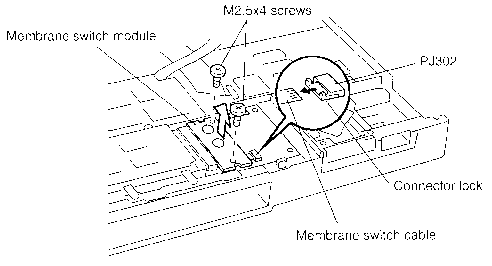
Removing the Membrane Switch Module
To remove the membrane switch module, follow the steps below and refer to Figure 4-28.
1. Turn off the power to the computer. Disconnect the AC power cord and all external cables connected to the computer.
2. Remove the battery pack, optional memory module, optional PC card, selectable bay module, HDD, DAA module, upper cover and keyboard, modem module, and RTC battery and sub-battery as described in Sections 4.2 through 4.11.
3. Remove two M2.5x4 screws.
4. Pull out the connector lock slightly.
5. Take out the membrane switch module and remove the membrane switch cable from PJ302.
Installing the Membrane Switch Module
To install the membrane switch module, follow the steps below, and refer to Figure 4-28.
1. Insert the membrane switch cable into PJ302 (into the opening between the connector lock and the connector itself).
2. Replace the membrane switch module and secure it with two M2.5x4 screws.
3. Push in the connector lock to secure the cable.
4. Install the RTC battery and sub-battery, modem module, upper cover and keyboard, DAA module, HDD, selectable bay module, optional PC card, optional memory module, and battery pack as described in Sections 4.11 back through 4.2.
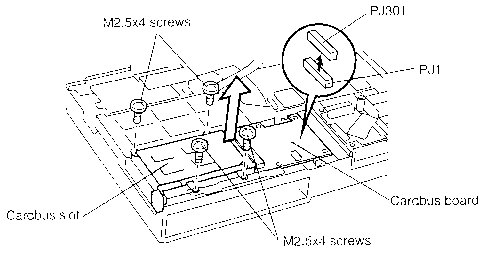
Removing the CardBus Board
To remove the cardbus board, follow the steps below and refer to Figure 4-29.
1. Turn off the power to the computer. Disconnect the AC power cord and all external cables connected to the computer.
2. Remove the battery pack, optional memory module, optional PC card, selectable bay module, HDD, DAA module, upper cover and keyboard, modem module, RTC battery and sub-battery, and membrane switch module as described in Sections 4.2 through 4.12.
3. Remove four M2.5x4 screws.
4. Disconnect PJ301 on the cardbus board from PJ1, and remove the board with the cardbus slot.
5. Disconnect the cardbus slot from the cardbus board.
Installing the CardBus Board
To install the cardbus board, follow the steps below and refer to Figure 4-29.
1. Connect the cardbus slot to the cardbus board.
2. Place the cardbus board with the cardbus slot in place, and press it gently but firmly to connect PJ301 on the board to PJ1.
3. Secure the board with four M2.5x4 screws.
4. Install the membrane switch module, RTC battery and sub-battery,
modem module, upper cover and keyboard, DAA module, HDD, selectable
bay module, optional PC card, optional memory module, and battery
pack as described in Sections 4.12 back through 4.2.
Removing the Display Assembly/Speakers
To remove the display assembly/speakers, follow the steps below and refer to Figures 4-30 to 4-34.
1. Turn off the power to the computer. Disconnect the AC power cord and all external cables connected to the computer.
2. Remove the battery pack, optional memory module, optional PC card, selectable bay module, HDD, DAA module, upper cover and keyboard, modem module, RTC battery and sub-battery, membrane switch module, and Cardbus board as described in Sections 4.2 through 4.13.
3. Turn the computer upside down and remove one M2.5x4 silver screw (at the rear of the computer), two M2.5x6 silver screws (inside the HDD slot at the bottom), and two M2.5x8 silver screws (on the bottom of the computer).
4. Turn the computer over and open the display panel fully.
NOTE: Protect screen and provide firm support for the display at all times.
5. Remove the display frame as described in Section 4.22.
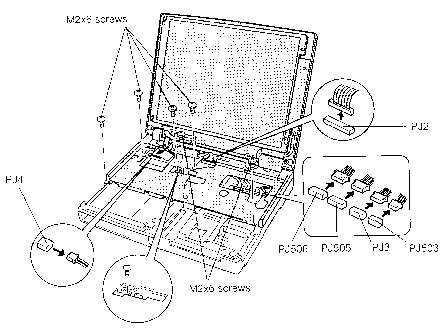
6. Release eight latches and remove the speaker cover. Start with releasing the latch at the front-left side by pushing on the cover near the latch.
7. Disconnect cables from PJ4, PJ2, PJ3, PJ503, PJ505, and PJ506 respectively.
8. Remove six M2x6 screws. The upper center screw secures a ground cable.
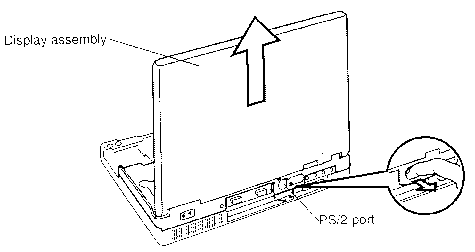
9. Release the latch located just below the PS/2 port at the rear. Push and pull on the rear side by the latch with your finger, then lift off the display assembly.
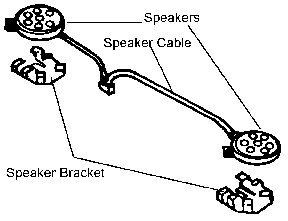
10. Remove two 2.5x4 screws (one from each speaker) securing the speaker bracket.
11. Carefully unthread the speaker cable and slide the speaker out from the speaker bracket.
Installing the Display Assembly
To install the display assembly and speakers, follow the steps below and refer to Figures 4-34 back to 4-30.
Removing the Microphone
To remove the microphone, follow the steps below and refer to Figures 4-34 to 4-36.
1. Turn off the power to the computer. Disconnect the AC power cord and all external tables connected to the computer.
2. Remove the battery pack, optional memory module, optional PC card, selectable bay module, HDD, DAA module, upper cover and keyboard, modem module, RTC battery and sub-battery, membrane switch module, cardbus board, and display assembly as described in Sections 4.2 through 4.14.
3. Remove one M2.5x6 screw from the metal plate.
4. Remove the tape securing the second battery/auxiliary battery cables.
5. Remove the metal frame.

6. Remove the heat transfer rubber from the metal frame.
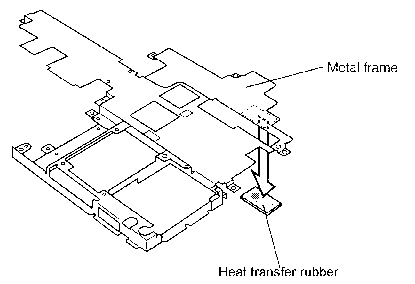
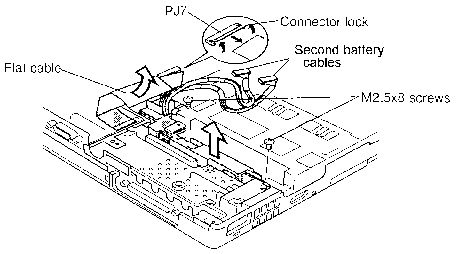
7. Lift slightly on the right-hand side of the metal plate, then disconnect the flat cable from PJ7 (Figure 4-37) on the PCI board. The flat cable is secured with two-sided tape, lift gently to remove it.
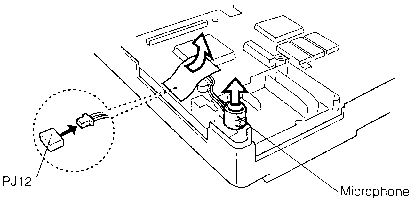
8. Disconnect the microphone cable from PJ12.
9. Take out the microphone.
Installing the Microphone
To install the microphone, follow the steps below and refer to Figures 4-37 back to 4-34.
1. Put the microphone in place so that the two projecting parts on the computer are inserted into the holes of the microphone's rubber cushion.
2. Connect the microphone cable to PJ12.
3. Seat the heat transfer rubber.
4. Put the metal frame in place.
5. Fasten one M2.5x6 screw.
6. Secure the auxiliary battery cables with tape.
7. Install the display assembly, cardbus board, membrane switch module, RTC battery and sub-battery, modem module, upper cover and keyboard, DAA module, HDD, selectable bay module, optional PC card, optional memory module, and battery pack as described in Sections 4.14 back through 4.2.
Removing the Flat Cables
To remove the flat cables, follow the steps below and refer to Figure 4-37.
1. Turn off the power to the computer. Disconnect the AC power cord and all external cables connected to the computer.
2. Remove the battery pack, optional memory module, optional PC card, selectable bay module, DAA module, HDD, upper cover and keyboard, modem module, RTC battery and sub-battery, membrane switch module, cardbus board, display assembly, and sound board as described in Sections 4.2 through 4.16.
3. Remove two M2.5x8 screws.
4. Push up the connector lock and disconnect the flat cable from PJ7 on the system board.
Installing the Flat Cables
To install the flat cables, follow the steps below and refer to Figure 4-37.
1. Insert the flat cable into PJ7 on the system board and secure it by pushing down on the connector lock.
2. Secure the cover with two M2.5x8 screws.
3. Install the sound board, display assembly, cardbus board, membrane
switch module, RTC battery and sub-battery, modem module, upper
cover and keyboard, DAA module, HDD, selectable bay module, optional
PC card, optional memory module, and battery pack as described
in Sections 4.16 back through 4.2.
Removing the Sound Board
To remove the sound board, follow the steps below and refer to Figures 4-38 and 4-39.
1. Turn off the power to the computer. Disconnect the AC power cord and all external cables connected to the computer.
2. Remove the battery pack, optional memory module, optional PC card, selectable bay module, HDD, DAA module, upper cover and keyboard, modem module, RTC battery and sub-battery, membrane switch module, cardbus board, and display assembly as described in Sections 4.2 through 4.14.
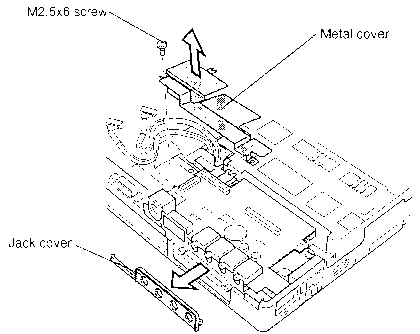
3. Remove one M2.5x6 screw and take off the metal cover.
4. Remove the jack cover.
1. Push up on the connector lock to release the sound board cable and pull out the cable.
2. Remove the sound board and disconnect PJ11 on the board from PJ8. When removing the sound board, be careful that the projecting parts on the board, such as the control dial, are not caught in between the computer frame.
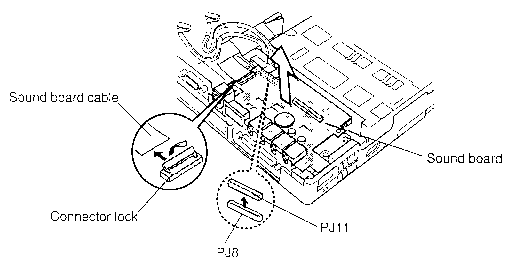 Figure
4-39 Removing the sound board
Figure
4-39 Removing the sound boardInstalling the Sound Board
To install the sound board, follow the steps below and refer to Figures 4-39 and 4-38.
1. Place the sound board. With the computer frame pulled out slightly, insert the projecting parts on the board, such as the control dial, into the corresponding holes on the computer frame. Press the board gently, but firmly, to connect PJ11 on the board to PJ8.
2. Insert the sound board cable into the connector and secure it by pushing down on the connector lock.
3. Put the jack cover in place.
4. Put the metal cover in place and secure it with one M2.5x6 screw.
5. Install the display assembly, cardbus board, membrane switch module, RTC battery and sub-battery, modem module, upper cover and keyboard, DAA module, HDD, selectable bay module, optional PC card, optional memory module, and battery pack as described in Sections 4.14 back through 4.2.
Removing the AC PS Unit
To remove the AC PS unit, follow the steps below and refer to Figure 4-40.
1. Turn off the power to the computer. Disconnect the AC power cord and all external cables connected to the computer.
2. Remove the battery pack, optional memory module, optional PC card, selectable bay module, DAA module, HDD, upper cover and keyboard, modem module, RTC battery and sub-battery, membrane switch module, cardbus board, display assembly, sound board, and flat cables as described in Sections 4.2 through 4.17.
3. Remove the AC PS cable from PJ501.
4. Remove tape from the AC inlet, then lift AC inlet straight up until unit clears socket and remove it.
CAUTION:
5. Remove one M2.5x8 screw.
6. Pull the computer metal frame out slightly and take out the AC PS unit.
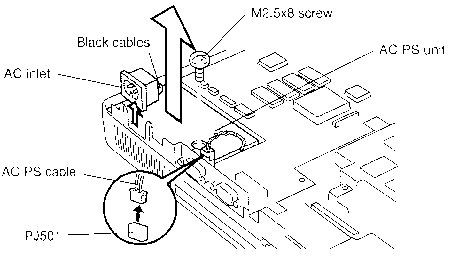
Installing the AC PS Unit
To install the AC PS unit, follow the steps below and refer to Figure 4-40.
1. Place the AC PS unit and secure it with one M2.5x8 screw.
CAUTION:
2. Set the AC inlet so that the computer metal frame is put in the openings between the front part and the side wings of the AC inlet.
3. Insert the AC PS cable into PJ501.
4. Install the flat cables, sound board, display assembly, cardbus board, membrane switch module, RTC battery and sub-battery, modem module, upper cover and keyboard, DAA module, HDD, selectable bay module, optional PC card, optional memory module, and battery pack as described in Sections 4.17 back through 4.2.
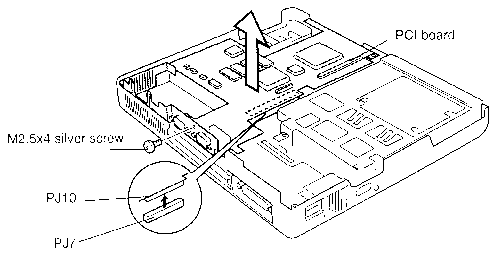
Removing the PCI Board
To remove the PCI board, follow the steps below and refer to Figure 4-41.
1. Turn off the power to the computer. Disconnect the AC power cord and all external cables connected to the computer.
2. Remove the battery pack, optional memory module, optional PC card, selectable bay module, DAA module, HDD, upper cover and keyboard, modem module, RTC battery and sub-battery, membrane switch module, cardbus board, display assembly, microphone, sound board, flat cables, and AC PS unit as described in Sections 4.2 through 4.18.
3. Remove one M2.5x4 silver screw (at the rear of the computer).
4. Lift off the PCI board while holding it by the metal frame and edge. Then disconnect PJ10 on the PCI board from PJ7 on the base.
Installing the PCI Board
To install the PCI board, follow the steps below and refer to Figure 4-41.
1. Put the PCI board in place, firmly connecting PJ10 on the PCI board to PJ7 on the base.
2. Fasten one M2.5x4 silver screw to secure the board.
3. Install the AC PS unit, flat cables, sound board, microphone,
display assembly, cardbus board, membrane switch module, RTC battery
and sub-battery, modem module, upper cover and keyboard, DAA module,
HDD, selectable bay module, optional PC card, optional memory
module, and battery pack as described in Sections 4.18 back through
4.2.
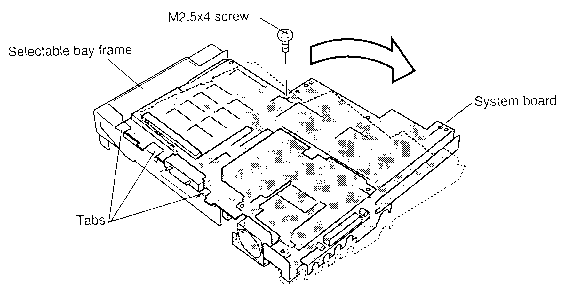
Removing the System Board
To remove the system board, follow the steps below and refer to Figures 4-42 and 4-43.
1. Turn off the power to the computer. Disconnect the AC power cord and all external cables connected to the computer.
2. Remove the battery pack, optional memory module, optional PC card, selectable bay module, DAA module, HDD, upper cover and keyboard, modem module, RTC battery and sub-battery, membrane switch module, cardbus board, display assembly, microphone, sound board, flat cables, AC PS unit, and PCI board as described in Sections 4.2 through 4.19.
3. Remove two M2.5x6 screws and take off the HDD top cover.
4. Remove two M2.5x4 screws and take off the heatsink cover.
5. Remove five M2.5x6 screws and one hexagonal stud with washer securing the system board.
6. Remove two M2.5x8 screws securing the probe pin harness, then lift and remove.
7. Tilt the system board up slightly while holding it by the metal frame.
8. Remove the system board by releasing five latches. When lifting off the board, be careful that it does not contact the selectable bay drive lock bar.
9. Remove one M2.5x4 screw securing the system board.
10. Turn the system board slightly, as indicated in Figure 4-43, to clear the tabs on the selectable bay frame. Lift out the system board.
Installing the System Board
To install the system board, follow the steps below and refer to Figures 4-43 and 4-42.
1. Place the system board in the selectable bay frame and secure it with the latches. When placing the board, make sure that the selectable bay drive lock bar is inserted into the hole on the board.
2. Fasten one M2.5x4 screw to secure the system board.
3. Fasten five M2.5x6 screws and one hexagonal stud with washer to secure the board.
4. Fasten two M2.5x8 screws to secure the Probe Pin Harness.
5. Place the heatsink cover and secure it with two M2.5x4 screws
6. Place the HDD top cover and secure it with two M2.5x6 screws.
7. Install the PCI board, AC PS unit, flat cables, sound board, microphone, display assembly, cardbus board, membrane switch module, RTC battery and sub-battery, modem module, upper cover and keyboard, DAA module, HDD, selectable bay module, optional PC card, optional memory module, and battery pack as described in Sections 4.19 back through 4.2.
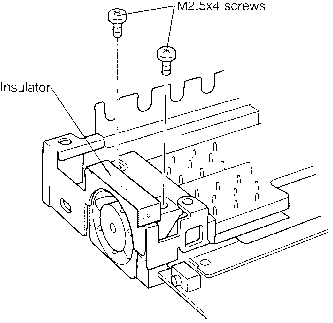
Removing the Fan
To remove the fan, follow the steps below and refer to Figure 4-44 and 4-45.
1. Turn off the power to the computer. Disconnect the AC power cord and all external cables connected to the computer.
2. Remove the battery pack, optional memory module, optional PC card, selectable bay module, DAA module, HDD, upper cover and keyboard, modem module, RTC battery and sub-battery, membrane switch module, cardbus board, display assembly, microphone, sound board, flat cables, AC PS unit, PCI board and system board as described in Sections 4.2 through 4.20.
3. Remove the insulator.
4. Remove two M2.5x4 screws securing the fan.
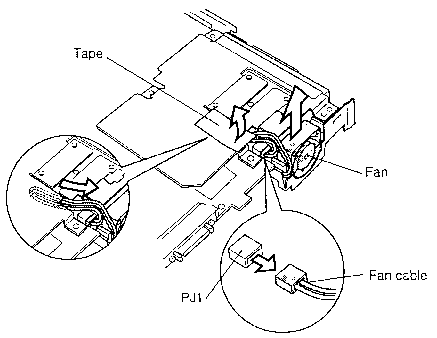
5. Turn the system over (upside down).
6. Remove the tape fastening the fan cable.
7. Disconnect the fan cable from PJ1.
8. Remove the fan.
9. Remove the insulator from the fan.
Installing the Fan
To install the fan, follow the steps below and refer to Figures 4-45 and 4-44.
1. Reattach the insulator to the fan.
2. Place the fan and thread the fan cable as indicated in Figure 4-45.
3. Connect the fan cable to PJ1.
4. Secure the fan cables with tape.
5. Fasten two M2.5x4 screws to secure the fan.
6. Install the system board, PCI board, AC PS unit, flat cables,
sound board, microphone, display assembly, cardbus board, membrane
switch module, RTC battery and sub-battery, modem module, upper
cover and keyboard, DAA module, HDD, selectable bay module, optional
PC card, optional memory module, and battery pack as described
in Sections 4.20 back through 4.2.
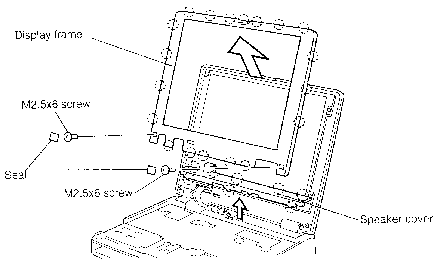
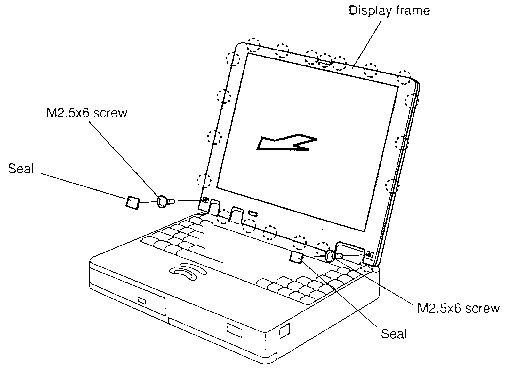
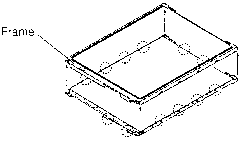
Removing the Display Frame
To remove the display frame, follow the steps below and refer to Figure 4-46. The illustration is based on the STN display screen, but the procedure is the same for the TFT display screen.
1. Turn off the power to the computer. Disconnect the AC power cord and all external cables connected to the computer.
2. Remove the battery pack as described in Section 4.2. (Remove the second battery if necessary).
3. Remove two seals and two M2.5x6 screws. When removing them, support the display panel by the back so it will not be damaged.
4. Carefully insert the fingers of both hands between the display frame (inner side) and the LCD panel, and pull out the frame to access the frame latches (nineteen latches, four at the left side, three at the right side, five at the lower side, and seven at the upper side). Start with the latches at the left and right sides.
CAUTION: Note the routing of the cables on the display frame.
Installing the Display Frame
To install the display frame, follow the steps below and refer to Figure 4-46 (the illustration is based on the STN display screen, but the procedure is the same for the TFT display screen).
1. Place the display frame and secure the latches.
CAUTION: Make sure the cable bundle fits into the frame guides.
2. Fasten two M2.5x6 screws and attach two seals. When fastening them, support the display panel by the back so it will not be damaged.
3. Install the battery pack as described in Section 4.2. (If required, install the second battery).
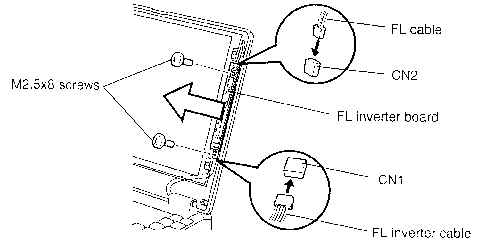
Removing the FL Inverter Board
To remove the FL inverter board, follow the steps below and refer to Figure 4-47 (the illustration is based on the STN display screen, but the procedure is the same for the TFT display screen).
1. Turn off the power to the computer. Disconnect the AC power cord and all external cables connected to the computer.
2. Remove the battery pack and display frame as described in Sections 4.2 and 4.22. If required, remove the second battery.
3. Remove two M2.5x8 screws securing the display panel.
CAUTION: When removing screws, support the display panel by the back so it will not be damaged.
4. Remove the plastic cover.
5. Gently lift the FL inverter board.
6. Disconnect the FL inverter cable from CN1 and the FL cable from CN2.
7. Remove the FL inverter board.
Installing the FL inverter board
To install the FL inverter board, follow the steps below and refer to Figure 4-47 (the illustration is based on the STN display screen, but the procedure is the same for the TFT display screen).
1. Connect the FL inverter cable to CN1 and the FL cable to CN2.
2. Place the FL inverter board and secure it with two M2.5x8 screws.
CAUTION: When fastening the screws, support the display panel by the back so it will not be damaged.
3. Replace the plastic cover.
4. Install the display frame and battery pack as described in Sections 4.22 and 4.2. Install the second battery if required.
Removing the LCD Module
To remove the LCD module, follow the steps below and refer to Figure 4-48 (the illustration is based on the STN display screen, the procedure is the same for the TFT display screen) and Figure 4-49 (the illustration is for the TFT display screen only).
1. Turn off the power to the computer. Disconnect the AC power cord and all external cables connected to the computer.
2. Remove the battery pack, display frame, and FL inverter board as described in Sections 4.22 and 4.2. Remove the second battery if required.
3. Remove four M2.5x8 screws. The screw at lower left secures a ground cable. Be sure to support the display panel by the back so it will not be damaged.
4. Carefully rotate the module from the top of the display outward. Disconnect the LCD cable from the connector (the connector position of the TFT display screen is not the same as illustrated), and lift off the LCD module.
5. Remove the Gold foil tape from the base of the module and lift the LCD module out of the unit.
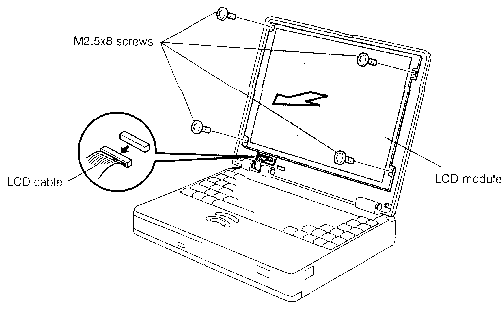
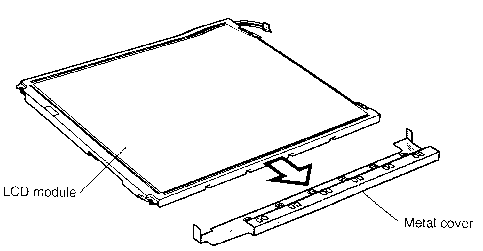
6. Remove the metal cover from the LCD module (510CDT only).
Installing the LCD Module
To install the LCD module, follow the steps below and refer to Figure 4-48 (the illustration is based on the STN display screen, but the procedure is the same for the TFT display screen) and Figure 4-49 (the illustration is the TFT display screen only).
1. Replace the metal cover (510CDT only). Fit the smaller flange over the front of the LCD module and the larger flange over the back of the LCD module. Make sure the cover seats flush with the module.
2. Connect the LCD cable (the connector position of the TFT display screen is not the same as illustrated).
CAUTION: Carefully rotate the unit into place and seat the cable bundle under the unit.
3. Replace the gold foil tape.
4. Seat the LCD module and secure it with four M2.5x8 screws (lower left screw secures the ground cable). When fastening the screws, support the display panel by the back to prevent any damage.
5. Install the FL inverter board, display frame, and battery pack
as described in Sections 4.23, 4.22, and 4.2. If required, install
the second battery.
CAUTION: When you remove the FL, be careful not to let any dust or other foreign matter enter the display panel components.
Removing the STN FL Unit
To remove the STN FL unit, follow the steps below and refer to Figures 4-50 to 4-53.
1. Turn off the power to the computer. Disconnect the AC power cord and all external cables connected to the computer.
2. Remove the battery pack, display frame, FL inverter board, and LCD module as described in Sections 4.2, 4.22, and 4.23. If required, remove the second battery.
3. Remove the three PET tapes (one at the rear of the LCD panel and two along the upper and lower edges of the LCD panel).
4. Release twelve latches and remove the frame.
5. Remove two M2x1 screws.
6. Remove the tape securing the cable.
7. Remove the cable from the connector and lift the cable up by releasing it from the cable guides.
8. Rotate the SEG board out so that it lies flat.
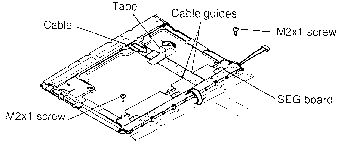
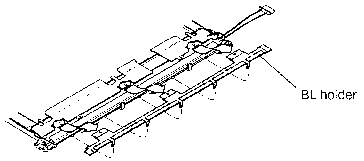
9. Release five latches and three projections, and remove the BL holder.
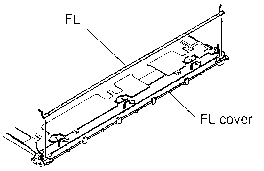
10. Tilt the FL cover and remove the FL.
Installing the STN FL Unit
To install the STN FL unit, follow the steps below and refer to Figures 4-53 back to 4-50.
1. Seat the FL and replace the FL cover.
2. Seat the BL holder by securing five latches and three projections. Make sure that the projections of the holder engage the corresponding projections at the rear of the LCD panel.
3. Rotate the SEG board back into place.
4. Lay the cable under the cable guides and insert the cable in the connector.
5. Secure the cable with tape.
6. Secure the SEG board with two M2x1 screws.
7. Set the frame in place and secure the latches.
8. Replace the three PET tapes.
9. Install the LCD module, FL inverter board, display frame, and battery pack as described in Sections 4.24, 4.23, 4.22, and 4.2. If required, install the second battery.
CAUTION: When you remove the TFT FL, be careful not to let any dust or other foreign matter contaminate the LCD panel. Any contamination can affect the performance of the unit.
Removing the TFT FL Unit (DTI)
To remove the TFT FL unit (DTI), follow the steps below and refer to Figure 4-54.
1. Turn off the power to the computer, then disconnect the AC power cord and all external cables connected to the computer.
2. Remove the battery pack, display frame, FL inverter board, and LCD module as described in Sections 4.2, 4.22, 4.23, and 4.24. If required, remove the second battery.
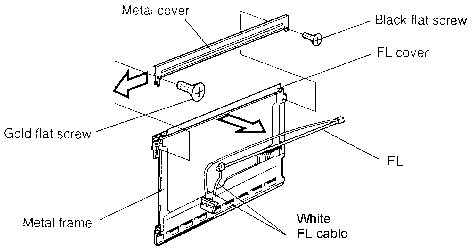
3. Remove one gold flat screw and one black flat screw at the rear of the LCD panel.
4. Slide the metal cover to the left to remove it.
5. Take out the white FL cable between the metal frame and the FL cover.
6. Tilt the FL cover and remove the FL.
Installing the TFT FL Unit (DTI)
To install the TFT FL unit (DTI), follow the steps below and refer to Figure 4-54.
1. Seat the FL and replace the FL cover.
2. Set the white FL cable between the metal frame and the FL cover.
3. Run the FL cables in their respective grooves.
4. Slide in metal cover to the frame, be sure that it is engaged with the metal frame.
5. Secure the metal cover with one gold flat screw and one black flat screw.
6. Install the LCD module, FL inverter board, display frame, and battery pack as described in Sections 4.24, 4.23, 4.22, and 4.2. If required, install the second battery.
CAUTION: When you remove the TFT FL, be careful not to let any dust or other foreign matter contaminate the LCD panel. Any contamination can affect the performance of the unit.
Removing the TFT FL Unit (Sansei)
To remove the TFT FL unit (Sansei), follow the steps below and refer to Figure 4-55.
1. Turn off the power to the computer. Disconnect the AC power cord and all external cables connected to the computer.
2. Remove the battery pack, display frame, FL inverter board, and LCD module as described in Sections 4.2, 4.22, 4.23, and 4.24. If required, remove the second battery.
3. Remove four silver flat screws securing the metal frame.
4. Release eleven latches and remove the frame. Start with the four latches at the upper side.
5. Turn the LCD panel over.
6. Remove two silver flat screws securing the metal cover.
7. Release three latches and gently lift off the metal cover while holding the left side of the metal cover.
8. Take out the white FL cable from the groove on the front side of the LCD panel.
9. Tilt the FL cover and remove the FL.

Installing the TFT FL Unit (Sansei)
To install the TFT FL unit (Sansei), follow the steps below and refer to Figure 4-55.
1. Seat the FL, run the pink FL cable in the groove, and replace the FL cover.
2. Run the white FL cable in the groove at the front side of the LCD panel.
3. Seat the metal cover and press to secure the latches.
4. Fasten two silver flat screws.
5. Seat the metal frame and press to secure the latches. Start with the latches at the bottom of the unit.
6. Fasten four silver flat screws.
7. Install the LCD module, FL inverter board, display frame, and
battery pack as described in Sections 4.24, 4.23, 4.22, and 4.2.
If required, install the second battery.