I have been using a HP Pavilion dv2910us (dv2700 series) notebook computer for the last four years and wanted to share some repair and upgrade tips.
CPU
The HP dv2910us shipped with an okay, but not exactly powerful Core 2 Duo T5550 Socket P CPU running at 1.83GHz with a 667MHz FSB and 2MB of L2 cache.
Upgrading to any 800MHz-FSB Socket P CPU with the same 35W thermal dissipation profile should work. At the time I upgraded, since I had the computer torn apart to replace the display cable anyway, I chose the Core 2 Duo T7700 which runs at 2.4GHz with a 800MHz FSB and with 4MB L2 cache. The T7700 also has VT technology to accelerate virtual machines in 64-bit mode. For best cooling, scrape off all of the factory thermal pad on the heatsink down to the bare copper and apply a moderate layer of Arctic Silver or Prolimatech PK-1 to the top of the CPU before reinstalling the heatsink.
The system is noticeably faster with this CPU and runs just as cool. The BIOS/firmware version F.2E seems to have no problems with VT or with enabling Speedstep on the faster CPU.
HP’s documentation states that a 2.5GHz T9300 is the fastest CPU available for this platform, but I can confirm that a 2.6GHz T9500 (SLAYX stepping) also works perfectly; a T9500 is thus the fastest CPU available for the dv2700 platform with the Wistron 30CD motherboard.
HP removed the link to the BIOS version F.2E but it’s still available on their FTP site: sp41959.exe
CPU Fan
The CPU fan started making noise about 2 years after purchase and finally died another 2 years later. The symptom of CPU fan death is that the system runs very slow due to thermal zone throttling and there is no air flow at the rear of the laptop (under normal circumstances, even under light use the fan will be creating at least a small amount of air flow).
The fan is a Delta KSB0505HA. The model number alone is not that helpful since it comes in several wildly varying form factors. And unfortunately, replacement is not that easy since it requires disassembly of the entire laptop and removal of the motherboard and then the CPU heatsink assembly. If possible I would recommend that you obtain an upgrade CPU, following the guidelines in the above section, and install it at the same time as replacing the fan, since there will be no other more convenient time or excuse to upgrade the CPU.
RAM
The system shipped with 3GB PC2-5300 DDR2 RAM and, according to the specifications, supports up to 4GB PC2-6400 (800MHz) DDR2 RAM. Actually, in this case, technology made the specifications obsolete since 4GB DDR2 SO-DIMM modules became available in about 2010.
In my case I ordered the Patriot PSD28G800SK kit which is a 2 x 4GB PC2-6400 DDR2 SO-DIMM kit providing a total of 8GB RAM at 800MHz, CL5 timing. Unfortunately, the first two kits I received showed bad areas when tested with Memtest86+. Only after RMA’ing both of them and receiving a third kit was I able to receive a set of modules which would pass Memtest86+ and allow for a stable system.
Note that in order to utilize over 4GB of RAM, the system must be running a 64-bit operating system or else a 32-bit operating system with PAE enabled. This is no problem for Linux, but many Windows consumer operating systems, including Vista which shipped with the dv2910US, do not enable PAE as a matter of product differentiation.
Note also that due to a hardware limitation of the Intel G965 chipset (section 3.1), if 8GB RAM is installed, the memory speed will be limited to 667MHz.
Display backlight
The display backlight gradually failed due to a bad solder connection which eventually burned up and destroyed one of the backlight leads. The symptoms are that the backlight will sometimes not power on immediately until the system warms up a bit, and sometimes will flicker off while in use, and manipulating the backlight brightness settings can sometimes bring it back.
Replacing this backlight is fairly straightforward and can actually be accomplished without even powering down the computer, though I would not recommend this for the faint of heart. (I did it so I could continue a task using the external VGA connector while taking my time on the LCD.)
However, if you are not confident in soldering and assembling complex things, it would probably be more prudent to replace the entire LCD assembly since they are not that expensive these days.
All you need to do to replace the backlight is to remove the LCD assembly from the screen casing, disassemble the layers of the assembly sufficiently to access the backlight, desolder or cut out the old backlight and solder in a new backlight, and reassemble. Wear latex gloves while doing this so that you do not leave fingerprints or other skin oils on the LCD components, which will unfortunately be visible when you are finished.
Reassembly requires attention to several details. First, be sure to put back into place any insulating material that is preventing short circuits from the backlight power leads to the LCD assembly casing. Second, be sure to put all types of adhesive and pads back into their original locations. Failure to do this could result in an audible noise from high frequency vibration of the components.
Display assembly cabling
The left display hinge is a rather busy location due to the numerous wires running through it. Unfortunately, in my experience a LCD ribbon cable failed in that location as well as an internal microphone cable. The components are not difficult to replace, requiring only the removal of the screen frame, the softkey panel, and the keyboard. I am not sure how to reduce the stress in this area to prevent future failures.
Bluetooth
The DV2700 series does not ship with Bluetooth capability from the factory. There are two ways to connect Bluetooth devices:
- Install a Mini-PCI WiFi card which includes Bluetooth capability, such as the Intel 7260 Mini-PCI 802.11ac WiFi with Bluetooth 4.0. This will require using a ‘NWL’ hacked BIOS that has the WiFi whitelist removed. The WiFi RF kill switch will have to be manually toggled once each time you boot up the machine while using such a BIOS.
- Install a Bluetooth USB dongle, potentially permanently consuming a USB port.
Both options are rather cheap; the first one saves a USB port and provides a WiFi upgrade, at a slight extra cost and the inconvenience of having to load a hacked BIOS. On the other hand, USB Bluetooth 4.0 dongles can be found very cheaply, less than $10, and they are generally fully plug and play.
If you buy a Bluetooth dongle and it works at first, but sporadically stops, perhaps working again when replugging, and you observe repeating kernel messages like the below:
[767296.480249] usb 6-2: New USB device found, idVendor=0a12, idProduct=0001
[767296.480261] usb 6-2: New USB device strings: Mfr=0, Product=0, SerialNumber=0
[767321.802449] hid-generic 0005:046D:B006.0004: unknown main item tag 0x0
[767321.802552] input: Dell BT Travel Mouse as /devices/pci0000:00/0000:00:1d.1/usb6/6-2/6-2:1.0/bluetooth/hci0/hci0:0/0005:046D:B006.0004/input/input21
[767321.803071] hid-generic 0005:046D:B006.0004: input,hidraw2: BLUETOOTH HID v1.24 Mouse [Dell BT Travel Mouse] on 00:1f:81:00:02:50
[767327.876039] Bluetooth: hci0: command 0x1405 tx timeout
[767329.888087] Bluetooth: hci0: command 0x1403 tx timeout
[767331.904091] Bluetooth: hci0: command 0x0c2d tx timeout
[767333.920019] Bluetooth: hci0: command 0x1405 tx timeout
[767335.936091] Bluetooth: hci0: command 0x1403 tx timeout
[767337.952094] Bluetooth: hci0: command 0x0c2d tx timeout
[767339.968091] Bluetooth: hci0: command 0x1405 tx timeout
[767341.984082] Bluetooth: hci0: command 0x1403 tx timeout
[767344.000023] Bluetooth: hci0: command 0x0c2d tx timeout
[767346.016075] Bluetooth: hci0: command 0x1405 tx timeout
[767348.032063] Bluetooth: hci0: command 0x1403 tx timeout
[767350.048050] Bluetooth: hci0: command 0x0c2d tx timeout
Trust me, just save yourself a lot of headache and trouble and return or throw away that dongle! It’s nothing you’re doing wrong, it’s just a broken piece of cheap hardware.
Speaking of the WiFi Mini-PCI card, the three antenna wires that some DV2700 models with factory 802.11n and the 4965 WiFi card utilize can be confusing; here is a picture of their correct arrangement:
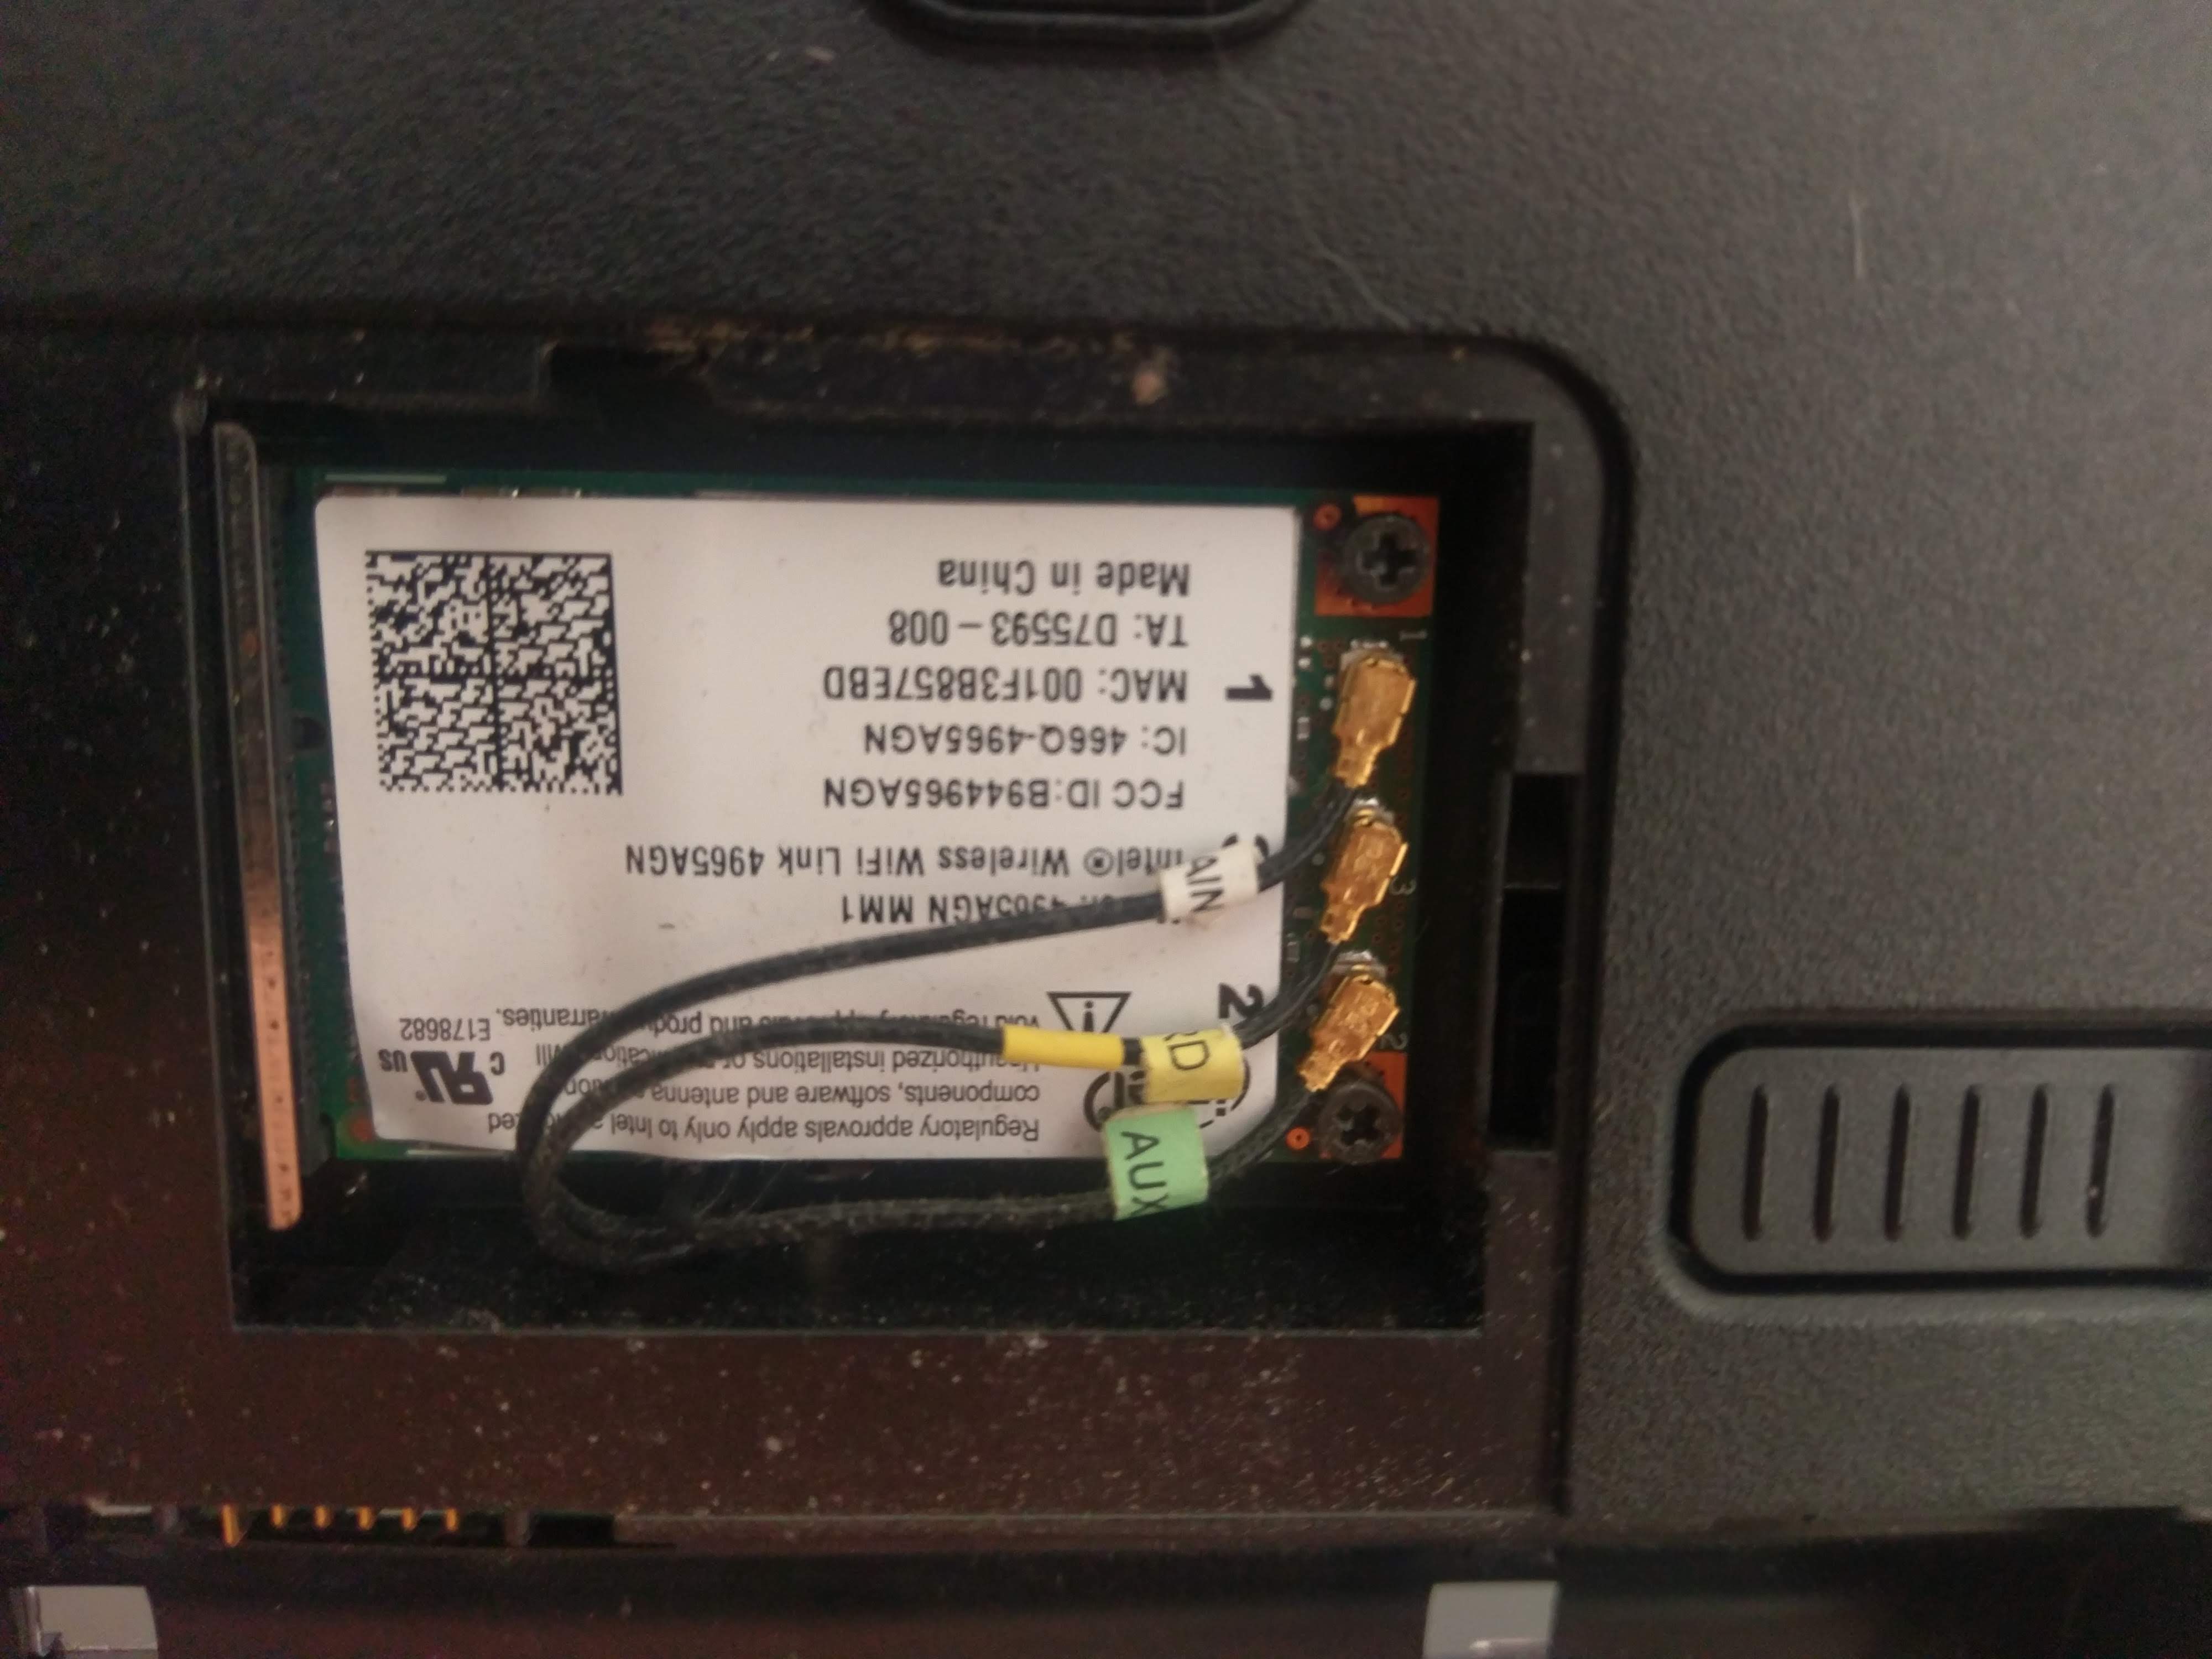
Newer cards like the 7260 may use only two of the three wires; it seems that you can safely ignore the yellow wire in that case, as it just leads to an extra antenna plate.
Double layer DVD+R recording
The Lite-On DS8A1H Slimline DVD drive in the DV2700 family is just okay – not great, and not the worst slimline drive either. Its main fault is that it is finicky about media and that even seemingly-successful burns (DL or not) may be unreadable or difficult to read. While recording DVD-R and DVD+R, including RW media, with the DS8A1H is fairly uneventful, you must follow three rules to ensure your DVD+R-DL recording will be a success:
- Use
xorrecord. Unfortunately,growisofshas geometry bugs utilizing dual layer media with the DS8A1H that are unlikely to be fixed. - Record at the slowest speed possible (this seems to be the ~2.4x that results with the speed=1 parameter to xorrecord).
- Use Verbatim AZO DVD+R DL media. Either 2.4X or 8X variant will be fine since we will be recording at the slowest speed anyway. This drive is very finicky about DL media; even Verbatim-branded “Life Series” DL media will not result in readable burns. A forum post sheds light on why.
- If you still have types of trouble with reading and/or writing to DVD media that are either 1) complete failure, or 2) seem to be of a more sporadic/random nature: use 91% isopropyl alcohol and a cotton swab to gently swab the laser pickup lens, and gently blow it dry with air duster. It seems that the plastic used in the lens gradually fogs as it ages and releases components of the plastic, and cleaning it in this manner every few years will restore optimal pickup performance.
One long, two short beeps and a black screen on boot
Two things can cause this. One of them is an easy fix, and the other will ruin your day:
- The WiFi Mini-PCI card may not be fully seated or the contacts may be corroded. Just take it out and reinstall it. Phew!
- The Intel northbridge may have experienced BGA solder fracture due to heat cycling. This is a far more complicated fix involving removing the entire motherboard which I am not going to get into here as the procedure is available elsewhere on the web. Your day is hereby ruined…
Help! My DV2700 is hot to the touch just sitting idle on a table!
Once a year, you should put the computer to sleep so that the CPU fan is not spinning, and use compressed air to blow out the little 6 row vent grill near the left rear of the PC, to the left of the battery and near the CPU fan exhaust vent. Contrary to the huge size of the CPU fan exhaust vent, this tiny little vent grill is the only air intake vent for the whole system and if it becomes obstructed with dust, the system cannot cool at all! The symptoms are:
- The fan is running at maximum all the time but you can’t feel much hot air coming out of the exhaust
- The system is slowed down due to ACPI thermal zone throttling
- The hard disk is overheating
Note that there seems to be a BIOS bug on this system: on a dual core CPU, if thermal throttling is entered, once the system cools down the second core will still not leave thermal throttling until the system is either put to sleep or rebooted! So keep that intake vent clean so you don’t have these kind of problems.
Hey man I really like what youve done here I have the exact same laptop I have a question I am looking for the fan and there alot of KSB0505HA would you mind sharing the website you bought it from?thanks so much I have been wondering about upgrades for my laptop for the longest time thanks man
how did you speed up your ram from 667 to 800mhz , i did some of your upgrades have a t9300 intel on my hp dv2700 model dv2927la , and bought 2 crucial ddr2 2gb each 800mhz , but my system just dont works at 800mhz keeps working at 667mhz , i did flash the bios but still no results.
I’m trying to resurrect my laptop of the same model and this is fantastically helpful. Thank you for posting.
Yhanks for this info, i just fired up my HP DV2700 & this is helpful info.
Hello my friend, tried to change the CPU from a T5250 to a T7200 or a T5600 and the DV2600 wouldn’t start. It has the same DC30 motherboard, but I (stupidity) forgot to update the BIOS to the one you linked… Should I try to update? It should work, right?
Seems like it should work, but you’ll have to reinstall the original CPU to find out 🙂
Already did it, it’s working, so I’ll install the OS, update the bios and then change the CPU. And I’m not closing this damn laptop until I finish the CPU change. 😀
Well, the BIOS were updated before. Any reason why the mobo wouldn’t detect the CPU? I’ve tried both a T5600 and a T7200, the laptop gave me black screen on both cases…
@brunobelo I’m a bit confused, why are you trying T5600 and T7200 in this Socket P system? It shouldn’t work since they are Socket M packages, right? https://en.wikipedia.org/wiki/List_of_Intel_Core_2_microprocessors#Core_2_Duo_2
Well, now I’m confused. On you text you say that a T7700 works…
Oh fuck, the processors are socket m, sorry about that! Stupid me!
They fit, but wouldn’t work…
can dv2700 upgrade the ssd? And what version is sata?
i have a dv2725la and put a t9300… it works but suddenly it freezes, can happen any time, but i see if i make a memory test from the bios it always freezes. i tried some other cpus with fsb 800 MHZ and the same happen. the original processor is 667MHz FSB so i supposed is because of this. the chipset is the GM965
I guess it’s bad RAM which advertises PC2-6400 but can’t work at that speed. Try changing the RAM.
SATA is 6Gb/s. You can put SATA SSD into it. You can also put PATA HDD into the DVDRW bay with an adapter, and you can use ExpressCard->NVMe adapter for another storage device. It’s likely only SATA will be bootable though.