SPONSORED LINKS
|
Although it is possible to let a guest OS access real hardware, such as harddisks, it is much more flexible and attractive to simulate harddisks using files residing in the host's filesystem. On Unix-like systems, files may contain holes, which makes this really simple. To the guest operating system, the harddisk image looks and acts like a real disk.
The version numbers of the various operating systems were the latest versions that worked satisfactory with GXemul at the time this page was updated; if new versions have been released since then, they might work as well.
In addition to the "working" guest operating systems listed above, you might find the following information interesting:
NOTE: Some of these sections may not be relevant to this specific release of GXemul, for example some of these modes may be legacy modes that worked before but not any longer, or are not yet working but could be in the future.
Some operating systems are listed with a version number less than what was available at the time of this GXemul release (e.g. NetBSD/prep). The reasons for this is because of incompleteness in GXemul's machine, device, and/or processor implementations.
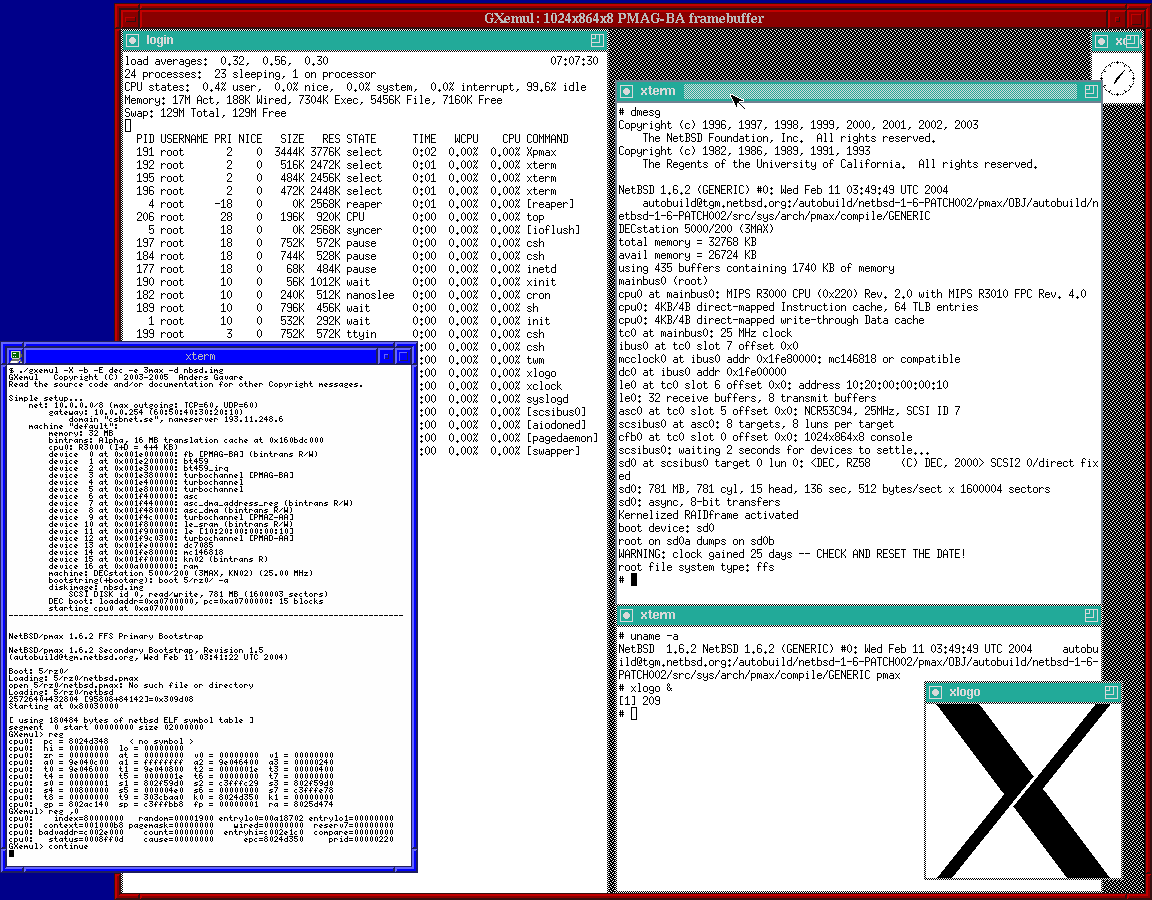
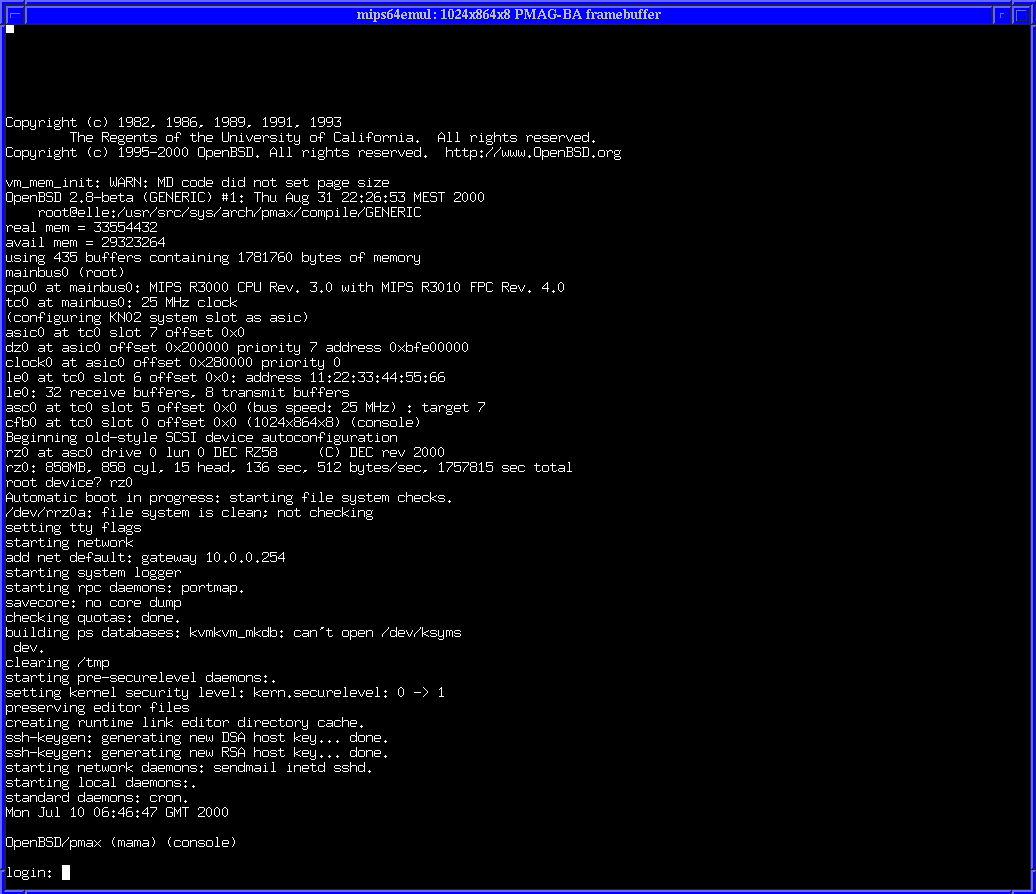
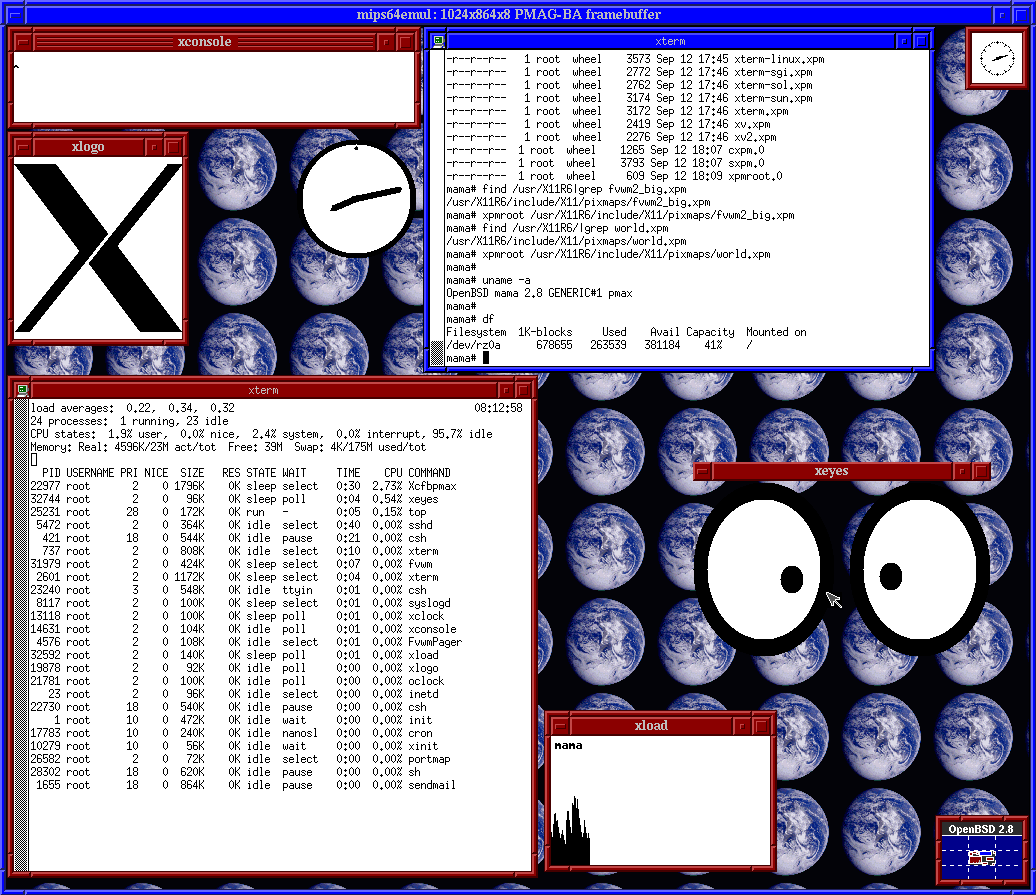
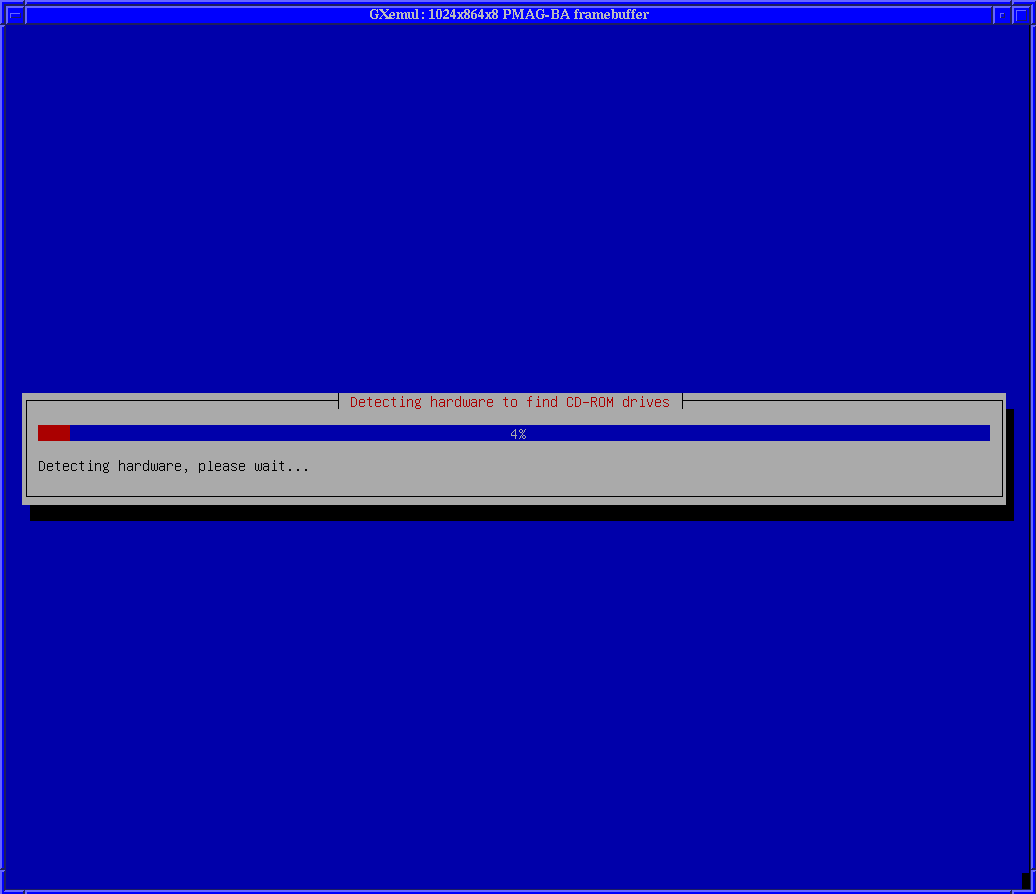
NetBSD/pmax was the first guest OS that could be installed onto a disk image in GXemul. The device emulation of the DECstation 5000/200 is reasonably complete; it should be enough to emulate a networked X-windows-capable workstation.
To install NetBSD/pmax onto a harddisk image in the emulator, follow these instructions:
dd if=/dev/zero of=nbsd_pmax.img bs=1024 count=1 seek=3000000
ftp://ftp.netbsd.org/pub/NetBSD/iso/4.0/pmaxcd-4.0.iso
gxemul -X -e 3max -d nbsd_pmax.img -d b:pmaxcd-4.0.iso
If you do not want to use the graphical framebuffer during the install, you can skip the -X command line option. Remember to enter xterm instead of vt100 when asked about your terminal type, if you do this.
You can also add -Y 2 to the command line options, if you feel that the default framebuffer window is too large.
When the installation has finished, the following command should start NetBSD from the harddisk image:
gxemul -X -e 3max -d nbsd_pmax.imgand log in as root. Type startx to start X windows.
(Remove -X if you only want a serial console.)
To install NetBSD/arc from a CDROM image onto an emulated harddisk image, follow these instructions:
dd if=/dev/zero of=nbsd_arc.img bs=1024 count=1 seek=1000000
	ftp://ftp.netbsd.org/pub/NetBSD/iso/4.0/arccd-4.0.iso
	ftp://ftp.netbsd.org/pub/NetBSD/NetBSD-4.0/arc/binary/kernel/netbsd-GENERIC.gz
	ftp://ftp.netbsd.org/pub/NetBSD/NetBSD-4.0/arc/binary/kernel/netbsd-RAMDISK.gz
gxemul -e pica -x -d nbsd_arc.img -d b:arccd-4.0.iso netbsd-RAMDISK.gz(Try removing -x if you have problems with the xterm.)
mount /dev/cd0a /mnt2
disklabel -i -I sd0    (for example 'a', '4.2BSD', '1c',
    '700M', 'b', 'swap', '701M', '$', 'P', 'W', 'y', and 'Q')
newfs /dev/sd0a
mount /dev/sd0a /mnt
cd /mnt
for a in /mnt2/arc/binary/sets/*.tgz; do echo $a; tar xzpf $a; done
cd dev; sh MAKEDEV all
cd ../etc; echo "rc_configured=YES" >> rc.conf
cat > /mnt/etc/fstab
/dev/sd0a / ffs rw 1 1
/dev/sd0b none swap sw 0 0
(press ctrl-d)
cd /; umount /mnt; umount /mnt2
halt
|
You can now use the generic NetBSD/arc kernel to boot from the harddisk image, using the following command:
gxemul -e pica -x -d nbsd_arc.img netbsd-GENERIC.gz
When asked for "root device: ", enter sd0.
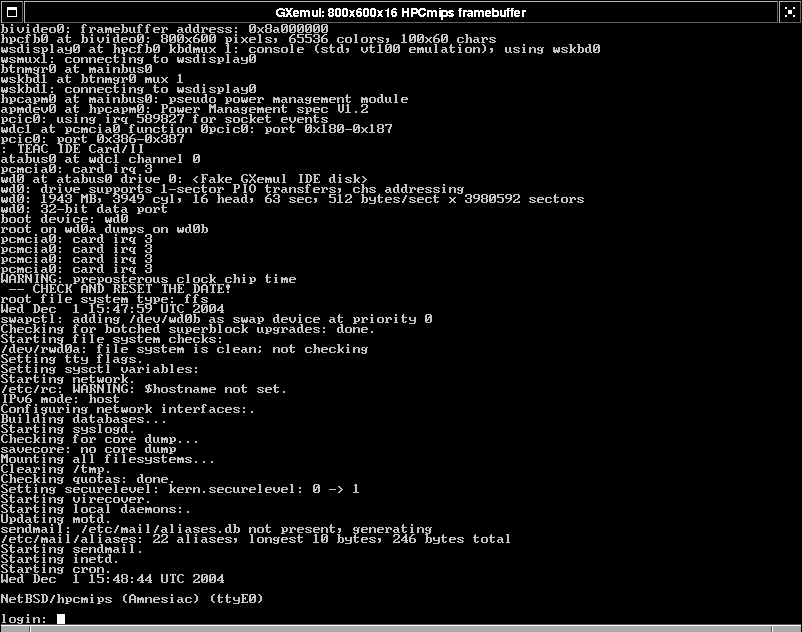
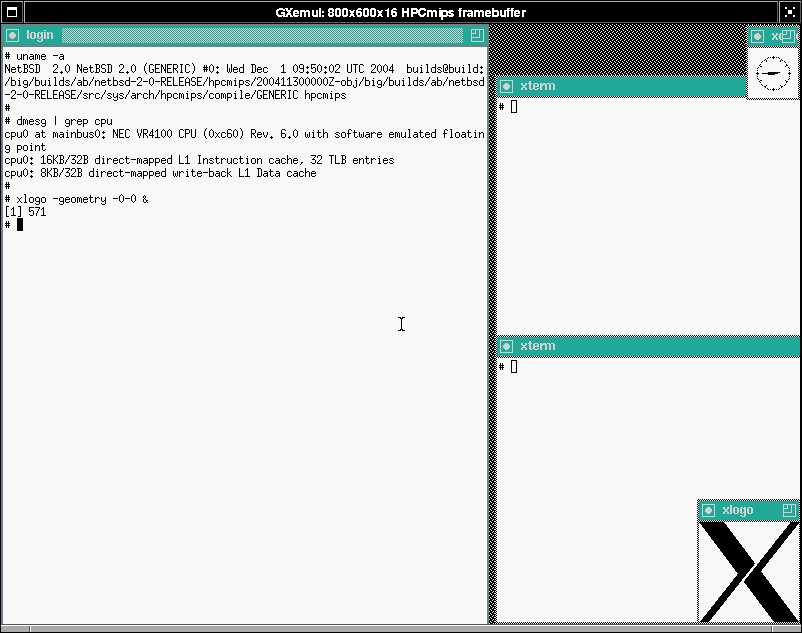
These instructions show an example of how to install NetBSD/hpcmips on an emulated MobilePro 770:
dd if=/dev/zero of=nbsd_hpcmips.img bs=1024 count=1 seek=3000000
	ftp://ftp.netbsd.org/pub/NetBSD/iso/4.0/hpcmipscd-4.0.iso
	ftp://ftp.netbsd.org/pub/NetBSD/NetBSD-4.0/hpcmips/binary/kernel/netbsd-GENERIC.gz
	ftp://ftp.netbsd.org/pub/NetBSD/NetBSD-4.0/hpcmips/installation/netbsd.gz
gxemul -e mobilepro770 -X -d nbsd_hpcmips.img -d b:hpcmipscd-4.0.iso netbsd.gzand proceed like you would do if you were installing NetBSD on a real MobilePro 770. (Install onto wd0, choose "Use entire disk" when doing the MBR partitioning, and choose to install from CD-ROM.)
If everything worked, NetBSD should now be installed on the disk image. Use the following command line to boot the emulated hpcmips machine:
gxemul -e mobilepro770 -X -d nbsd_hpcmips.img netbsd-GENERIC.gz
When you have logged in as root, you can use startx to start X Windows, but there is no mouse support yet so only keyboard input is available. This makes it a bit akward to use X.
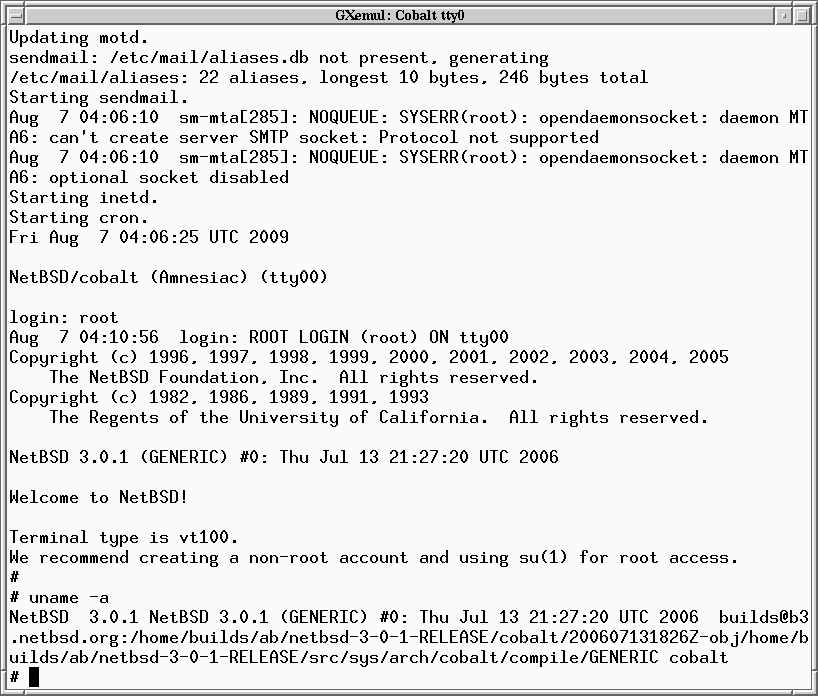
The following instructions will let you install NetBSD/cobalt onto a disk image, from an emulated DECstation 3MAX machine:
ftp://ftp.netbsd.org/pub/NetBSD/NetBSD-3.1/pmax/binary/kernel/netbsd-INSTALL.gz
dd if=/dev/zero of=nbsd_cobalt.img bs=1024 count=1 seek=700000
	ftp://ftp.netbsd.org/pub/NetBSD/NetBSD-3.1/cobalt/binary/kernel/netbsd-GENERIC.gz
	ftp://ftp.netbsd.org/pub/NetBSD/iso/3.1/cobaltcd-3.1.iso
gxemul -e 3max -d nbsd_cobalt.img -d cobaltcd-3.1.iso netbsd-INSTALL.gz
newfs /dev/sd0c mount /dev/cd0c /mnt mkdir /mnt2; mount /dev/sd0c /mnt2 cd /mnt2; sh for a in /mnt/*/binary/sets/[bcekmt]*.tgz; do echo $a; tar zxfp $a; done exit cd dev; sh ./MAKEDEV all; cd ../etc echo rc_configured=YES >> rc.conf echo "/dev/wd0d / ffs rw 1 1" > fstab cd /; umount /mnt; umount /mnt2; halt |
You should now be able to boot NetBSD/cobalt like this:
gxemul -E cobalt -d nbsd_cobalt.img netbsd-GENERIC.gzNote that the installation instructions above create a filesystem without a disklabel, so there is only one ffs partition and no swap. You will need to enter the following things when booting with the generic kernel:
	root device (default wd0a): wd0d
	dump device (default wd0b): none
	file system (default generic): ffs
	init path (default /sbin/init):     (just press enter here)
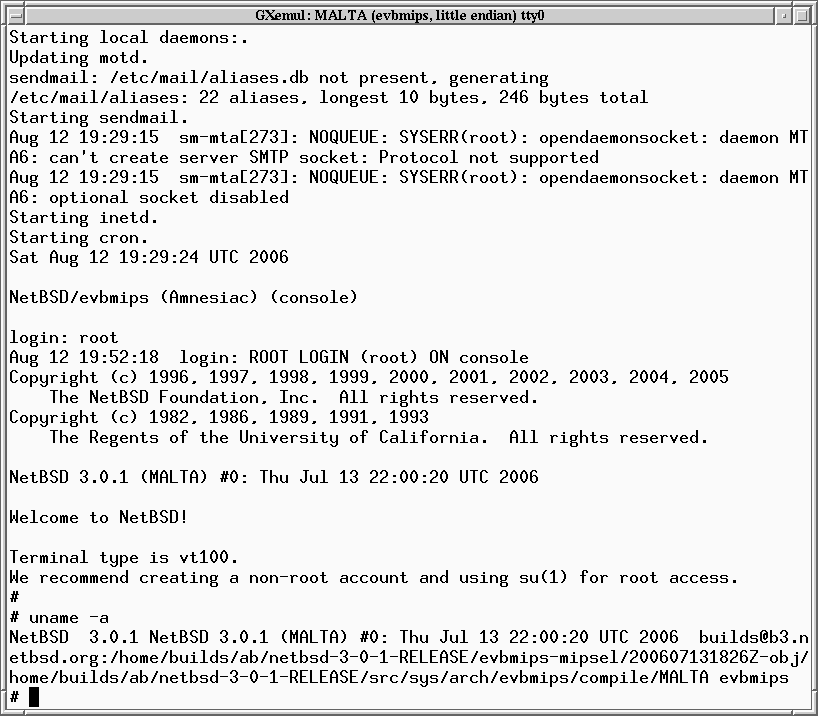
One way to install the NetBSD/evbmips distribution onto a disk image is to install the files using another (emulated) machine.
The following instructions will let you install NetBSD/evbmips onto a disk image, from an emulated DECstation 3MAX machine:
ftp://ftp.netbsd.org/pub/NetBSD/NetBSD-4.0/pmax/binary/kernel/netbsd-INSTALL.gz
dd if=/dev/zero of=nbsd_malta.img bs=1024 count=1 seek=700000
	ftp://ftp.netbsd.org/pub/NetBSD/NetBSD-4.0/evbmips/binary/kernel/netbsd-MALTA.gz
	ftp://ftp.netbsd.org/pub/NetBSD/NetBSD-4.0/iso/evbmips-mipselcd-4.0.iso
gxemul -e 3max -d nbsd_malta.img -d evbmips-mipselcd-4.0.iso netbsd-INSTALL.gz
newfs /dev/sd0c mount /dev/cd0c /mnt mkdir /mnt2; mount /dev/sd0c /mnt2 cd /mnt2; sh for a in /mnt/*/binary/sets/[bcemt]*.tgz; do echo $a; tar zxfp $a; done exit cd dev; sh ./MAKEDEV all; cd ../etc echo rc_configured=YES >> rc.conf echo "/dev/wd0c / ffs rw 1 1" > fstab cd /; umount /mnt; umount /mnt2; halt |
You should now be able to boot NetBSD/evbmips using this command:
gxemul -x -e malta -d nbsd_malta.img netbsd-MALTA.gz
NOTE: To select a 4Kc (MIPS32) CPU instead of the default 5Kc (MIPS64) CPU, add -C 4Kc to the command line. With NetBSD 4.0, however, there will be little or no difference in functionality, as NetBSD still runs in 32-bit mode on 64-bit MIPS CPUs. There are two things that differ:
The installation instructions above create a filesystem without a disklabel, so there is only one ffs partition and no swap. You will need to enter the following things when booting with the generic kernel:
	root device (default wd0a): wd0c
	dump device (default wd0b):		(just press enter)
	file system (default generic):		(just press enter)
	init path (default /sbin/init):		(just press enter)
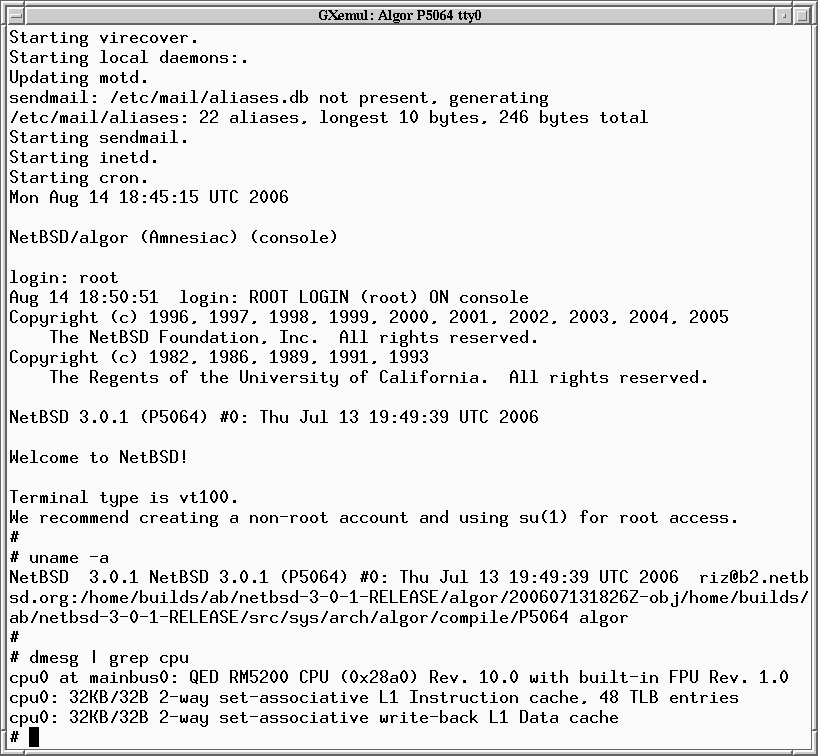
One way to install the NetBSD/algor distribution onto a disk image is to install the files using another (emulated) machine.
The following instructions will let you install NetBSD/algor onto a disk image, from an emulated DECstation 3MAX machine:
ftp://ftp.netbsd.org/pub/NetBSD/NetBSD-3.1/pmax/binary/kernel/netbsd-INSTALL.gz
dd if=/dev/zero of=nbsd_algor.img bs=1024 count=1 seek=700000
	ftp://ftp.netbsd.org/pub/NetBSD/NetBSD-3.1/algor/binary/kernel/netbsd-P5064.gz
	ftp://ftp.netbsd.org/pub/NetBSD/iso/3.1/algorcd-3.1.iso
gxemul -e 3max -d nbsd_algor.img -d algorcd-3.1.iso netbsd-INSTALL.gz
newfs /dev/sd0c mount /dev/cd0c /mnt mkdir /mnt2; mount /dev/sd0c /mnt2 cd /mnt2; sh for a in /mnt/*/binary/sets/[bcekmt]*.tgz; do echo $a; tar zxfp $a; done exit cd dev; sh ./MAKEDEV all; cd ../etc echo rc_configured=YES >> rc.conf echo "/dev/wd0c / ffs rw 1 1" > fstab cd /; umount /mnt; umount /mnt2; halt |
You should now be able to boot NetBSD/algor using this command:
gxemul -x -e p5064 -d nbsd_algor.img netbsd-P5064.gz
The installation instructions above create a filesystem without a disklabel, so there is only one ffs partition and no swap. You will need to enter the following things when booting with the generic kernel:
	root device (default wd0a): wd0c
	dump device (default wd0b):		(just press enter)
	file system (default generic):		(just press enter)
	init path (default /sbin/init):		(just press enter)
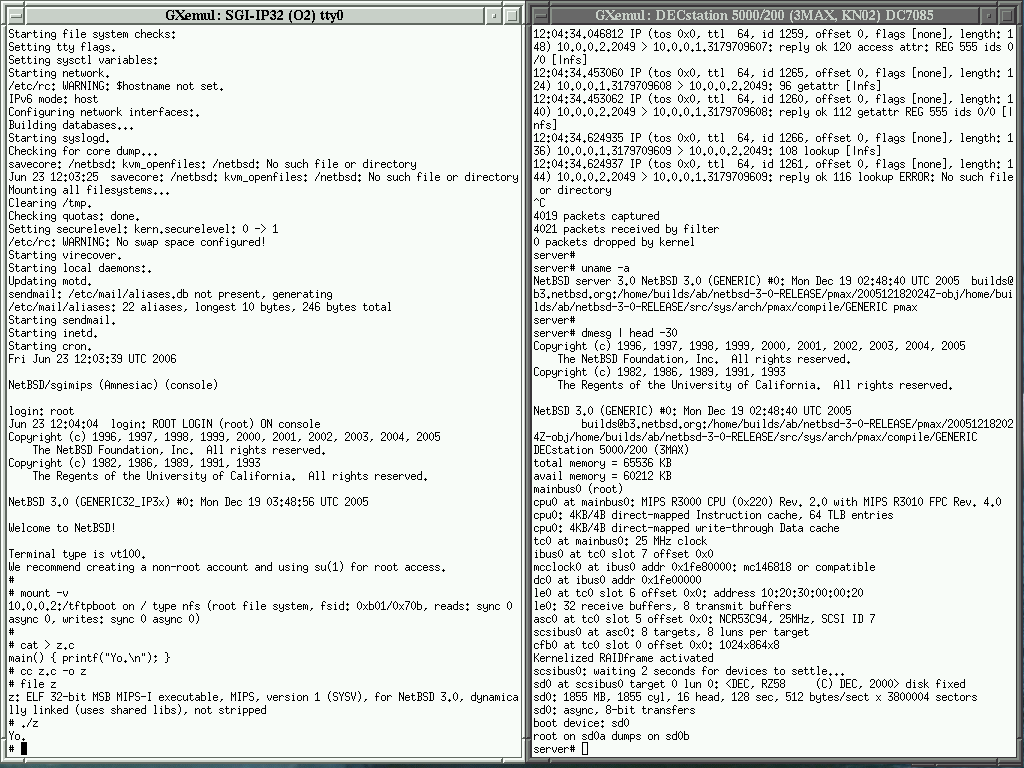
NetBSD/sgimips can run in GXemul on an emulated O2 (SGI-IP32). However, GXemul does not yet emulate the AHC PCI SCSI controller in the O2. (I have mailed Adaptec several times, asking for documentation, but never received any reply.) NetBSD can still run in the emulator, as long as it doesn't use SCSI.
For a simple test with the ramdisk/install kernel, try dowloading
ftp://ftp.NetBSD.org/pub/NetBSD/NetBSD-3.1/sgimips/binary/kernel/netbsd-INSTALL32_IP3x.gzand run gxemul -x -e o2 netbsd-INSTALL32_IP3x.gz.
It is possible to set up an environment for netbooting the emulated SGI machine off of another emulated machine. Performing this setup is quite time consuming, but necessary:
gxemul -e 3max -d nbsd_pmax.imgand enter the following commands as root inside the emulator:
echo hostname=server >> /etc/rc.conf
echo ifconfig_le0=\"inet 10.0.0.2\" >> /etc/rc.conf
echo nameserver 10.0.0.254 >> /etc/resolv.conf
echo 10.0.0.254 > /etc/mygate
echo /tftpboot -maproot=root 10.0.0.1 > /etc/exports
echo rpcbind=YES >> /etc/rc.conf
echo nfs_server=YES >> /etc/rc.conf
echo mountd=YES >> /etc/rc.conf
echo bootparamd=YES >> /etc/rc.conf
printf "client root=10.0.0.2:/tftpboot \\\n swap=10.0.0.2:/tftpboot/swap\n" > /etc/bootparams
echo "bootps dgram udp wait root /usr/sbin/bootpd bootpd -d 4 -h 10.0.0.2" >> /etc/inetd.conf
cat >> /etc/bootptab
client:\
        :ht=ether:\
        :ha=102030000010:\
        :sm=255.0.0.0:\
        :lg=10.0.0.254:\
        :ip=10.0.0.1:\
        :rp=/tftpboot:
(press CTRL-D)
echo "10:20:30:00:00:10 client" > /etc/ethers
echo 10.0.0.1 client > /etc/hosts
reboot
|
	ftp://ftp.netbsd.org/pub/NetBSD/iso/3.1/sgimipscd-3.1.iso
	ftp://ftp.NetBSD.org/pub/NetBSD/NetBSD-3.1/sgimips/binary/kernel/netbsd-GENERIC32_IP3x.gz
	ftp://ftp.NetBSD.org/pub/NetBSD/NetBSD-3.1/sgimips/binary/kernel/netbsd-INSTALL32_IP3x.gz
gxemul -e 3max -d nbsd_pmax.img -d sgimipscd-3.1.isoand extract the files from the sgimips CD-ROM image to the DECstation disk image:
cd /tftpboot; mount /dev/cd0a /mnt for a in /mnt/*/binary/sets/[bcegmt]*; do echo $a; tar zxfp $a; done echo 10.0.0.2:/tftpboot / nfs rw 0 0 > /tftpboot/etc/fstab echo rc_configured=YES >> /tftpboot/etc/rc.conf echo 10.0.0.254 >> /tftpboot/etc/mygate echo nameserver 10.0.0.254 >> /tftpboot/etc/resolv.conf echo rc_configured=YES >> /tftpboot/etc/rc.conf dd if=/dev/zero of=swap bs=1024 count=65536 cd /; umount /mnt; halt |
!  Configuration file for running NetBSD/sgimips diskless with
!  a NetBSD/pmax machine as the nfs server.

net(
	add_remote("localhost:12444")   ! the server
	local_port(12445)               ! the client
)

machine(
	name("client machine")
	serial_nr(1)

        type("sgi")
        subtype("o2")

        load("netbsd-INSTALL32_IP3x.gz")
        ! load("netbsd-GENERIC32_IP3x.gz")
)
|
net(
	local_port(12444)               ! the server
	add_remote("localhost:12445")   ! the client
)

machine(
	name("nfs server")
	serial_nr(2)

        type("dec")
        subtype("5000/200")

        disk("nbsd_pmax.img")
)
|
	in one xterm:
	gxemul @config_server

	and then, in another xterm:
	gxemul @config_client
	ifconfig mec0 10.0.0.1; route add default 10.0.0.254
	mount -v 10.0.0.2:/tftpboot /mnt
	cd /mnt/dev; ./MAKEDEV all; cd /; umount /mnt
	halt
Then, once the client machine has halted, log in as root on the server machine and type reboot.
You might want to log in as root on the server machine, and run tcpdump -lnvv or similar, to see that what the client machine actually does on the network.
It should now be possible to boot NetBSD/sgimips using the NetBSD/pmax nfs server, using the following commands: (NOTE! Execute these two commands in separate xterms!)
	gxemul @config_server
	gxemul @config_client
When asked for "root device:" etc. on the client machine, enter the following values:
	root device: mec0
	dump device: 				(leave blank)
	file system (default generic): 		(leave blank)
	..
	init path (default /sbin/init):		(leave blank)
	Enter pathname of shell or RETURN for /bin/sh:	(leave blank)
	Terminal type? [unknown] xterm
	..
	# exit			(to leave the single-user shell)
Note: Netbooting like this is very slow, so you need a lot of patience. For example, when NetBSD says "nfs_boot: trying DHCP/BOOTP", there will be a long pause, even on a very fast host machine. The reason for this is mostly because the emulator doesn't deal with timing issues very well, but also because NetBSD tries IPv6 first, before falling back to IPv4.
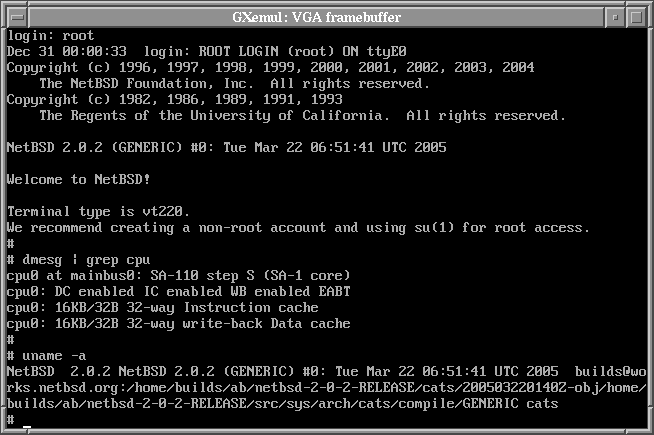
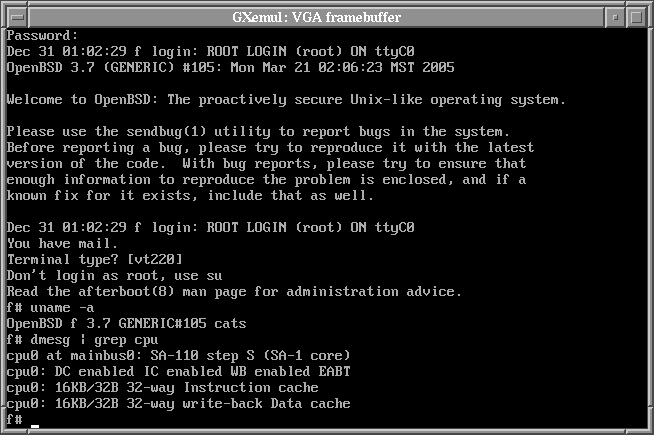
To install NetBSD/cats onto a disk image, follow these instructions:
dd if=/dev/zero of=nbsd_cats.img bs=1024 count=1 seek=3000000
	ftp://ftp.netbsd.org/pub/NetBSD/iso/4.0/catscd-4.0.iso
	ftp://ftp.netbsd.org/pub/NetBSD/NetBSD-4.0/cats/binary/kernel/netbsd.aout-GENERIC.gz
	ftp://ftp.netbsd.org/pub/NetBSD/NetBSD-4.0/cats/binary/kernel/netbsd.aout-INSTALL.gz
gxemul -XEcats -d nbsd_cats.img -d catscd-4.0.iso netbsd.aout-INSTALL.gzand proceed like you would do if you were installing NetBSD on a real CATS from CDROM.
Alternatively, to install from FTP, you can skip downloading the ISO, and start the install without -d catscd-4.0.iso. Suitable network settings are IP 10.0.0.1, gateway/default route 10.0.0.254, netmask 255.0.0.0, nameserver 10.0.0.254.
If everything worked, NetBSD should now be installed on the disk image. Use the following command line to boot the emulated CATS machine:
gxemul -XEcats -d nbsd_cats.img netbsd.aout-GENERIC.gz

It is tricky to install, because there is (as far as I know) no INSTALL kernel. One way to install the NetBSD/evbarm distribution onto a disk image is to install the files using another (emulated) machine.
The following instructions will let you install NetBSD/evbarm onto a disk image, from an emulated CATS machine:
wget ftp://ftp.netbsd.org/pub/NetBSD/NetBSD-3.1/cats/binary/kernel/netbsd.aout-INSTALL.gz
dd if=/dev/zero of=nbsd_iq80321.img bs=1024 count=1 seek=999000
	ftp://ftp.netbsd.org/pub/NetBSD/NetBSD-2.1/evbarm/binary/kernel/netbsd-wd0-IQ80321.gz
	ftp://ftp.netbsd.org/pub/NetBSD/iso/2.1/evbarmcd.iso
gxemul -XEcats -d nbsd_iq80321.img -d evbarmcd.iso netbsd.aout-INSTALL.gzExit from the installer, and execute the following commands as root:
disklabel -I -i wd0
    (enter suitable commands, e.g. a, 4.2BSD, 1c, 750M, b,
     swap, a, 200M, P, W, y, Q)
newfs /dev/wd0a; mount /dev/wd0a /mnt2; cd /mnt2
mount /dev/cd0a /mnt; sh
for a in /mnt/*/binary/sets/[bcegmt]*.tgz; do echo $a; tar zxfp $a; done
exit
cd dev; sh ./MAKEDEV all; cd ../etc
echo rc_configured=YES >> rc.conf
echo "/dev/wd0a / ffs rw 1 1" > fstab
echo "/dev/wd0b none swap sw 0 0" >> fstab
cd /; umount /mnt; umount /mnt2; sync; halt
|
You should now be able to boot NetBSD/evbarm using this command:
gxemul -x -E iq80321 -d nbsd_iq80321.img netbsd-wd0-IQ80321.gz
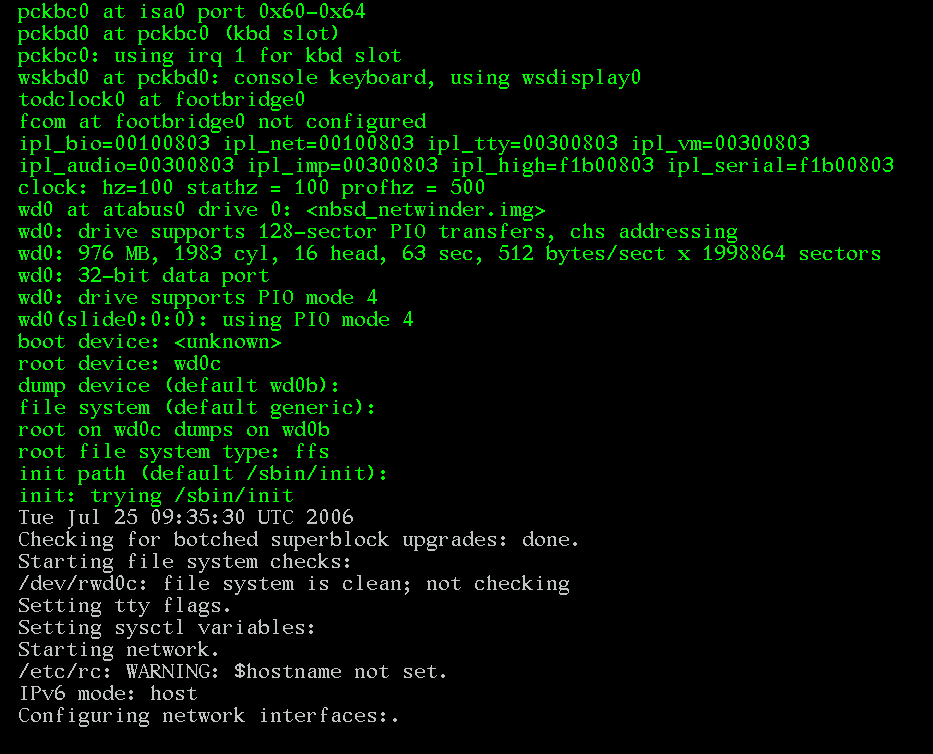
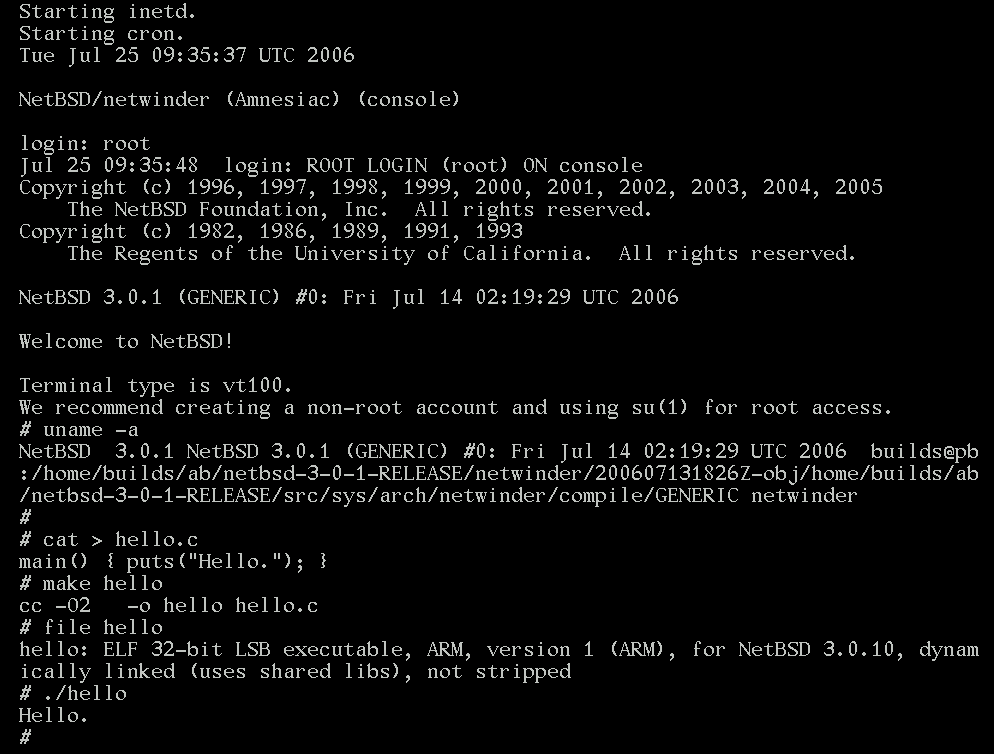
There is no INSTALL ramdisk kernel, so one way to install the NetBSD/netwinder distribution onto a disk image is to install the files using another (emulated) machine. The following instructions will let you install the NetBSD/netwinder distribution onto a disk image, from an emulated DECstation 3MAX machine:
ftp://ftp.netbsd.org/pub/NetBSD/NetBSD-3.1/pmax/binary/kernel/netbsd-INSTALL.gz
dd if=/dev/zero of=nbsd_netwinder.img bs=1024 count=1 seek=999000
	ftp://ftp.netbsd.org/pub/NetBSD/NetBSD-3.1/netwinder/binary/kernel/netbsd-GENERIC.gz
	ftp://ftp.netbsd.org/pub/NetBSD/iso/3.1/netwindercd-3.1.iso
gxemul -e 3max -d nbsd_netwinder.img -d netwindercd-3.1.iso netbsd-INSTALL.gz
newfs /dev/sd0c mount /dev/cd0c /mnt mkdir /mnt2; mount /dev/sd0c /mnt2 cd /mnt2; sh for a in /mnt/*/binary/sets/*.tgz; do echo $a; tar zxfp $a; done exit cd dev; sh ./MAKEDEV all; cd ../etc echo rc_configured=YES >> rc.conf echo "/dev/wd0c / ffs rw 1 1" > fstab cd /; umount /mnt; umount /mnt2; halt |
NetBSD/netwinder is now installed on the disk image. The following command line can be used to start NetBSD/netwinder:
gxemul -X -E netwinder -d nbsd_netwinder.img netbsd-GENERIC.gz
This will result in a 1024x768 framebuffer. Add -Y2 to the command line if you want to scale it down to 512x384.
Note: The installation instructions above create a filesystem without a disklabel, so there is only one ffs partition and no swap. You will need to enter the following things when booting with the generic kernel:
	root device (default wd0a): wd0c
	dump device (default wd0b): (just press enter)
	file system (default generic):    (just press enter)
	init path (default /sbin/init):   (just press enter)
Known bugs/problems:

To install NetBSD/prep onto a disk image, follow these instructions:
dd if=/dev/zero of=nbsd_prep.img bs=1024 count=1 seek=1000000
    ftp://ftp.netbsd.org/pub/NetBSD/iso/2.1/prepcd.iso
    ftp://ftp.netbsd.org/pub/NetBSD/NetBSD-2.1/prep/binary/kernel/netbsd-GENERIC.gz
gxemul -X -e ibm6050 -d nbsd_prep.img -d rdb:prepcd.iso -j prep/binary/kernel/netbsd-INSTALL.gz
At "(I)nstall, (S)hell, or (H)alt", choose
s.
# fdisk -u wd0
Do you want to change our idea of what BIOS thinks? [n]
(just press ENTER)
Which partition do you want to change?: [none] 0
sysid: ... (just press ENTER)
start: ... 1cyl
size: ... (just press ENTER)
Which partition do you want to change?: [none] (press ENTER)
Should we write new partition table? [n] y
# disklabel -I -i wd0
partition> a
Filesystem type [?] [unused]: 4.2BSD
Start offset ('x' to start after partition 'x') [0c, 0s, 0M]: 1c
Partition size ('$' for all remaining) [0c, 0s, 0M]: 900M
partition> b
Filesystem type [?] [unused]: swap
Start offset ('x' to start after partition 'x') [0c, 0s, 0M]: a
Partition size ('$' for all remaining) [0c, 0s, 0M]: $
partition> W
Label disk [n]? y
partition> Q
# newfs wd0a
# sysinst
Choose to install onto wd0. Choose
"a: Edit the MBR partition table"
when presented with that option.
Choose the 'a' partition/slice,
set the 'e' ("active") and 'f' ("install") fields to Yes,
and then choose "x: Partition table OK".
Choose "b: Use existing partition sizes" in the next
menu.
Select partition 'a' and press ENTER. Set field 'k' (mount point)
to '/'.
Get out of the partitioner by selecting
"x: Partition sizes ok" twice.
At "Write outside MBR partition? [n]:", just press
ENTER.
Install from CD-ROM, device wd1c.
If everything worked, NetBSD should now be installed on the disk image. Use the following command line to boot the emulated machine:
gxemul -X -e ibm6050 -d nbsd_prep.img netbsd-GENERIC.gz
When asked which the root device is, type wd0 and just press ENTER to select the default values for dump device, file system type, and init path.
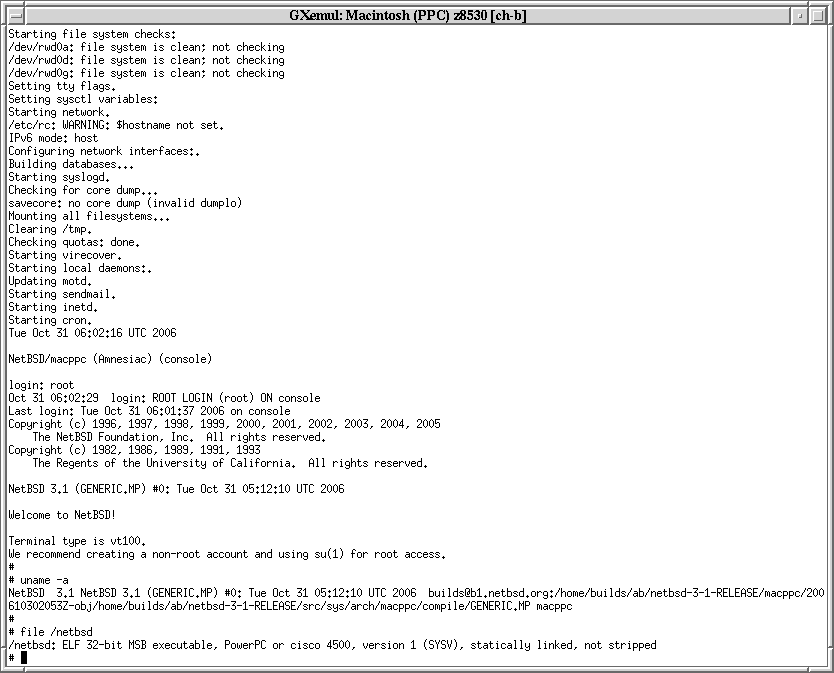
To install NetBSD/macppc onto a disk image, follow these instructions:
dd if=/dev/zero of=nbsd_macppc.img bs=1024 count=1 seek=3000000
    ftp://ftp.netbsd.org/pub/NetBSD/iso/4.0/macppccd-4.0.iso
    ftp://ftp.netbsd.org/pub/NetBSD/NetBSD-4.0/macppc/binary/kernel/netbsd-GENERIC.MP.gz
gxemul -x -e g4 -d nbsd_macppc.img -d b:macppccd-4.0.iso -j macppc/binary/kernel/netbsd-INSTALL
and continue as you would do when installing NetBSD on a real
machine.
If everything worked, NetBSD/macppc should now be installed on the disk image.
Use the following command line to boot the emulated machine:
gxemul -x -e g4 -d nbsd_macppc.img netbsd-GENERIC.MP.gz
If asked about root device, enter wd0.
NetBSD/pmppc can run in GXemul on an emulated Artesyn PM/PPC board. Currently, no SCSI or other disk controller is emulated for this machine type, but it is possible to run NetBSD with root-on-nfs.
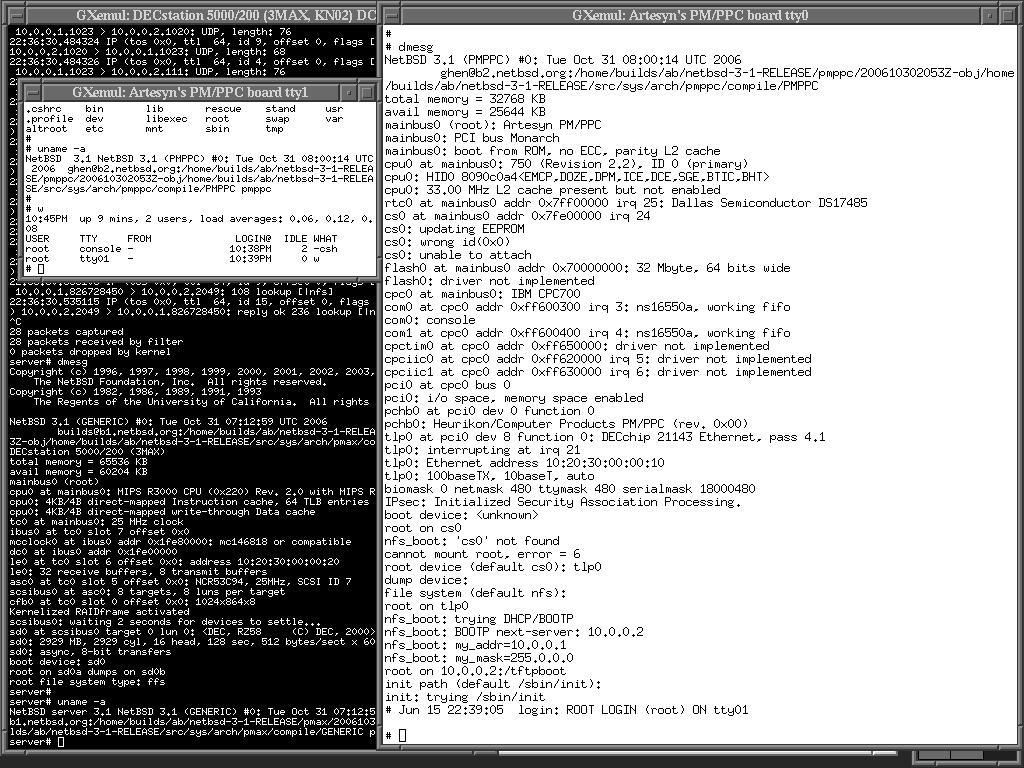
These setup steps will let you run NetBSD/pmppc with root-on-nfs:
gxemul -e 3max -d nbsd_pmax.imgand enter the following commands as root inside the emulator:
echo hostname=server >> /etc/rc.conf
echo ifconfig_le0=\"inet 10.0.0.2\" >> /etc/rc.conf
echo nameserver 10.0.0.254 >> /etc/resolv.conf
echo 10.0.0.254 > /etc/mygate
echo /tftpboot -maproot=root 10.0.0.1 > /etc/exports
echo rpcbind=YES >> /etc/rc.conf
echo nfs_server=YES >> /etc/rc.conf
echo mountd=YES >> /etc/rc.conf
echo bootparamd=YES >> /etc/rc.conf
printf "client root=10.0.0.2:/tftpboot \\\n swap=10.0.0.2:/tftpboot/swap\n" > /etc/bootparams
echo "bootps dgram udp wait root /usr/sbin/bootpd bootpd -d 4 -h 10.0.0.2" >> /etc/inetd.conf
cat >> /etc/bootptab
client:\
        :ht=ether:\
        :ha=102030000010:\
        :sm=255.0.0.0:\
        :lg=10.0.0.254:\
        :ip=10.0.0.1:\
        :rp=/tftpboot:
(press CTRL-D)
echo "10:20:30:00:00:10 client" > /etc/ethers
echo 10.0.0.1 client > /etc/hosts
reboot
|
	ftp://ftp.netbsd.org/pub/NetBSD/iso/3.1/pmppccd-3.1.iso
	ftp://ftp.NetBSD.org/pub/NetBSD/NetBSD-3.1/pmppc/binary/kernel/netbsd-PMPPC.gz
gxemul -e 3max -d nbsd_pmax.img -d pmppccd-3.1.isoand extract the files from the PM/PPC CD-ROM image to the DECstation disk image:
cd /tftpboot; mount /dev/cd0a /mnt for a in /mnt/*/binary/sets/[bcemt]*; do echo $a; tar zxfp $a; done echo 10.0.0.2:/tftpboot / nfs rw 0 0 > /tftpboot/etc/fstab echo rc_configured=YES >> /tftpboot/etc/rc.conf echo 10.0.0.254 >> /tftpboot/etc/mygate echo nameserver 10.0.0.254 >> /tftpboot/etc/resolv.conf echo rc_configured=YES >> /tftpboot/etc/rc.conf dd if=/dev/zero of=swap bs=1024 count=65536 cd /tftpboot/dev; sh MAKEDEV all cd /; umount /mnt; halt |
!  Configuration file for running NetBSD/pmppc diskless with
!  a NetBSD/pmax machine as the nfs server.

net(
	add_remote("localhost:12444")   ! the server
	local_port(12445)               ! the client
)

machine(
	name("client machine")
	serial_nr(1)

        type("pmppc")

        load("netbsd-PMPPC.gz")
)
|
net(
	local_port(12444)               ! the server
	add_remote("localhost:12445")   ! the client
)

machine(
	name("nfs server")
	serial_nr(2)

        type("dec")
        subtype("5000/200")

        disk("nbsd_pmax.img")
)
|
It should now be possible to boot NetBSD/pmppc using the NetBSD/pmax nfs server, using the following commands: (NOTE! Execute these two commands in separate xterms!)
	gxemul @config_server
	gxemul @config_client
You might want to log in as root on the server machine, and run tcpdump -lnvv or similar, to see that what the client machine actually does on the network.
When asked for "root device:" etc. on the client machine, enter the following values:
	root device: tlp0
	dump device: 				(leave blank)
	file system (default generic): 		(leave blank)
	..
	init path (default /sbin/init):		(leave blank)
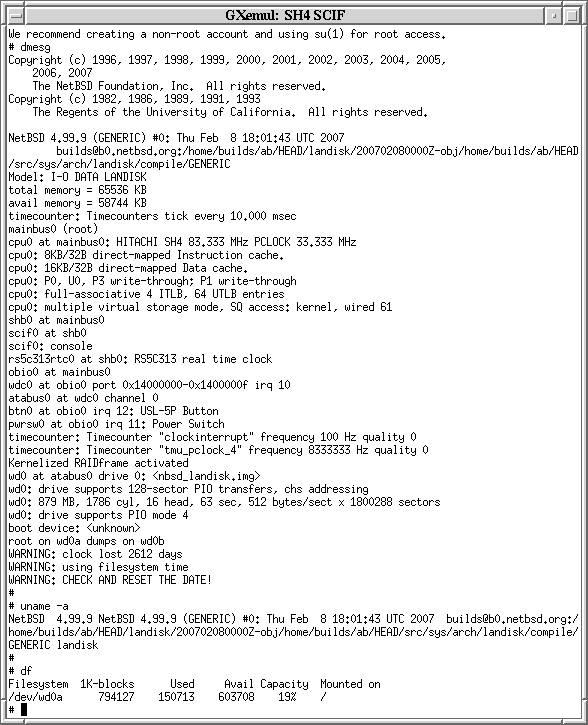
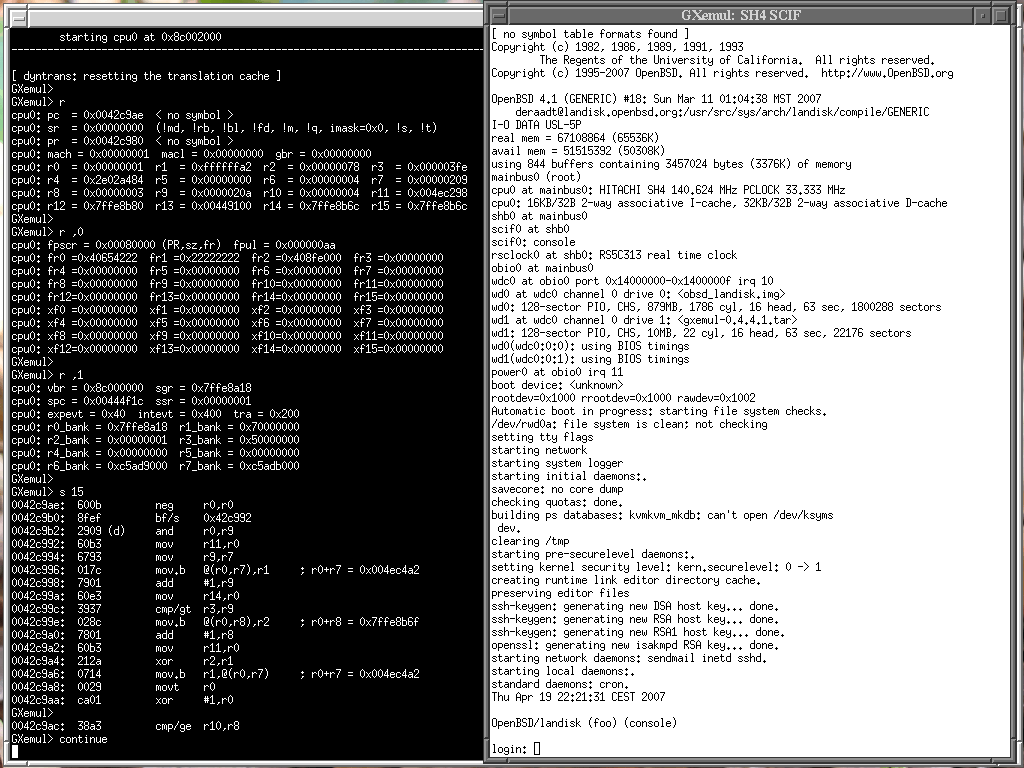
The NetBSD/landisk distribution does not include any INSTALL kernel, so it must be installed using another (emulated) machine.
The following instructions will let you install NetBSD/landisk onto a disk image, using an emulated CATS machine:
ftp://ftp.netbsd.org/pub/NetBSD/NetBSD-4.0/cats/binary/kernel/netbsd.aout-INSTALL.gz
dd if=/dev/zero of=nbsd_landisk.img bs=1024 count=1 seek=900000
	wget -np -l 0 -r ftp://ftp.netbsd.org/pub/NetBSD/NetBSD-4.0/landisk
	cp ftp.netbsd.org/pub/NetBSD/NetBSD-4.0/landisk/binary/kernel/netbsd-GENERIC.gz .
	mkisofs -U -o landisk.iso ftp.netbsd.org/pub/NetBSD/NetBSD-4.0
gxemul -XEcats -d nbsd_landisk.img -d landisk.iso netbsd.aout-INSTALL.gz
disklabel -i -I wd0    (for example 'a', '4.2BSD', '1c',
    '700M', 'b', 'swap', '701M', '$', 'P', 'W', 'y', and 'Q')
newfs /dev/wd0a
mount /dev/cd0c /mnt
mkdir /mnt2; mount /dev/wd0a /mnt2
cd /mnt2; sh
ls -R /mnt
for a in /mnt/*/binary/sets/[bcekmt]*.tgz; do ls -R /mnt > /dev/null; echo $a; tar zxfp $a; done
exit
cd dev; sh ./MAKEDEV all; cd ../etc
echo rc_configured=YES >> rc.conf
echo "/dev/wd0a / ffs rw 1 1" > fstab
echo "/dev/wd0b none swap sw 0 0" >> fstab
cd /; umount /mnt; umount /mnt2; halt
|
NOTE: For some reason, reading the iso image created by mkisofs does not work as expected. The "ls -R /mnt" commands included above seem to make it work. (Yes, this is a serious bug, but I am not sure how to diagnose it.)
You should now be able to boot NetBSD/landisk using this command:
gxemul -x -E landisk -d nbsd_landisk.img netbsd-GENERIC.gz
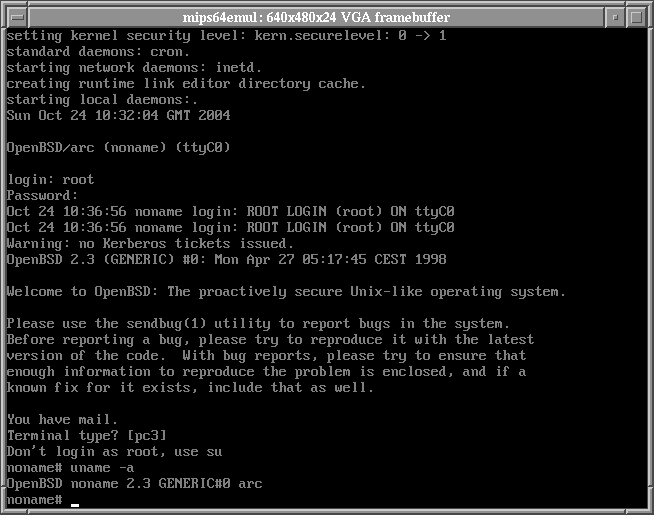
OpenBSD/pmax died at release 2.8 of OpenBSD, so you should be aware of the fact that this will not give you an up-to-date OpenBSD system.
Following these instructions might work. If not, then use common sense and imagination to modify them as you see fit.
dd if=/dev/zero of=obsd_pmax.img bs=1 count=512 seek=900000000
wget -r ftp://ftp.se.openbsd.org/pub/OpenBSD/2.8/pmax/
mv ftp.se.openbsd.org/pub/OpenBSD/2.8/pmax/simpleroot28.fs.gz . gunzip simpleroot28.fs.gz chmod +w simpleroot28.fs <--- make sure |
	mkisofs -o openbsd_pmax_2.8.iso ftp.se.openbsd.org/pub/OpenBSD/2.8/pmax
	rm -rf ftp.se.openbsd.org      (this directory is not needed anymore)
gxemul -e 3max -d obsd_pmax.img -d b:simpleroot28.fs -j bsd -d c:openbsd_pmax_2.8.iso(If you add -X, you will run with the graphical framebuffer. This is REALLY slow because the console has to scroll a lot during the install. I don't recommend it.)
	fsck /dev/rz1a        (and mark the filesystem as clean)
	mount /dev/rz1a /
	mkdir /kern
	mkdir /mnt2
	mount -t kernfs kern kern
	./install
and proceed with the install. Good luck. :-)
gxemul -e 3max -d obsd_pmax.img -d 2c:openbsd_pmax_2.8.iso -j bsd -o '-s'While you are at it, you might want to extract the X11 install sets as well, as the installer seems to ignore them too. (Perhaps due to a bug in the installer, perhaps because of the way I used mkisofs.)
Execute the following commands in the emulator:
fsck /dev/rz0a mount / passwd root cd /; mount -t cd9660 /dev/rz2c /mnt; sh for a in /mnt/[xX]*; do tar zxvf $a; done ln -s /usr/X11R6/bin/Xcfbpmax /usr/X11R6/bin/X ln -s /dev/fb0 /dev/mouse echo /usr/X11R6/lib >> /etc/ld.so.conf ldconfig sync halt |
NOTE: It is also possible to install via ftp instead of using a CDROM image. This is not much less awkward, you still need the simpleroot filesystem image, and you still have to manually add the X11 install sets and set the root password, and so on.
Once you have completed the installation procedure, the following command will let you boot from the new rootdisk image:
gxemul -e 3max -X -o '-aN' -d obsd_pmax.img -j bsd
(Normally, you would be asked about which root device to use (rz0), but using -o '-aN' supresses that.)
When asked for which terminal type to use, when logging in as root,
enter rcons if you are using the graphical framebuffer,
vt100 for text-mode.
Use startx to start X windows.
To install OpenBSD/cats onto an emulated harddisk image, follow these instructions:
dd if=/dev/zero of=obsd_cats.img bs=1024 count=1 seek=1900000
	wget -np -l 0 -r ftp://ftp.se.openbsd.org/pub/OpenBSD/4.0/cats/
	cp ftp.se.openbsd.org/pub/OpenBSD/4.0/cats/bsd .
	cp ftp.se.openbsd.org/pub/OpenBSD/4.0/cats/bsd.rd .
(Replace ftp.se.openbsd.org with a server closer to you, for increased download speed.)
	mkisofs -allow-lowercase -o openbsd_cats_4.0.iso ftp.se.openbsd.org/pub/OpenBSD/
	rm -rf ftp.se.openbsd.org      (this directory is not needed anymore)
gxemul -XEcats -d obsd_cats.img -d openbsd_cats_4.0.iso bsd.rdand proceed like you would do if you were installing OpenBSD on a real CATS. (Install onto wd0, don't configure the network, install from CD.)
(Although it is possible to configure the network, IPv4 address 10.0.0.1, netmask 255.0.0.0, gateway/default route 10.0.0.254, and nameserver 10.0.0.254, the userland NAT-like networking layer is not stable enough yet to support a full install via ftp.)
NOTE: Make sure that you sync and reboot correctly once the installation is finished, or the /dev nodes may not have been written correctly to disk.
Once the install has finished, the following command should let you boot from the harddisk image:
gxemul -XEcats -d obsd_cats.img bsd
To install OpenBSD/landisk onto an emulated harddisk image, follow these instructions:
dd if=/dev/zero of=obsd_landisk.img bs=1024 count=1 seek=2000000
	wget -np -l 0 -r ftp://ftp.se.openbsd.org/pub/OpenBSD/4.2/landisk/
	cp ftp.se.openbsd.org/pub/OpenBSD/4.2/landisk/bsd .
	cp ftp.se.openbsd.org/pub/OpenBSD/4.2/landisk/bsd.rd .
(Replace ftp.se.openbsd.org with a server closer to you, for increased download speed.)
	mkisofs -U -o openbsd_landisk_4.2.iso ftp.se.openbsd.org/pub/OpenBSD/
	rm -rf ftp.se.openbsd.org      (this directory is not needed anymore)
gxemul -x -E landisk -d obsd_landisk.img -d d:openbsd_landisk_4.2.iso bsd.rdand proceed like you would do if you were installing OpenBSD on a real landisk. The following hints are useful to get you through the installation:
Once the install has finished, the following command should let you boot from the disk image:
gxemul -x -E landisk -d obsd_landisk.img bsd
As with most emulation modes in GXemul, the NIC in this machine is not emulated yet. If you want to transfer files to/from the emulated landisk machine, see this chapter in the documentation.
To run HelenOS for ARM in GXemul:
http://www.helenos.eu/releases/HelenOS-0.2.0.5-arm32-gxemul.boot
gxemul -X -E testarm HelenOS-0.2.0.5-arm32-gxemul.boot
To run HelenOS for MIPS in GXemul:
http://www.helenos.eu/releases/HelenOS-0.2.0.5-mips32-gxemul.boot
gxemul -X -E testmips -C 5Kc HelenOS-0.2.0.5-mips32-gxemul.boot(Note the -C 5Kc option.)
Once the kernel has booted, you can press e.g. F2 to get to the Tetris task, or F12 to enter the kernel console.
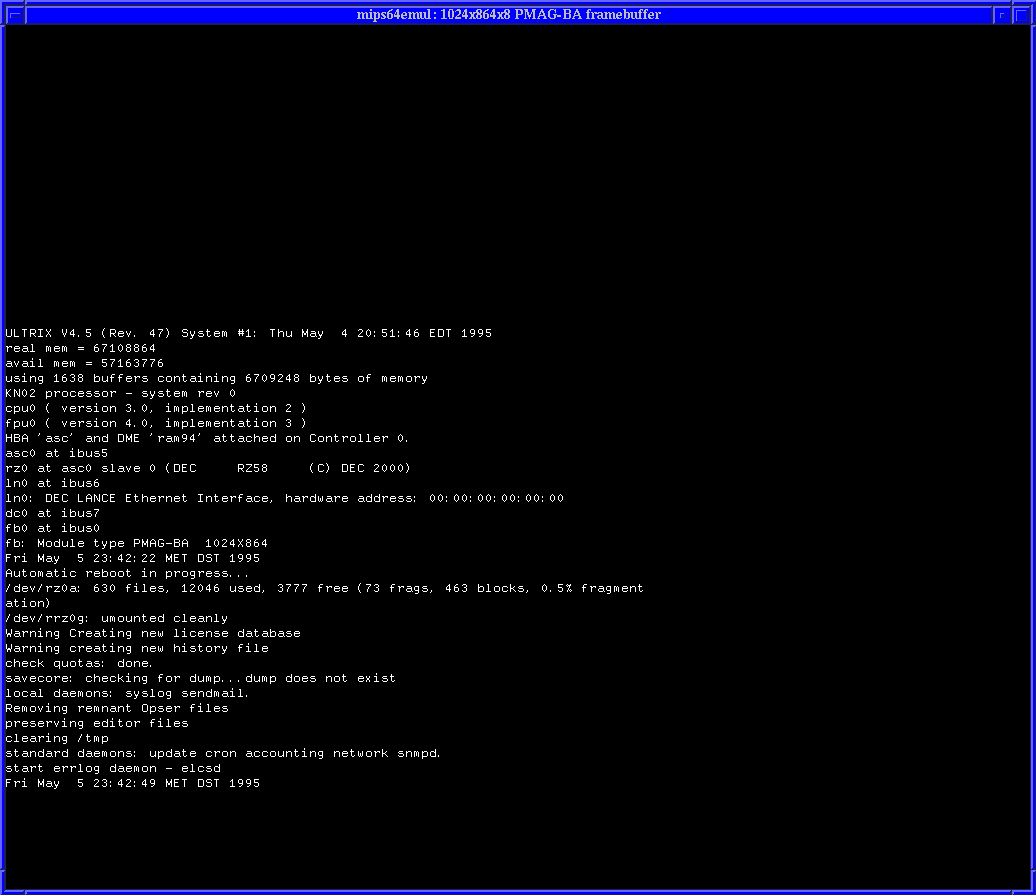
The following instructions should let you install Ultrix onto a disk image:
dd if=/dev/zero of=rootdisk.img bs=1024 count=1 seek=800000
gxemul -X -e 3max -d rootdisk.img -d bc:/dev/cd0c -j vmunix
gxemul -X -e 3max -d rootdisk.img -d c:/dev/cd0c -j vmunix
When the installation is completed, the following command should start Ultrix from the harddisk image:
gxemul -X -e 3max -j vmunix -d rootdisk.img
If you have a very fast host machine, you might experience a weird timer related bug, which makes it impossible to logon to the system. It is triggered when the emulation goes faster than any real DECstation machine was capable of running. A temporary workaround is to add -I33000000 to fix the emulated clock speed to 33 million instructions per emulated second.
If the workaround above doesn't work, you can also start up other processes on the host, apart from the emulator, so that the emulator runs more slowly. This is an ugly workaround, but seems to work. Once you have logged in into Ultrix, you can kill the extra processes.
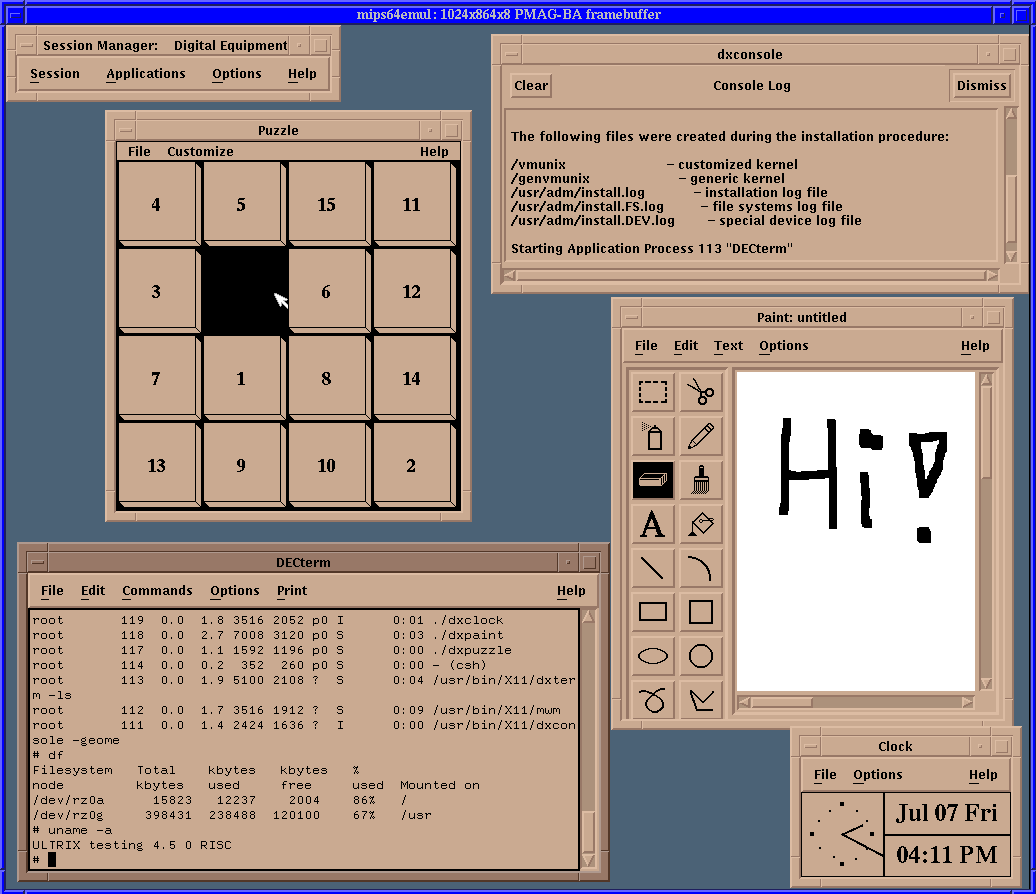
You can experiment with adding -Z2 (for emulating a dual-headed workstation) or even -Z3 (tripple-headed), and also the -Y2 option for scaling down the framebuffer windows by a factor 2x2. There is also a -z option for supplying names of X11 displays to use. The following example starts Ultrix on an emulated tripple-headed workstation, on three different displays (remote1:0.0, localhost:0.0, and remote2:0.0), using no scaledown:
        gxemul -N -e 3max -jgenvmunix -d rootdisk.img \
            -XZ3 -z remote1:0.0 -z localhost:0.0 -z remote2:0.0
The photo below shows a single Ultrix session running tripple-headed in GXemul on an Alpha 21164PC, with displays on a Sun Ultra1 (to the left), on the Alpha itself (in the middle), and on an HP700/RX X-terminal (8-bit color depth, running off the Alpha) to the right.
The X11 displays may differ in bit depth and endianness. Unfortunately, there is no way yet to set the scaledown factor on a per-window basis, so the scaledown factor affects all windows.
(If you didn't use -Zn during the installation, and compiled your own /vmunix, then it will not contain support for multiple graphics cards. To overcome this problem, use the generic kernel, -j genvmunix, whenever you are running the emulator with a different setup than the one you used when Ultrix was installed.)
A note for the historically interested: OSF/1 for MIPS was quite similar to Ultrix, so that is possible to run as well. If you are unsuccessful in installing Ultrix or OSF/1 directly in the emulator, you can always install it on your real machine onto a real SCSI disk, and then copy the contents of that SCSI disk into a file (using dd(1)), and use that file as a disk image file in the emulator.
![]()
![]()
The following instructions should let you run Sprite in the emulator:
	ftp://ftp.es.embnet.org/pub/misc/os/cluster/Sprite/ds5000.bt
	83973120 bytes, MD5 = ec84eeeb20fe77b758370d5e312e4a5e
(A big thank you to José R. Valverde for maintaining the OS archives at ftp.embnet.org.)
gxemul -X -e 3max -M128 -d ds5000.bt -j vmsprite -o ''
The first time you boot up with the disk image, you will be asked a number of questions regarding network settings. If you feel like entering correct values, then you should use the following:
    Your machine's Ethernet address:    10:20:30:00:00:10
    Your machine's IP:                  10.0.0.1
    Subnet mask:                        0xff000000
    Gateway's Ethernet address:         60:50:40:30:20:10
    Gateway's IP:                       10.0.0.254
Unfortunately, at the end of ftp://ftp.es.embnet.org/pub/misc/os/cluster/Sprite/boot.txt, the following sad statement can be found:
    The bootable Sprite image is meant to be a demonstration of Sprite, not
    a robust Sprite system.  There are several missing things, such as
    floating point and network support.
Once you are logged in as root, running xinit will start the X11 environment.
Luckily, a precompiled install kernel has been made available by David Muse, for Debian for R3000 DECstations, which has support for framebuffer, keyboard, and networking, which works pretty well. Thanks David. :-)
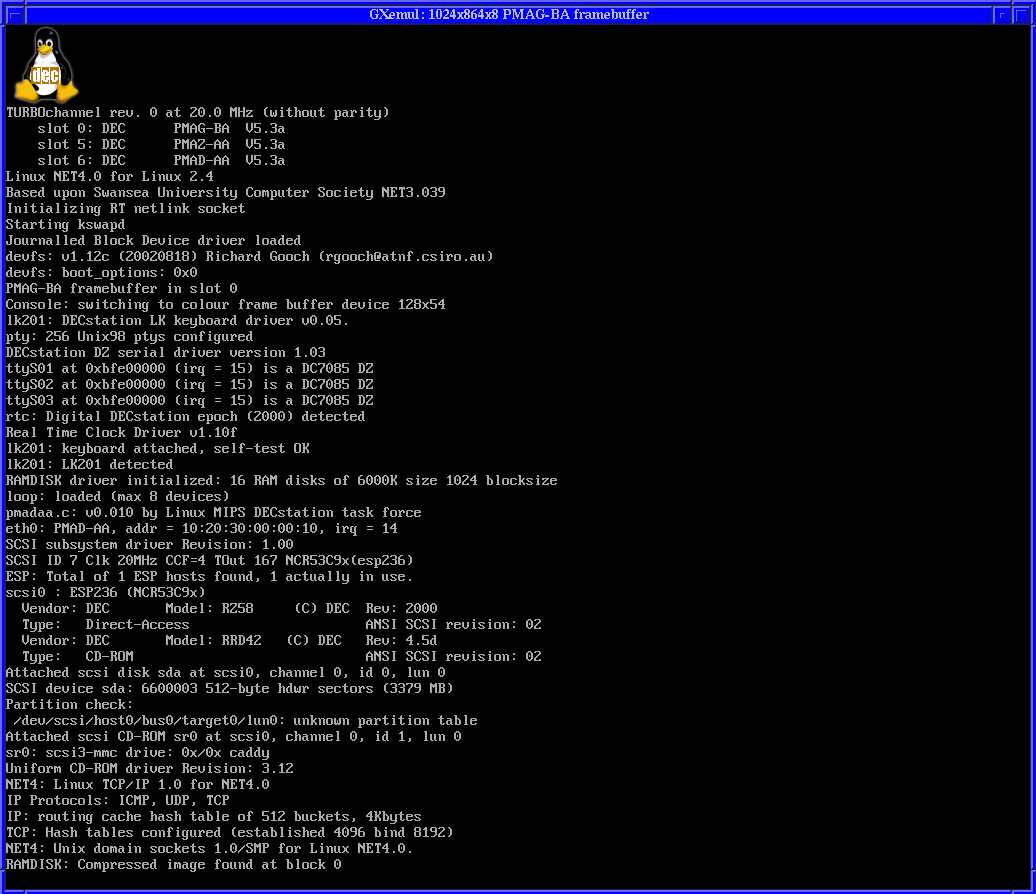
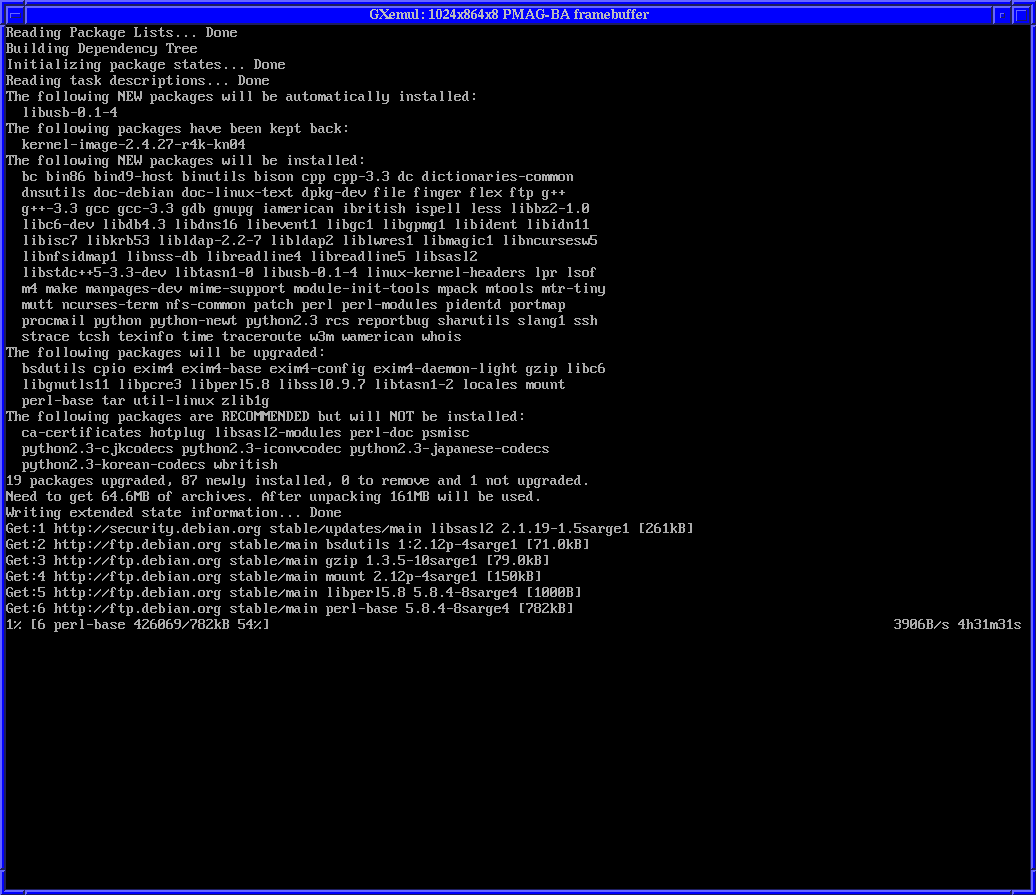
The following steps should let you install Debian GNU/Linux for DECstation onto a harddisk image in the emulator:
dd if=/dev/zero of=debian_pmax.img bs=1024 count=1 seek=6000000
	http://www.firstworks.com/mips-linux-2.4.31/vmlinux-2.4.31
	http://cdimage.debian.org/cdimage/archive/3.1_r6a/mipsel/iso-cd/debian-31r6a-mipsel-netinst.iso
gxemul -X -e3max -d debian_pmax.img -d debian-31r6a-mipsel-netinst.iso vmlinux-2.4.31
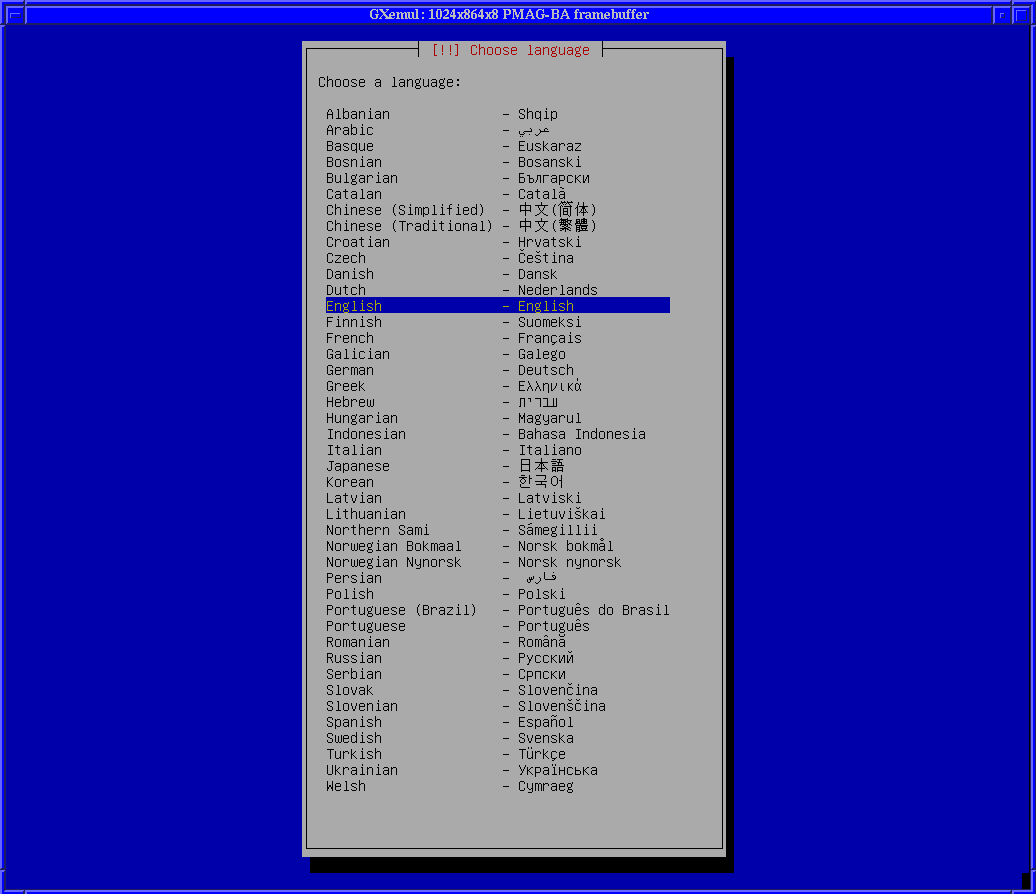
If everything goes well, you will see Linux' boot messages, and then arrive at the language chooser.
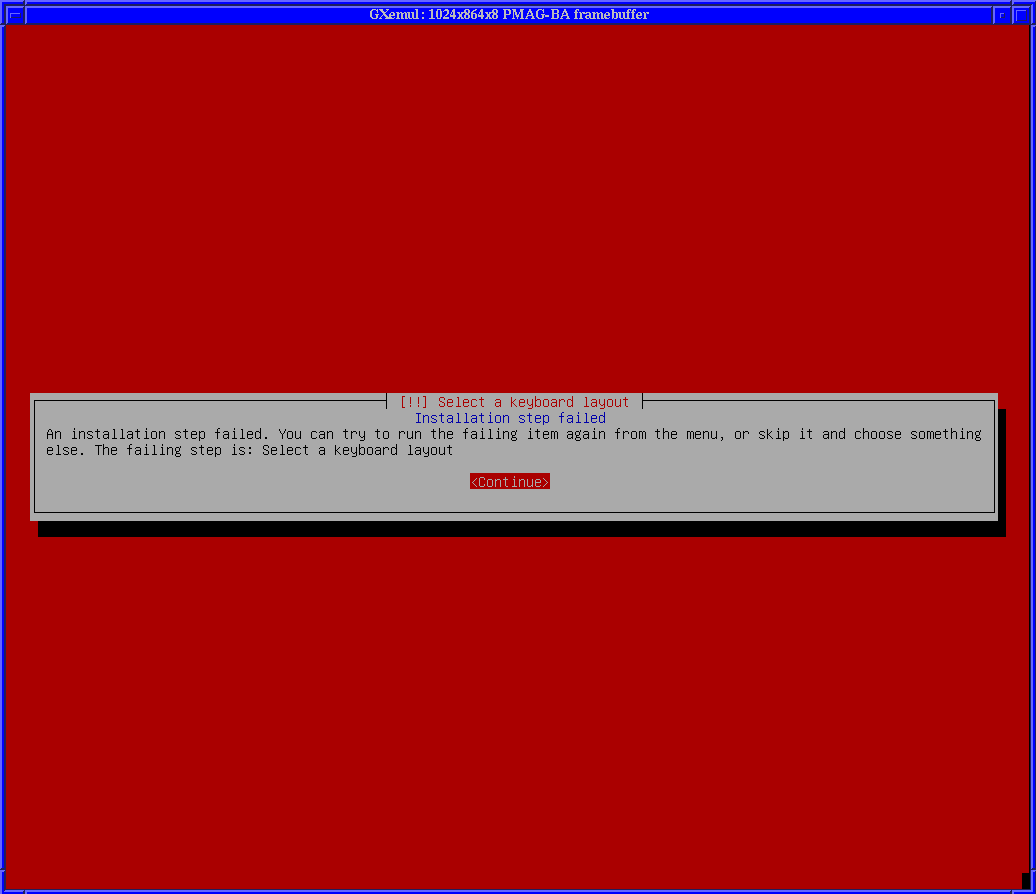
There will be a warning about the keyboard layout. Don't mind this. Continue, and then select Detect and mount CD-ROM in the next menu.
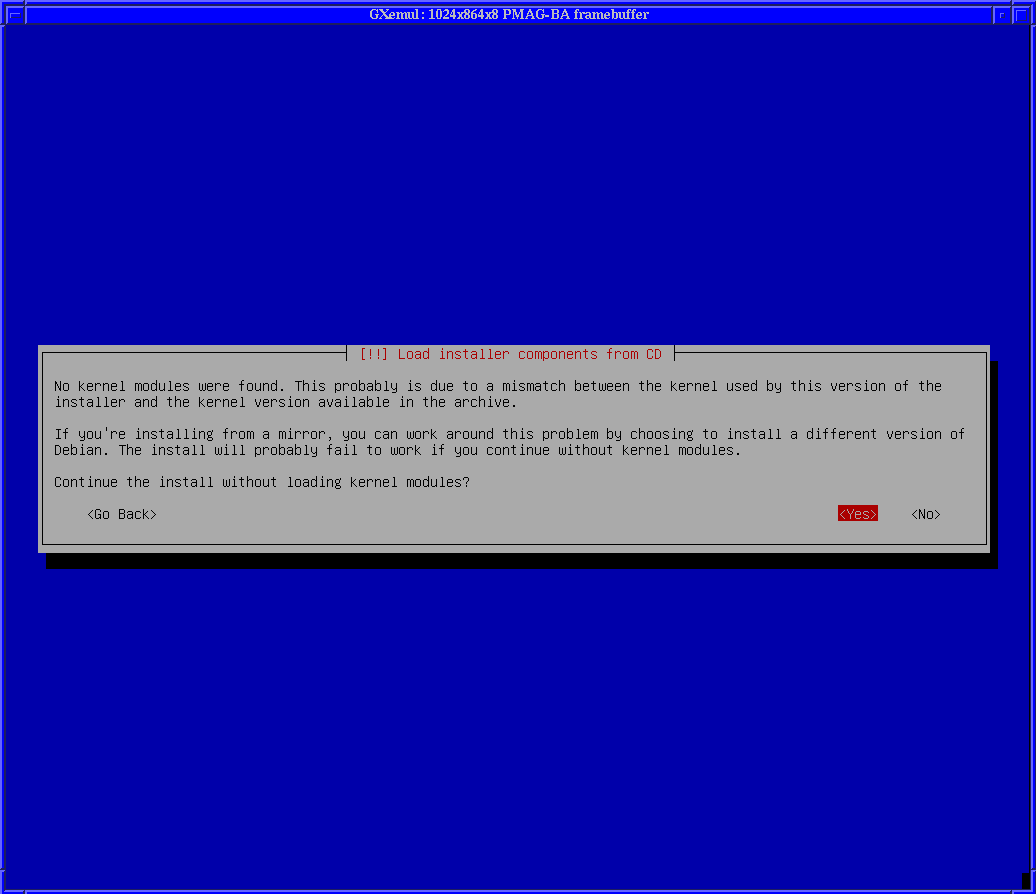

There will also be a warning about lack of loadable modules. Don't mind this either, continue anyway by choosing Yes.
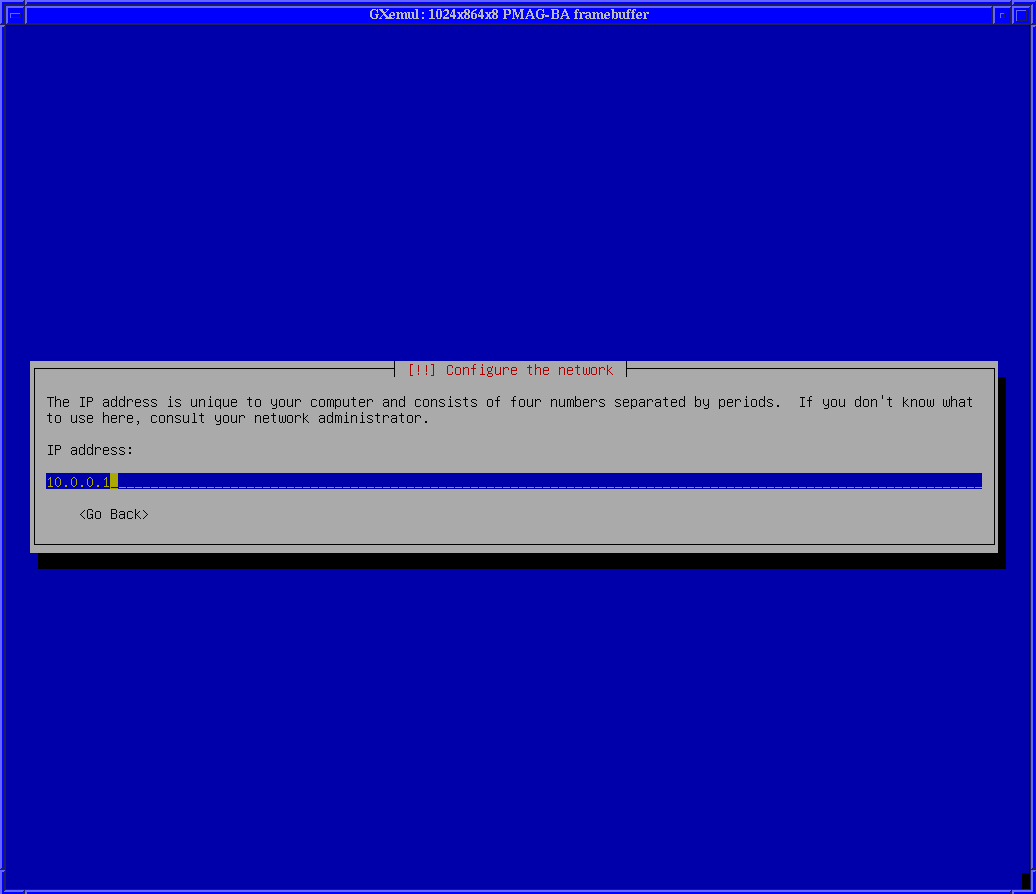
When you reach the network configuration part of the install, choose Configure network manually and enter the following values:
	IP address:                 10.0.0.1
	Netmask:                    255.0.0.0
	Gateway:                    10.0.0.254
	Name server addresses:      10.0.0.254
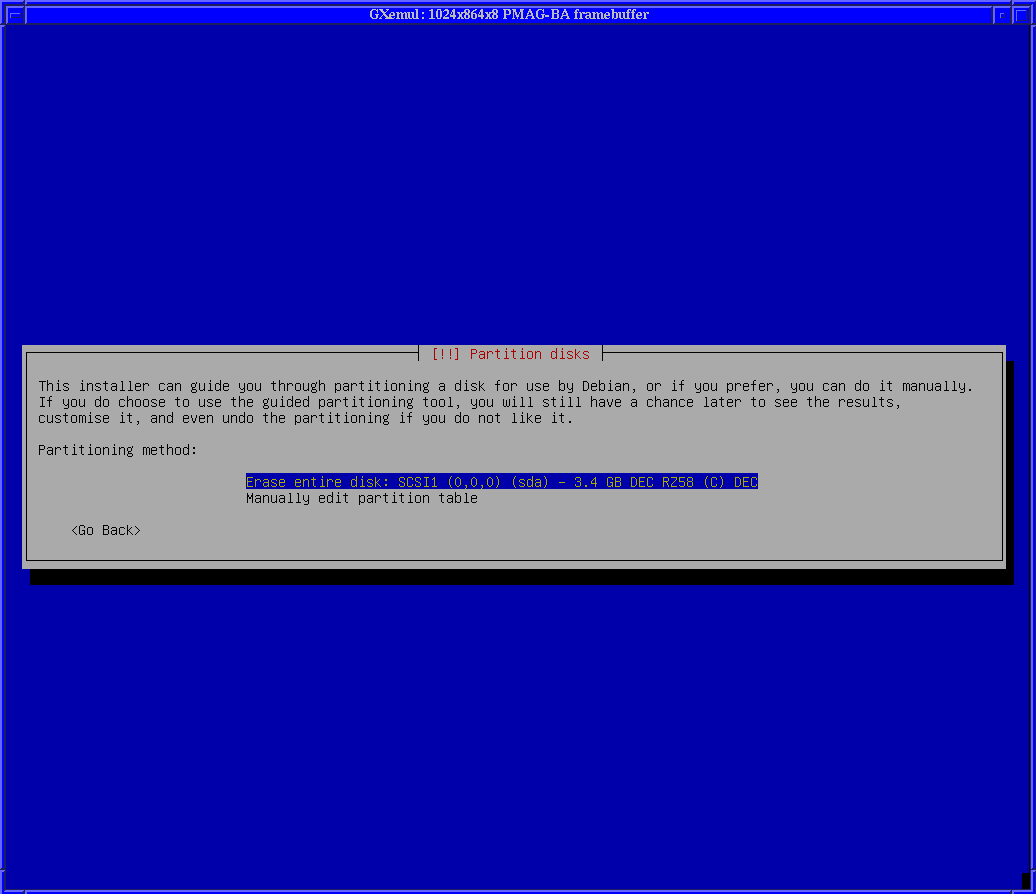
Choose Erase entire disk in the partitioner.
Wait for the base system to be installed. This takes almost forever, so you can go fetch several Jolts or cups of coffee in the meanwhile.
Congratulations! The first phase of the installation is now completed. Reboot using the following command line:
gxemul -X -e3max -o 'root=/dev/sda1' -d debian_pmax.img vmlinux-2.4.31
The post-install step takes quite some time as well. A perfect opportunity for more coffee.
When asked about whether the hardware clock is set to GMT or not, answer Yes.
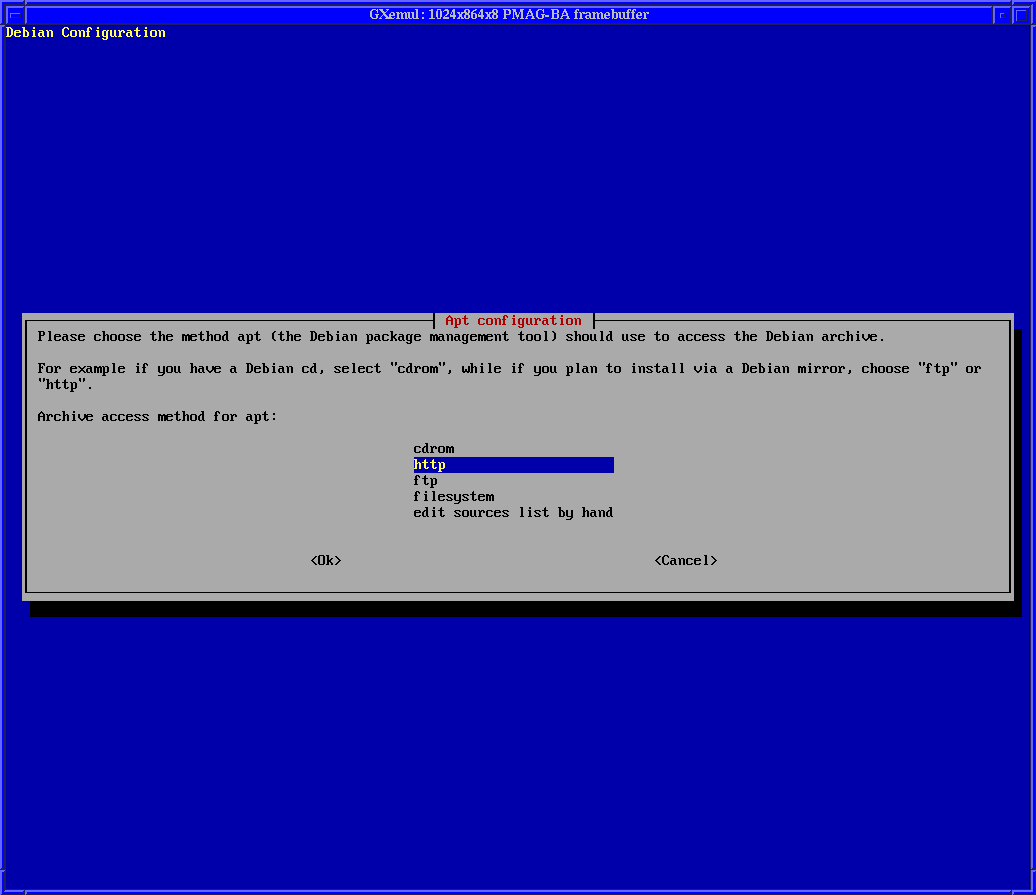
When asked about "Apt configuration", choose http as the method to use for accessing the Debian archive.
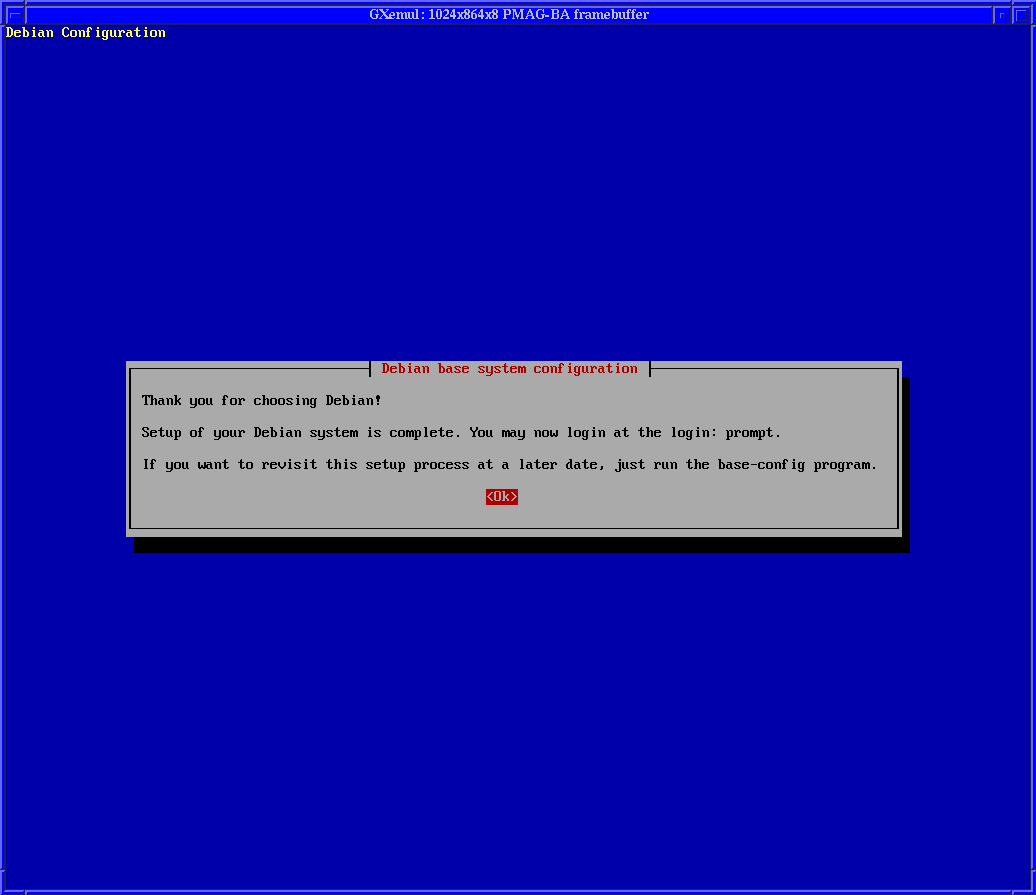
Downloading the packages takes almost forever. Be patient.
Congratulations (again)! You are now fully done with the installation.
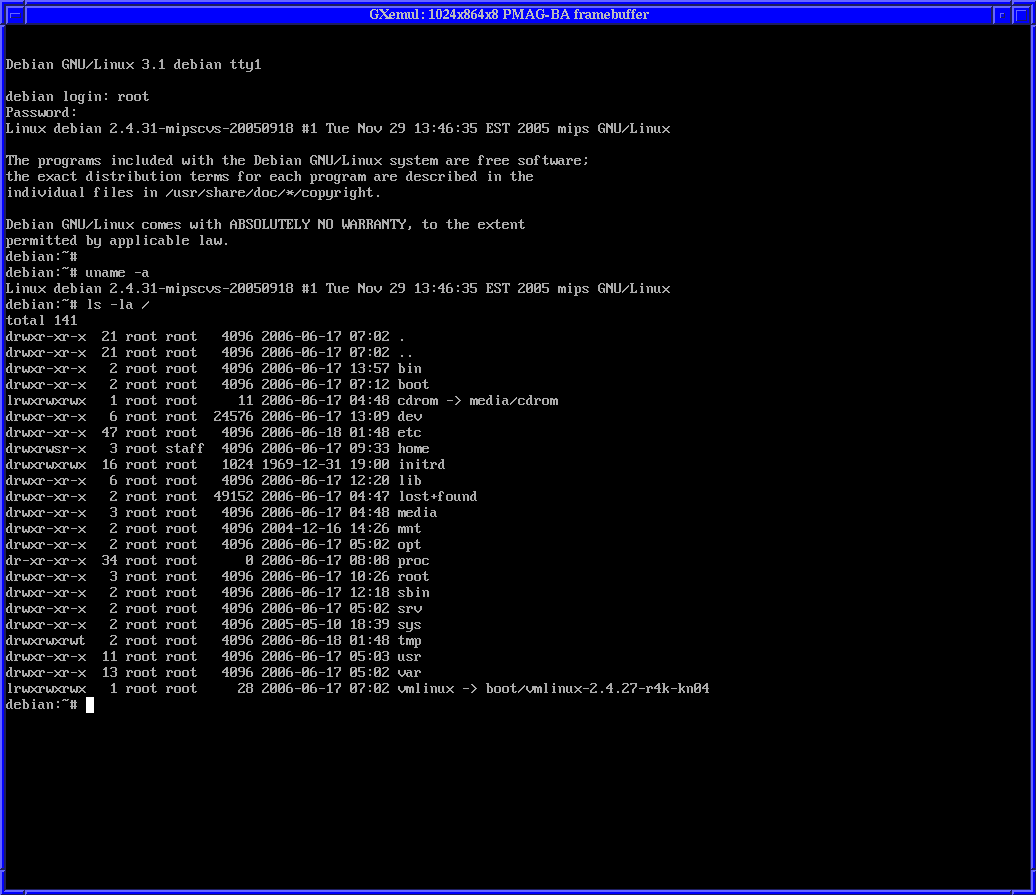
Debian GNU/Linux for DECstation is now installed and ready to be used.
Use this command to boot from the installed disk image:
gxemul -X -e3max -o 'root=/dev/sda1' -d debian_pmax.img vmlinux-2.4.31
NOTE: Mach for DECstation requires some files (called 'startup' and 'emulator') which I haven't been able to find on the web. Without these, Mach will not get very far. These installation instructions are preliminary.
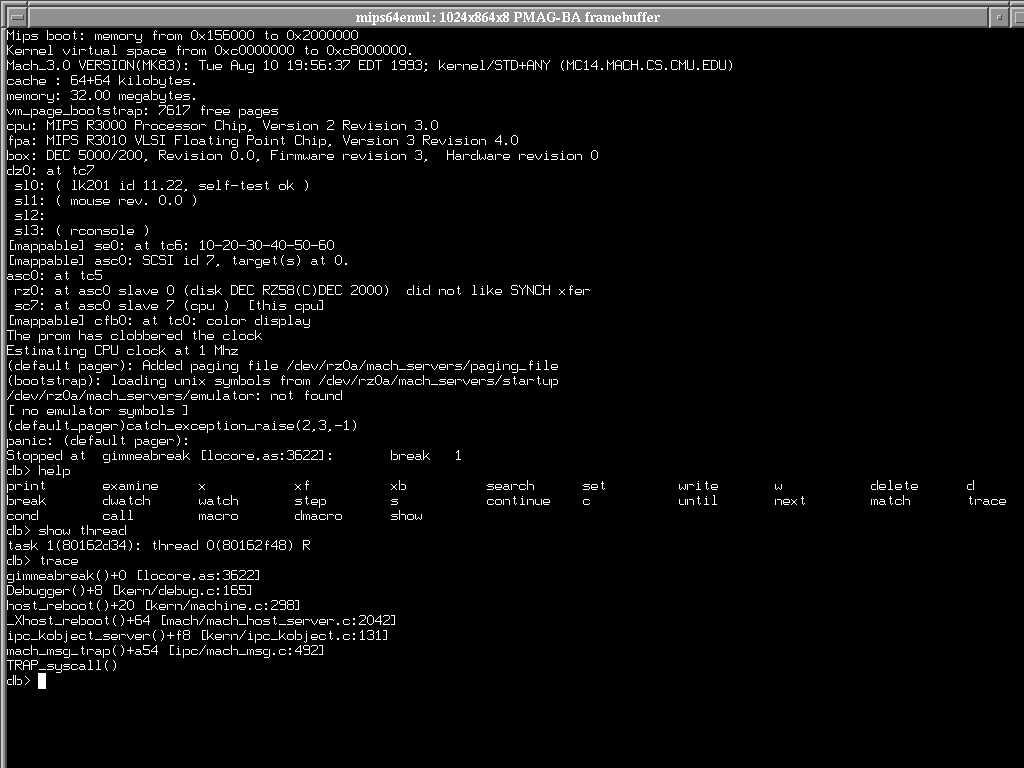
The following steps should let you experiment with running Mach for DECstation in the emulator:
	http://lost-contact.mit.edu/afs/athena/user/d/a/
	    daveg/Info/Links/Mach/src/release/pmax.tar.Z
	7263343 bytes, md5 = f9d76c240a6e169921a1df99ad560cc0
tar xfvz pmax.tar.Z pmax_mach/special/mach.boot.MK83.STD+ANY
dd if=/dev/zero of=disk.img bs=1 count=512 seek=400000000
	gxemul -c 'put w 0x800990e0, 0' -c 'put w 0x80099144, 0' \
	    -c 'put w 0x8004aae8, 0' -e 3max -X -d disk.img \
	    pmax_mach/special/mach.boot.MK83.STD+ANY
Earlier versions of GXemul had a configure option to enable better R3000 cache emulation, but since Mach was more or less the only thing that used it, I removed it. Today's version of GXemul can thus not boot mach.boot.MK83.STD+ANY straight off, it has to be patched to skip the cache detection.
The -c commands above patch the kernel to get past the cache detection. Thanks to Artur Bujdoso for these values.
TODO: Better instructions on how to create the old-style UFS disk image.
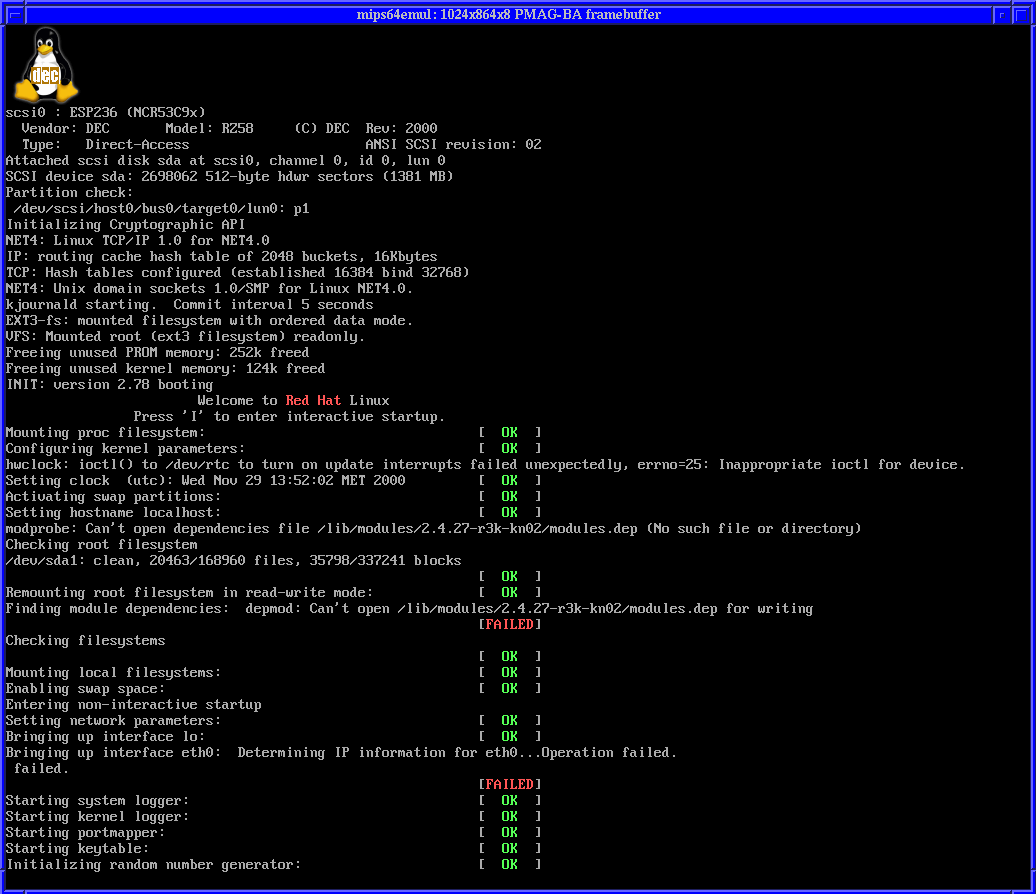
The following steps should let you run Redhat Linux for DECstation in GXemul:
http://www.firstworks.com/mips-linux-2.4.31/vmlinux-2.4.31
	ftp://ftp.linux-mips.org/pub/linux/mips/mipsel-linux/root/mipsel-root-20011216.tgz
	19486676 bytes, md5 = 5bcb725c90209479cd7ead8ad0c4a414
dd if=/dev/zero of=redhat_mips.img bs=1024 count=1 seek=2000000
I recommend you run fdisk and mke2fs and untar the archive from within Debian/DECstation or Debian/CATS running inside the emulator. (Alternatively, if you are on a Linux host, you could use a loopback mount, or similar. This might require root access. See e.g. http://www.mega-tokyo.com/osfaq2/index.php/Disk%20Images%20Under%20Linux.)
In order to actually boot the system you need to modify /etc/fstab. Change
	/dev/root               /               nfs     defaults        1 1
	#/dev/sdc1              /               ext2    defaults        1 1
	none                    /proc           proc    defaults        0 0
	none                    /dev/pts        devpts  mode=0622       0 0
to
	#/dev/root              /               nfs     defaults        1 1
	/dev/sda1               /               ext2    defaults        1 1
	none                    /proc           proc    defaults        0 0
	none                    /dev/pts        devpts  mode=0622       0 0
(Note sda1 instead of sdc1.)
To boot Redhat linux from the disk image, use the following command line:
gxemul -X -e3max -o "root=/dev/sda1 ro" -d redhat_mips.img vmlinux-2.4.31If you need to boot into single user mode, change options to -o "root=/dev/sda1 rw init=/bin/sh".
NOTE: I haven't succeeded all the way with this yet, and this shows/triggers many bugs in the emulator, but some of it works.
GXemul does not yet emulate the AHC PCI SCSI controller in the O2. (I have mailed Adaptec several times, asking for documentation, but never received any reply.) OpenBSD/sgi can still run in the emulator, as long as it doesn't use SCSI. For a simple test with the ramdisk (install) kernel, try dowloading
ftp://ftp.se.openbsd.org/pub/OpenBSD/4.0/sgi/bsd.rdand run gxemul -xeo2 bsd.rd.
It might also be possible to netboot. Another emulated machine must then be used as the nfs root server, and the emulated O2 machine must boot as a diskless client. Performing this setup is quite time consuming, but necessary:
gxemul -e 3max -d nbsd_pmax.imgand enter the following commands as root inside the emulator:
echo hostname=server >> /etc/rc.conf echo ifconfig_le0=\"inet 10.0.0.2\" >> /etc/rc.conf echo nameserver 10.0.0.254 >> /etc/resolv.conf echo 10.0.0.254 > /etc/mygate echo /tftpboot -maproot=root 10.0.0.1 > /etc/exports echo rpcbind=YES >> /etc/rc.conf echo nfs_server=YES >> /etc/rc.conf echo mountd=YES >> /etc/rc.conf echo bootparamd=YES >> /etc/rc.conf printf "client root=10.0.0.2:/tftpboot \\\n swap=10.0.0.2:/tftpboot/swap\n" > /etc/bootparams echo "10:20:30:00:00:10 client" > /etc/ethers echo 10.0.0.1 client > /etc/hosts reboot |
cd /tftpboot; ftp -i ftp.se.openbsd.org (log in as anonymous...) cd pub/OpenBSD/4.0/sgi mget b*tgz c*tgz e* g* m* quit sh for a in *.tgz; do echo $a; tar zxfp $a; done echo 10.0.0.2:/tftpboot / nfs rw 0 0 > /tftpboot/etc/fstab rm *.tgz dd if=/dev/zero of=swap bs=1024 count=32768 halt |
	ftp://ftp.se.openbsd.org/pub/OpenBSD/4.0/sgi/bsd
	ftp://ftp.se.openbsd.org/pub/OpenBSD/4.0/sgi/bsd.rd
!  Configuration file for running OpenBSD/sgi diskless with
!  a NetBSD/pmax machine as the nfs server.
!
!  This config file is for the client.

net(
	add_remote("localhost:12444")   ! the server
	local_port(12445)               ! the client
)

machine(
	name("client machine")
	serial_nr(1)

        type("sgi")
        subtype("o2")

        ! load("bsd")
        load("bsd.rd")
)
|
net(
	local_port(12444)               ! the server
	add_remote("localhost:12445")   ! the client
)

machine(
	name("nfs server")
	serial_nr(2)

        type("dec")
        subtype("5000/200")

        disk("nbsd_pmax.img")
)
|
	in one xterm:
	gxemul @config_server

	and then, in another xterm:
	gxemul @config_client
ifconfig mec0 10.0.0.1; route add default 10.0.0.254 mount -v 10.0.0.2:/tftpboot /mnt cd /mnt/dev; ./MAKEDEV all; cd /; umount /mnt halt |
NOTE: Everything up to this point should work. However, the next step (in gray) doesn't actually work:
Once everything has been set up correctly, change bsd.rd in config_client to just bsd (the GENERIC kernel). It should now be possible to boot OpenBSD/sgi using the NetBSD/pmax nfs server. (When asked for "root device :" on the OpenBSD machine, enter mec0.)
But it doesn't work. Probably because GXemul's implementation of the mec (ethernet card used in the O2) is too much of a quick hack. For now, use the bsd.rd kernel, and (at every boot) type:
	s  (for Shell)
	ifconfig mec0 10.0.0.1; route add default 10.0.0.254
	mount -v 10.0.0.2:/tftpboot /mnt
	cd /mnt; usr/sbin/chroot .
	sh etc/rc
This will not cause OpenBSD to be booted normally, but at least a few basic things will work. By the way, the emulator performs so poorly, that you will have time to fetch several cups of coffee for each of the steps above.
Earlier, I had this guest OS listed as officially working in the emulator, but for several reasons, it has been moved down here to the "informative-but-not-really-working" section.
Currently, I don't test for every release whether or not OpenBSD/arc can be installed. Releases prior to 0.3.7 (but probably not 0.3.7) should work. Anyway, here are the old installation instructions:
To install OpenBSD/arc onto an emulated harddisk image, follow these instructions:
dd if=/dev/zero of=obsd_arc.img bs=1024 count=1 seek=700000
wget -np -l 0 -r ftp://ftp.se.openbsd.org/pub/OpenBSD/2.3/arc/
mkisofs -o openbsd_arc_2.3.iso ftp.se.openbsd.org/pub/OpenBSD/
gxemul -e pica -X -d obsd_arc.img -d b:openbsd_arc_2.3.iso -j 2.3/arc/bsd.rdand proceed like you would do if you were installing OpenBSD on a real Acer PICA-61. (Answer 'no' when asked if you want to configure networking, and then install from CD-ROM.)
Once the install has finished, the following command should let you boot from the harddisk image:
gxemul -X -e pica -d obsd_arc.img ftp.se.openbsd.org/pub/OpenBSD/2.3/arc/bsdThe system is very sensitive to (I think) kernel stack overflow, so it crashes easily. If I remember correctly from mailing lists, this also happened on real hardware.
IT DOES NOT WORK YET!
The following installation instructions would theoretically work:
dd if=/dev/zero of=debian_cats.img bs=1024 count=1 seek=3300000
http://ftp.debian.org/debian/dists/oldstable/main/disks-arm/current/cats/tftpboot.img
gxemul -XEcats -d debian_cats.img tftpboot.img
It doesn't work, though, because the NIC isn't working well enough.
The only use of Debian/CATS in the emulator right now is as a way to manipulate Linux disk images, if you are on a non-Linux host. By choosing "Execute a shell" in the installer's menu, you can have access to tools such as fdisk and mke2fs, which are useful for creating Linux paritions on disk images.
The following steps should let you boot into the Linux/QEMU_MIPS kernel, in way similar to the run-qemu script:
	wget http://fabrice.bellard.free.fr/qemu/mips-test-0.2.tar.gz
	tar zxvf mips-test-0.2.tar.gz
	gxemul -E qemu_mips -x -M 128 -o 'console=ttyS0
		rd_start=0x80800000 rd_size=10000000 init=/bin/sh'
		0x80800000:mips-test/initrd.gz mips-test/vmlinux-2.6.18-3-qemu
Installation steps similar to these would be required to install Windows NT onto a disk image:
dd if=/dev/zero of=winnt_test.img bs=1024 count=1 seek=999000
gxemul -X -e pica -d winnt_test.img -d bc6:/dev/cd0c -j MIPS\\ARCINSTNote that ARCINST almost works, but not quite.
gxemul -X -e pica -d winnt_test.img -d bc6:/dev/cd0c -j MIPS\\SETUPLDR
SETUPLDR manages to load some drivers from the cdrom, but then it crashes because of incomplete emulation of some hardware devices.
The following instructions will let you install NetBSD/bebox onto a disk image, using a NetBSD/prep kernel temporarily during the install:
ftp://ftp.netbsd.org/pub/NetBSD/NetBSD-2.1/prep/binary/kernel/netbsd-INSTALL.gz
dd if=/dev/zero of=nbsd_bebox.img bs=1024 count=1 seek=999000
wget -np -l 0 -r ftp://ftp.netbsd.org/pub/NetBSD/arch/bebox/snapshot/19981119/ mv ftp.netbsd.org/pub/NetBSD/arch/bebox/snapshot/19981119/kern.tgz . tar zxvf kern.tgz rm -f kern.tgz mkisofs -o netbsd-bebox-19981119.iso ftp.netbsd.org/pub/NetBSD/arch/bebox/snapshot/19981119 |
gxemul -x -e ibm6050 -d d:netbsd-bebox-19981119.iso -d nbsd_bebox.img netbsd-INSTALL.gzChoose (S) for Shell, and execute the following commands:
disklabel -I -i wd1 a 4.2BSD 1c 750M b swap a 200M W y Q newfs /dev/wd1a mount_cd9660 /dev/wd0c /mnt mount /dev/wd1a /mnt2 cd mnt2 for a in /mnt/*.tgz; do echo $a; tar zxfp $a; done cd dev; sh ./MAKEDEV all; cd ../etc echo rc_configured=YES >> rc.conf echo "/dev/wd0a / ffs rw 1 1" > fstab echo "/dev/wd0b none swap sw 0 0" >> fstab cd /; umount /mnt; umount /mnt2 sync; halt |
You should now be able to boot NetBSD/bebox using this command:
gxemul -X -E bebox -d nbsd_bebox.img netbsd
When asked for the root device, enter wd0a.
IT DOES NOT WORK YET, there are errors while uncompressing the tgz files, and the machine crashes when trying to run /sbin/init.