Archive for the ‘Linux/UNIX/Open Source’ Category

Debian Buster can’t boot because initramfs doesn’t activate a LVM /usr volume

Wednesday, January 13th, 2021

One of the great things about Debian is the ease of migrating an installation through multiple releases via the dist-upgrade facility. However, regardless of the technical design, over time opinions change and begin to collide with those prior intentions.

One such example is the practice of placing /usr on a separate partition. Previously, doing so was the default approach of the Debian installer, but it has fallen out of favor due to the declining utility and popularity of remote-mounting /usr. Hidden boot-time dependencies on /usr have crept in as a result, in turn making a separate /usr mount increasingly impractical to maintain.

Upon upgrading a system with such a configuration to Debian 9 “Buster”, the user will be confronted an unbootable system and the following console gibberish:

Gave up waiting for /usr device. Common problems:
 - Boot args (cat /proc/cmdline)
   - Check rootdelay= (did the system wait long enough?)
 - Missing modules (cat /proc/modules; ls /dev)
ALERT! /dev/mapper/debian-usr does not exist. Dropping to shell!

BusyBox ........
Enter 'help' for a list of built-in commands.

/bin/sh: can't access tty; job control turned off
(initramfs)

What’s going on here? Even the initramfs init script seems to accommodate a separate /usr, searching for and mounting it:

if read_fstab_entry /usr; then
        log_begin_msg "Mounting /usr file system"
        mountfs /usr
        log_end_msg
fi

The actual problem is that on a LVM system, the block device (volume) containing /usr is not accessible because it hasn’t been activated. The reason is because the LVM initramfs scripts only activate two volumes: the volume designated as the root filesystem, and the volume containing a swap area designated as the resume device.

/usr/share/initramfs-tools/scripts/local-top/lvm2:

[..]

activate "$ROOT"
activate "$resume"

exit 0

A manual workaround to get the system booting from the initramfs prompt:

(initramfs) lvm vgchange -a y
  5 logical volume(s) in volume group "debian" now active
(initramfs) exit

To fix it permanently, add a custom script to /etc/initramfs-tools – the description of how to do this is in Debian bug #980021.

Happy hacking!
Can LiteOn/Slimtype DS8A1H laptop DVD recorder burn dual layer DVDs?

Sunday, April 22nd, 2018

Many mid-2000s Compaq/HP laptops which shipped while DVD media was predominant included this unbranded “Slimtype DVD A DS8A1H” DVD recorder, which is actually a rebadged LiteOn drive.  It’s not that great a drive, but it does work to burn double/dual layer (DL) DVDs for use on a console DVD player.  Here is what you need to know to produce DVDs that work on a console player.

(more…)

Install Linux on an Android-Based Lenovo Yoga Book (YB1X90F)

Friday, April 28th, 2017

Having a Linux distribution installed on an Android netbook can be the best of both worlds. Leveraging the Linux kernel already running on any Android device, a Linux userspace will be native and fast and come with many tools power users will appreciate. Here are some ways to get the most out of the Linux on Android experience.

(more…)

ACPI Warning: SystemIO range X conflicts with OpRegion Y error

Sunday, April 23rd, 2017

On a Linux system, you might be trying to use a utility like decode-dimms to read the SPD EEPROM of your system’s RAM DIMM modules.

But it does not work, and checking the kernel messages, you see:

[    1.457863] i801_smbus 0000:00:1f.3: enabling device (0001 -> 0003)
[    1.457945] ACPI Warning: SystemIO range 0x0000000000000400-0x000000000000041F conflicts with OpRegion 0x0000000000000400-0x000000000000040F (\SMRG) (20160831/utaddress-247)
[    1.458063] ACPI: If an ACPI driver is available for this device, you should use it instead of the native driver

In this case, the Intel 82801 SMBus driver is attempting to load, finding that the ACPI SMRG (System Management Region) has already claimed part or all of the SMBus I/O range, and failing due to strict ACPI resource enforcement. (In the general case, this will be true of whatever driver is attempting enablement immediately preceding the ACPI messages.)

To work around this and accept the risk of system instability, add the acpi_enforce_resources=lax parameter to your kernel command line and reboot.

Afterwards you will see two extra lines in the output:

[    1.457863] i801_smbus 0000:00:1f.3: enabling device (0001 -> 0003)
[    1.457945] ACPI Warning: SystemIO range 0x0000000000000400-0x000000000000041F conflicts with OpRegion 0x0000000000000400-0x000000000000040F (\SMRG) (20160831/utaddress-247)
[    1.458031] ACPI: This conflict may cause random problems and system instability
[    1.458063] ACPI: If an ACPI driver is available for this device, you should use it instead of the native driver
[    1.458110] i801_smbus 0000:00:1f.3: SMBus using PCI interrupt

The third line is new and appears advisory, but it is actually advising that the device is being enabled despite the risk of instability posed by two kernel drivers owning the same I/O region. The fifth line is from the driver that was attempting to load and its appearance means that it has proceeded to load.

While this parameter might bypass SMBus conflicts in particular, allowing a utility like decode-dimms to offer functionality not offered by the ACPI BIOS that first claimed that I/O region, it will also bypass this conflict for any device affected by ownership by the ACPI BIOS that would prevent a driver from loading.

How to use fio to stress test a hard drive

Sunday, April 23rd, 2017

So you’ve a got a disk in your hand that’s new, used, or questionably refurbished, and you want to give it a thorough thrashing to see how it holds up before trusting your data to it. How? SMART tests and badblocks are the usual tools, but you really want to simulate a workload instead of just doing a linear once-over.

Fortunately, the fio benchmarking tool has a randrw module that can do exactly this. Run this and it will scribble all over a disk and check the results. You should then have a good idea whether that disk is a winner or a dud for a real world workload.

Example, assuming we will stress-test the disk for 1 day (86400 seconds), we have 4 CPU threads, and the disk to be tested is /dev/sdg (WARNING: all data on this disk will be randomly trashed):

# fio --name=randrw --time_based --runtime=86400 --ioengine=libaio --iodepth=64 --rw=randrw --bs=4k --direct=1 --numjobs=4 --filename=/dev/sdg

Google Cast extension stopped working in the Chromium web browser (Sept. 2016)

Thursday, October 6th, 2016

The Google Cast extension for Chrome and related browsers (such as the open source Chromium) allows, like the similarly named Android app, arbitrary desktop content to be mirrored to a HDMI TV or monitor with a connected Chromecast device.

In recent versions of the official Google Chrome browser (version 51 and newer), the Cast functionality has been integrated into the browser such that no extension is necessary, through what is called the Media Router feature.

In a total coincidence, many users of the open source Chromium browser have had problems recently with the Google Cast extension no longer functioning. While initially it appeared to be a deliberate policy change thanks to a Google support channel miscommunication, it turns out that there are two separate issues that could be the cause of the Google Cast extension no longer working in the Chromium browser.

Conflict with new “Media Router” functionality

While the Chromium browser does not seem to have the required functionality to use the Chromecast via the Media Router feature built in, strangely it ships with the associated feature control flag enabled by default, which then prevents the traditional Google Cast extension from working. Simply follow the instructions posted by users in reviews on the Chrome Web Store:

What resolved the issue for me was going to chrome://flags/#media-router and disabling the Media Router from the drop down menu. Then relaunch the browser.

A bug introduced circa Chrome 53-54

A bug was introduced that blocked the Google Cast extension via an error in the content security policy. That bug was fixed on Sept. 20, 2016 and is not present in newer builds of Chrome 54 and onward.

So if you’ve found yourself suddenly unable to use your Chromecast via the Chromium browser: check your configuration flags, upgrade your browser if necessary, and you should be Chromecasting again in no time!

Addendum

The multicast network protocol that Chromecast clients use to communicate with the device is described well in this Cisco manual.

If you are wondering whether your Google Cast extension is working at a basic level (that it is attempting to communicate with the Chromecast(s) on your network), you can do:

# tcpdump -A -i wlan0 -n udp dst 239.255.255.250

You should see DIAL protocol packets like the following originating from the IP address where the browser with the Cast extension is running:

16:08:30.400846 IP 172.16.2.24.58274 > 239.255.255.250.1900: UDP, length 172
E.....@...H............l....M-SEARCH * HTTP/1.1
HOST: 239.255.255.250:1900
MAN: "ssdp:discover"
MX: 1
ST: urn:dial-multiscreen-org:service:dial:1
USER-AGENT: Google Chrome/53.0.2785.143 Linux

If you see these packets, the cast functionality in your browser is working and you’ve likely got a different problem on your network.

I just want to PXE-boot my PC with some image on a Debian-based server.

Monday, August 22nd, 2016

This should be the least-hassle method of booting a PC over the network from a Debian-based server using the Intel PXE interface.

I set this up to PXE-boot memtest86+, but anything that can be loaded via the PXELINUX loader (such as a Linux kernel) can be added to the menu and booted this way. Building the menu via PXELINUX avoids the byzantine and reportedly bug-ridden PXE menu facility.
(more…)

Linux SSD TRIM Trivia

Sunday, July 31st, 2016

Enabling SSD TRIM support on Linux can be interesting due to the many storage layers involved. TRIM must be enabled by enabling the relevant discard option at least at the following levels (if they exist in a configuration):

  • mdraid (manually in the case of RAID4/5/6)
  • dm-crypt
  • LVM

Additionally, the filesystem must either be configured with the discard to issue TRIM commands automatically after filesystem operations that clear blocks, or a scheduled fstrim must be performed during a maintenance window. With frequently LVM operations, discard-everything may be a better choice.

But generally, if a device supports queued TRIM and the implementation is not broken in the SSD firmware, then enabling at the filesystem level as well should be a reasonable approach.

To set up a new SSD in Linux, generally Debian’s SSD Optimization wiki is a good place to start.

Here are some questions about interesting TRIM scenarios that I determined the answers to.

Linux hybrid mdraid, mixing SSD and HDD devices

Can a hybrid RAID be trimmed by the filesystem running on top of it? The long and short answer to this question is: actually, this works fine. The TRIM command is sent only to hardware devices which advertise support for it, so it won’t be sent to the HDD. If trimming the filesystem causes errors, check for TRIM support in other intermediate layers (LVM, dm-crypt, mdraid).

Linux software RAID4/5/6

The raid456 driver cannot apparently automatically query the underlying storage layers to determine whether the device zeroes data blocks that have been discarded, and failing to do this is considered unsafe.

So one must check manually the SSD devices using lsblk -D for this feature, which is blacklisted for some buggy hardware:

valhalla:~# lsblk -D
NAME                  DISC-ALN DISC-GRAN DISC-MAX DISC-ZERO
sda                          0      512B       2G         1
??sda1                       0      512B       2G         1
??sda2                       0      512B       2G         1
? ??md0                      0      512B       2G         1
??sda3                       0      512B       2G         1

If the RAID underlying devices (check /proc/mdstat) all have ones in the DISC-ZERO column, it is safe to enable the module parameter:

parm:           devices_handle_discard_safely:Set to Y if all devices in each array reliably return zeroes on reads from discarded regions (bool)

Which is done by adding raid456.devices_handle_discard_safely=1 to one’s kernel command line in the bootloader configuration.

TRIMming all free space on a disk

Once everything is all set up, one may want to TRIM any unused space in case it was previously written to for whatever reason. This is easy to do as long as an LVM physical volume exists over the entire disk. Simply create a logical volume that uses up all the free space, then delete that volume:

lvcreate -l100%FREE -n blkdiscard SSD-VG
lvremove SSD-VG/blkdiscard

Repair Black Box ServSwitch EC Series KVM IP Switch

Sunday, July 31st, 2016

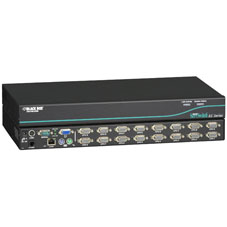
KV9316A

I repaired a broken Black Box KV9316A 16-port KVM-over-IP switch through replacing electrolytic capacitors and an internal battery. The short story is that a manufacturer of several internal logic boards used cheap “TRec” electrolytic capacitors which failed with high ESR, and the manufacturer of the power supply unit used a cheap “SWC” electrolytic capacitor which failed open, causing a voltage drop under load. The long story follows.

(more…)

Help! My pre-UVC USB webcam doesn’t actually work on the Web!

Saturday, April 23rd, 2016

I encountered a bit of trouble using an old Creative Webcam 3 USB with a website that wanted to capture video from it.  This camera uses an OmniVision OV511+ controller and had never been any trouble to use even with Linux.  However, attempting to use it via the browser produced a message that access to the camera was denied.

The first thing to check was permissions on the /dev/video0 device. I found that the user was not in the video group that was required to access the device by default. However, granting this permission and restarting the login session was still not enough.

It turns out that a characteristic of the USB Video Class (UVC) standard is that only video frames with certain pixel encodings can be generated by compliant devices. Whether due to this narrow scope or for other reasons, the WebRTC standard, which provides access to cameras via HTML5-compliant web browsers, only incorporated support for a relatively small number of pixel encodings, and browsers using the WebRTC library therefore only implement support for, at most, that subset of possible pixel encodings.

For example, Chrome (and any other browser which uses the WebRTC library) only supports decoding just a handful of the dozens of raw pixel formats, many vendor-specific, that are supported by the Video4Linux2 API.

Unfortunately, one of those vendor-specific pixel formats that is not supported by the WebRTC layer is the O511 pixel format generated by the OV511+ chip in the Creative Webcam 3 USB. This can be confirmed like so:


$ lsusb
Bus 001 Device 010: ID 05a9:a511 OmniVision Technologies, Inc. OV511+ Webcam
$ v4l2-ctl --all -d /dev/video0
[..]
Format Video Capture:
   Width/Height  : 640/480
   Pixel Format  : 'O511'

Okay, so what can be done? Fortunately, V4L2 developers provided a compatibility wrapper that will convert frames from esoteric pixel formats on-the-fly to the much more widely supported BGR42/YUV420 pixel formats. The wrapper is loaded using LD_PRELOAD before the browser is launched, e.g:

$ LD_PRELOAD=/usr/lib/libv4l/v4l2convert.so firefox
$ LD_PRELOAD=/usr/lib/libv4l/v4l2convert.so chromium-browser

If your distribution is multiarch, the library will be under /usr/lib/x86_64-linux-gnu or similar.